OM/SM-AH-CE
7
a) Prior to operation, clean kettle pan with hot
f)
Remove governor cap screw on gas control
water and detergent. Rinse thoroughly.
valve. See figure for governor position on valve.
b) Remove all literature and packing materials
g) Governor is suitable for natural and propane gas.
from the interior and exterior of the unit.
c) Ensure the open end or the elbow at the
governor turret clockwise, or anti-clockwise to
safety valve outlet is pointed down. If not, turn
reduce pressure. Check the burner pressure
the elbow to the correct position. See Safety
again after 15 minutes and adjust if necessary.
Valve Operation Instructions on Page 8.
2.5.1
Lighting Sequence
From Initial Start Up:
a) Put a small amount of water in the kettle pan.
b) Ensure gas and electricity mains are “on.”
c)
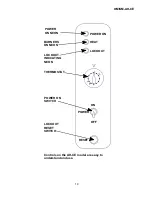
Switch the toggle switch to the "on" position.
d) Turn thermostat dial to desired setting.
e) Observe that the burners ignite by the pilot
lamp illuminating.
f)
If the unit does not ignite, it will lock-out. Turn
the unit off and wait for one or two minutes
before again attempting to switch it on.
g) Press reset lock-out switch and repeat steps
(b) to (e).
h) To switch unit off, flip toggle (On/Off) switch
to the “off” position.
i)
Turn gas and electricity mains off.
2.5.2
Setting The Gas Pressure
a) Check gas pressure during commissioning.
Connect a pressure gauge to the pressure test
point on the burner manifold or the gas control
valve. See figure for test points.
b) When checking pressure at gas valve test
points, undo the screw a half turn and slip
tube over the nipple.
c)
Turn the main gas and electricity supplies on.
d) Light the burners (Paragraph 2.5.1).
e) Remove screws securing control cabinet side
panel. (Paragraph 3.5).
h) To increase pressure turn the screw inside the
i)
Disconnect pressure gauge from the test point.
j)
Re-seal the pressure test point and test for gas
soundness.
k)
Replace governor cap screw, lid and panels.
2.5.3
Checking Performance of Controls
a) Light the unit (Paragraph 2.5.1). Check that the
controls produce a healthy spark from the
electrode to the earthing post and that ignition is
smooth and without delay.
b) Turn thermostat off and then on. Check that
burners go out when switched off and ignite
smoothly and quickly when switched back on.
Repeat several times.
c)
If the unit fails to respond as described above
contact an authorized Groen service agent.
2.6
Instruction to Installer
IMPORTANT
After installing and commissioning the
appliance, the installer should hand the user's
instructions to the user or purchaser. Ensure that
the instructions for lighting, turning off, correct
use and cleaning are properly understood.
Emphasis should be made with regard to the
location of the main gas isolating valve. The
emergency shut down procedure should be
demonstrated.
Summary of Contents for GROEN AH-20
Page 23: ...OM SM AH CE 23 ...
Page 24: ...OM SM AH CE 24 Parts Lists ...


