
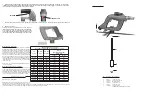

Package Should Contain:
1. Satellite dispenser
2. Product inlet tubing, 1/4" x 12"
3. Ceramic weight.
4. Footvalve
5. Metering tip kit
6. Instruction sheet.
3. Insert product inlet assembly into bottle and secure dispensing unit to bottle. Use velcro strap to further secure bottle
handle to dispensing unit.
4. Connect water supply hose of at least 3/8" ID to water inlet swivel.
(Minimum 25 PSI pressure, with water running, is required for proper operation.)
10092190
10/09
Hydro Systems 3798 Round Bottom Road, Cincinnati, OH 45244 Phone: (513) 271-8800 Fax: (513) 271-0160
protective clothing and eyewear when dispensing chemicals or other materials or when working in the vicinity of all chemicals, fi lling or
emptying equipment, or changing metering tips.
observe safety and handling instructions of the chemical manufacturer.
direct discharge away from you or other persons or into approved containers.
dispense cleaners and chemicals in accordance with manufacturer's instructions. Exercise CAUTION when maintaining your equipment.
reassemble equipment according to instruction procedures. Be sure all components are fi rmly screwed or latched into position.
equipment clean to maintain proper operation.
THANK YOU FOR YOUR INTEREST IN OUR PRODUCTS
WEAR
ALWAYS
KEEP
Please use this equipment carefully and observe all warnings andcautions.
***************************************************NOTE ********************************************
Problem Cause
Solution
1. No discharge
a. No water
a. Open water supply
b. Valve not open
b. Trigger not fully depressed
c. Eductor clogged
c. Look for obstruction, remove if possible
d. Foamer/Sprayer pivot not
d. Rotate to stops, top or bottom
in
proper
location
2. No concentrate draw
a. Clogged foot strainer
a. Clean or replace
b. Metering tip or eductor has scale
b. Clean (descale)* or replace
build-up
c. Low water pressure
c. Minimum 25 PSI (with water running)
required to operate unit properly
d. Switch in "OFF" position
d. Switch to "ON" position
e. Air leak in chemical pick-up tube
e. Put clamp on tube or replace tube if brittle
f. Clear plastic tip installed in inlet
f. Replace with colored metering tip
pick-up
stem
3. Excess concentrate draw a. Metering tip not in place
a. Press correct tip
fi
rmly into barb on pick-up stem
4. Failure of unit to turn off
a. Trigger lock is on
a. Release trigger lock
TROUBLESHOOTING CHART:
FOAMER/SPRAYER
MODEL 5823 & 5824
C
ONTINUED
ON
NEXT
PAGE
....
2. Select metering tip using guide on
next page. Install metering tip into barb
in center of cap. Cut product inlet tube to
desired lentgh for selected bottle, slide
weight over end of tube, insert footvalve
into end of tube. NOTE: REMEMBER
TO CHECK FOOT VALVE STRAINERS
PERIODICALLY FOR CLOGGING:
CLEAN IF NECESSARY.
5. Install Foam or Spray Nozzle
to front of dispenser. Move product
switch to "ON" to dispense product.
Switch to "OFF" to rinse. Rotate
front nozzle for jet rinse.
Installation and Operation:
1. Remove dispensing unit from box.
6. To remove Foam or Spray
Nozzle. Lift up on front. Snap other
Nozzle in place when not in use.
LIFT
ON


