PAGE 14
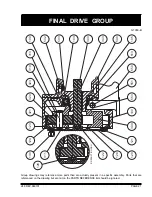
Pocket seals, body seals and ring seals in the hydraulic motor assembly are not part of the winch seal kit. The
seal kit for the hydraulic motor can be ordered from the factory under Part No. 23131. All parts of the hydraulic
motor, with the exception of the motor adaptor, item 800, are standard parts of the
COMMERCIAL WM31 hydraulic
motor, having a 2 inch gear section. All of these parts can be ordered from PULLMASTER or COMMERCIAL
INTERTECH dealers in Canada, the United States and in most overseas areas.
REMOVAL OF HYDRAULIC MOTOR ASSEMBLY:
If disassembly of the hydraulic motor is not necessary, proceed as follows:
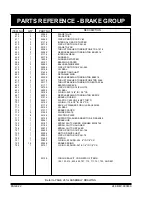
1) Remove 12 hex head capscrews, item 821, with lockwashers, item 823, from the motor adaptor, item 800.
Since the brake springs, item 752, apply pressure against the inside of the motor adaptor, it is recommended
that the hex capscrews are unscrewed, one turn at a time, until the spring pressure has been released. The
complete motor assembly, including the motor adaptor, can now be removed from the brake housing assembly.
2) Remove and discard O-ring, item 801, and O-ring, item 707. (O-ring, item 801, seals the pressure transfer
hole for the automatic brake release and is situated on the flange of the brake housing.)
DISASSEMBLY OF BRAKE HOUSING ASSEMBLY:
1) After the motor assembly has been removed, all parts of the brake assembly are accessible. Remove 16 brake
springs, item 752. Thoroughly examine springs for damage and measure overall length. Overall spring length
should be 1.99 inch. If any spring measures less than 1.93 inch, replace all springs as a set.
f
2) Pull the motor drive shaft, item 730, out of the brake housing, together with sprag clutch aligner, item 724,
support washer, item 717, sprag clutch, item 723, sprag clutch spacer, item 726, and circlips, items 727 and 731.
3) Remove circlip, item 727, from the motor drive shaft to take off sprag clutch, item 723, sprag clutch spacer,
item 726, support washer, item 717, and sprag clutch aligner, item 724.
4) Thoroughly inspect the surface of the motor drive shaft where the sprag clutch engages. If any indentation
or surface damage is detected, replace motor drive shaft, sprag clutch and connecting shaft as a set.
5) Pull the connecting shaft, item 600, out of the center bore of the brake housing, together with brake hub, item
720. Thoroughly inspect the bore of the connecting shaft where the sprag clutch engages. If any indentation
or surface damage is detected, replace connecting shaft, sprag clutch and motor drive shaft as a set.
6) Remove the thrust bearing, item 617, and two thrust washers, item 615.
7) To separate the brake hub, item 720, from the connecting shaft, item 600, remove circlip, item 513.
8) Remove circlip, item 621, from bore of connecting shaft, item 600.
9) Push the bearing sleeve, item 620, out the bore of the connecting shaft. Discard O-ring, item 625, and oil seal,
item 623. Check needle bearing, item 627, for wear or damage and replace if necessary.
10) Pull the brake piston, item 750, out of the brake housing using two 1/2-13NC bolts screwed into the two puller
holes in the piston and discard O-rings, item 751 and item 753.
f
11) Thoroughly examine the inner bores of the brake housing and the outer diameters of the brake piston for scoring
caused by hydraulic fluid contamination. Minor surface damage may be repaired by polishing with a fine emery cloth.
248 REV.971001
SERVICE INSTRUCTIONS
CONTINUED
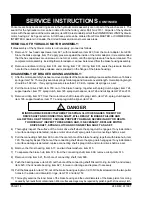
MINOR SURFACE DEFECTS WHERE THE SPRAG CLUTCH ENGAGES THE MOTOR
DRIVE SHAFT AND CONNECTING SHAFT, WILL RESULT IN BRAKE FAILURE AND
ALLOW THE LOAD TO DROP, CAUSING PROPERTY DAMAGE, SEVERE INJURY OR DEATH.
THOROUGHLY INSPECT THESE AREAS AND, IF NECESSARY, REPLACE MOTOR
DRIVE SHAFT, SPRAG CLUTCH AND CONNECTING SHAFT AS A SET.
DANGER

