background image


2

ASSEMBLY #

SERIES

DESIGN

82021   004

INTRODUCTION AND THEORY OF OPERATION 


The Rufnek series planetary winch is designed to use a high-speed gear motor, 

driving through a multiple disc brake, through three planet sets to the cable drum. 
The multiple-disc brake is spring applied and hydraulically released through a port in the 
brake housing.  During inhaul, the brake is not released since the load is driven through 
the one-way cam clutch, bypassing the brake.  When the load comes to a stop, the cam 
clutch locks up and the load is prevented from moving by the brake. 


The brake and brake valve receives its signal any time the winch is in pay out.  With 

the brake fully open at about 340 PSI the brake valve will open and dynamically control 
the lowering of the load. 


ASSEMBLY NUMBER EXPLANATION 


     This  manual  is  for  design  series  004.  In the case of a major design change 
implementation, a new design series designation number will be issued for the winch.  A 
new manual will also be created for that specific design series. 


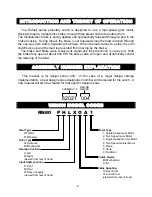
WINCH MODEL CODES 


Gear Type

W=Worm
P=Planetary

Drive Type

H=Hydraulic
M=Mechanical

Gearbox Position

L=Left
R=Right
(viewed from rear of truck)

Input Shaft Location

F=Front
R=Rear
X=Does not apply
(viewed from rear of truck)

Cable Spooling

O=Over Drum
U=Under Drum
(viewed from rear of truck)

Clutch Device

M=Mechanical
A=Air

Motor Type

1. Single Speed Gear Motor
2. Two Speed Gear Motor
3. Single Speed Geroler Motor
4. Two Speed Geroler Motor
5. Piston
6. Vane
X. No Motor

RN80    P     

H L X O A 1

Summary of Contents for TWG Tulsa RUFNEK 80

Page 1: ...MBLY 10 E INPUT PLANET SET DISASSEMBLY 11 F SECONDARY PLANET SET DISASSEMBLY 12 G OUTPUT PLANET SET DISASSEMBLY 12 GENERAL ASSEMBLY 12 H OUTPUT PLANET SET ASSEMBLY 12 I SECONDARY PLANET SET ASSEMBLY 12 J INPUT PLANET SET ASSEMBLY 12 K GEAR END ASSEMBLY 12 L DRUM SECTION ASSEMBLY 12 M BRAKE SECTION ASSEMBLY 12 N MOTOR ASSEMBLY 12 TROUBLESHOOTING 12 RUFNEK 80 BILL OF MATERIAL 12 VISCOSITY CHART 12 T...

Page 2: ...the brake fully open at about 340 PSI the brake valve will open and dynamically control the lowering of the load ASSEMBLY NUMBER EXPLANATION This manual is for design series 004 In the case of a major design change implementation a new design series designation number will be issued for the winch A new manual will also be created for that specific design series WINCH MODEL CODES Gear Type W Worm P...

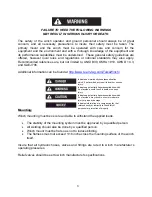
Page 3: ... secure and able to withstand the applied loads The stability of the mounting system must be approved by a qualified person All welding should also be done by a qualified person Winch mount must be flat so as not to induce binding The flatness must not exceed 1 16 inch across the mounting surface of the winch itself Insure that all hydraulic hoses valves and fittings are rated to winch manufacture...

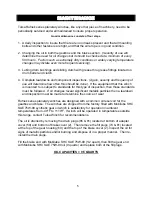
Page 4: ... for compliance Must insure that the drum clutch is fully engaged before hoisting A visual inspection of the drum clutch engagement is required before each winching operation Must rig all loads secure before winching Pull the load line taut and inspect the condition of load for stability Must inspect the drum brake if equipped The drum brake is not a load holding device it is design to prevent ove...

Page 5: ... mounted to is subject to standards for this type of inspection then those standards must be followed If oil changes reveal significant metallic particles then a teardown and inspection must be made to determine the source of wear Rufnek series planetary winches are designed with a common oil reservoir for the gearbox and brake The winches are shipped from the factory filled with Mobilube SHC SAE ...

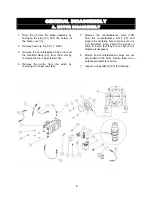
Page 6: ... four cap screws 106 4 Remove the motor from the winch by removing four capscrews 88 5 Remove the counterbalance valve 108 from the counterbalance block 76 and inspect the metering hole to make sure it is not obstructed Also inspect the o rings on valve to insure that they are not flat or cut Replace if necessary 6 Motors and counterbalance valves are not serviceable in the field Return them to an...

Page 7: ... from the brake housing 5 Remove the stator plates 12 and friction discs 13 from the brake housing and check them for excessive wear Replace the parts if necessary Be sure to check the top stator plate for scoring caused by the removal of the piston and polish if needed Friction discs should measure no less than 055 in thickness and stator plates should measure no less than 068 in thickness 6 To d...

Page 8: ...hers 63 62 on the bottom of the brake housing 20 Disconnect the airline running from the air cylinder 68 to the brake housing 20 Remove the brake housing by sliding the housing off the output shaft 38 At this time you will need to remove the two cap screws 70 nuts and washers 71 72 from the frames 64 or 65 You can now remove the brake band assembly 66 Note which frame the mounting bolts are on for...

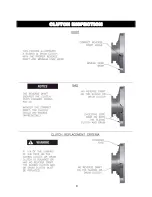
Page 9: ...9 CLUTCH INSPECTION ...

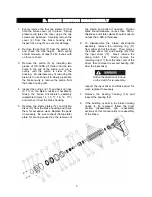
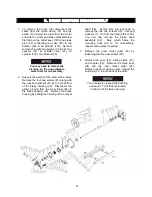
Page 10: ...by removing the ten capscrews 112 4 Inspect the o rings 57 114 for wear and replace if necessary 5 Remove the input gear set 42 along with the inner and outer thrust washers 43 Inspect and replace if necessary 6 Remove the sun gear 45 and secondary gear set 41 Inspect and replace if necessary 7 Remove the primary housing 58 by removing eight capscrews 32 Inspect the o ring 59 and replace if necess...

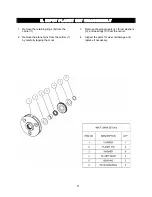
Page 11: ...etaining rings 6 from the carrier 1 2 Remove the planet pins from the carrier 1 by carefully tapping them out 3 Remove the planet gears 4 thrust washers 3 and bearings 5 from the carrier 4 Inspect the parts for wear or damage and replace if necessary ...

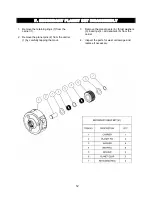
Page 12: ...ning rings 7 from the carrier 1 2 Remove the planet pins 2 from the carrier 1 by carefully tapping them out 3 Remove the planet gears 6 thrust washers 3 bearings 4 and spacers 5 from the carrier 4 Inspect the parts for wear or damage and replace if necessary ...

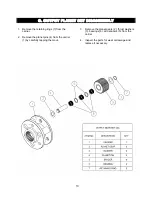
Page 13: ...ing rings 7 from the carrier 2 Remove the planet pins 4 from the carrier 1 by carefully tapping them out 3 Remove the planet gears 2 thrust washers 3 bearings 6 and spacers 5 from the carrier 4 Inspect the parts for wear or damage and replace if necessary ...

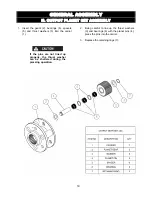
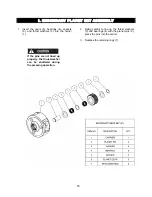
Page 14: ...g careful to line up the thrust washers 3 and bearings 6 with the planet pins 4 press the pins into the carrier 3 Replace the retaining rings 7 GENERAL ASSEMBLY H OUTPUT PLANET SET ASSEMBLY If the pins are not lined up properly the thrust washer can be shattered during the pressing operation ...

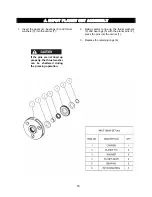
Page 15: ...ust washers 3 into the carrier 1 2 Being careful to line up the thrust washers 3 and bearings 4 with the planet pins 2 press the pins into the carrier 3 Replace the retaining rings 7 If the pins are not lined up properly the thrust washer can be shattered during the pressing operation ...

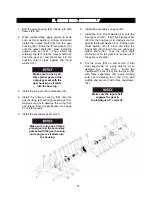
Page 16: ...ers 3 into the carrier 1 2 Being careful to line up the thrust washers 3 and bearings 5 with the planet pins 2 press the pins into the carrier 1 3 Replace the retaining rings 6 If the pins are not lined up properly the thrust washer can be shattered during the pressing operation ...

Page 17: ...to specification see page 27 of this manual 5 Install the secondary gear set 41 Make sure to line up all three planet gears in the secondary gear set with the gear housing and sun gear as it starts into the housing 6 Install the secondary sun gear 45 7 Install the inner thrust washer 43 onto the input gear set 42 Insert the input gear set 42 into the ring gear 22 making sure it is against the thru...

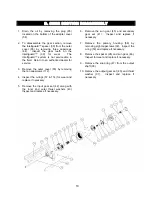
Page 18: ...t space between the drum 34 and the brake band 66 Then tighten the jam nut to secure the adjusting nut 3 Install the inner thrust collar 24 making sure the half moon slots are lined up with the key slots in the output shaft 38 Tap the three keys 94 into their slots in the output shaft 4 Align the coupler 30 with the keys 94 and slide it onto the output shaft 38 Install the sliding clutch 27 and yo...

Page 19: ...rn the drum to make sure it is not binding 10 If necessary install the air cylinder 105 and the air cylinder cover 91 to the brake housing with four capscrews 69 and spacers 97 11 Install the bracket 90 to the brake housing using four capscrews 29 12 Attach the yoke 67 by installing clevis pins 49 into the bracket 90 and clevis 48 Install cotter keys 100 to clevis pins 49 to secure their positions...

Page 20: ...ston 5 into the brake housing 20 and gently tap it down until it is seated making sure not to damage the o rings 8 10 or back up rings 9 11 6 Install the springs 7 into the spring pockets in the piston If working in a horizontal position coat the bottom of each spring with chassis lube to keep it in position 7 Install the cover 2 onto the brake housing 20 using four capscrews 3 making sure the cov...

Page 21: ... 107 into the manifold block 93 and counterbalance block 76 4 Install the counter balance valve 108 into the counterbalance block 76 5 Install the manifold block 93 and counter balance block 76 using four capscrews 106 6 Install hoses 4 54 56 77 and 80 7 Remove the oil level plugs 81 86 from the brake cover 2 and gearbox cover 55 Fill the brake and gearbox through the oil fill hole located on top ...

Page 22: ...ssures b Load being lifted may be more than the winch s rating Reduce the load or re rig to increase mechanical advantage Oil leaks from the vent located on the top of the gearbox a The motor shaft seal may have failed Replace this seal and reduce backpressure if that caused the shaft seal to fail b Brake piston seals may have failed Service the brake section and replace worn parts Winch runs too ...

Page 23: ...ARING HOUSING 17 2 44323 RETAINING RING 18 1 41759 CLUTCH 19 1 44337 INPUT DRIVER 20 1 44420 BRAKE HOUSING 21 2 44439 BUSHING 22 OMIT 23 OMIT 24 1 42938 THRUST COLLAR 25 2 44690 OIL SEAL 26 3 994188 THRUST RACE 27 1 44576 SLIDING CLUTCH 28 1 44498 SUN GEAR SPACER 29 4 29614 CAPSCREW 30 1 44422 COUPLER 31 2 42868 BUSHING 32 8 30204 CAPSCREW 33 2 33324 WASHER 34 1 44423 WELDMENT DRUM 35 1 44424 CABL...

Page 24: ...ING 61 8 30203 CAPSCREW 62 8 20318 NUT 63 8 20559 LOCKWASHER 64 1 44434 RIGHT HAND FRAME 65 1 44435 LEFT HAND FRAME 66 1 44461 BRAKE BAND 67 1 43882 CLUTCH YOKE 68 1 42929 BRAKE BAND AIR CYLINDER 69 4 43880 CAPSCREW 70 2 20525 CAPSCREW 71 2 20521 NUT 72 2 20518 LOCKWASHER 73 1 42955 AIR SHIFT MOUNTING BRK 74 1 31582 O RING PLUG 75 1 13050 BREATHER 76 1 42029 1200W COUNTERBALANCE BLOCK 77 1 42031 H...

Page 25: ... BLOCK 94 3 44436 SHAFT KEY 95 OMIT 96 OMIT 97 4 43078 SPACER 98 1 34003 O RING 99 1 939243 CLEVIS PIN 100 3 20514 COTTER PIN 101 1 43367 12 VOLT CARTRIDGE VALVE 102 OMIT 103 OMIT 104 OMIT 105 1 44340 AIR CYLINDER 106 4 43372 CAPSCREW 107 2 32182 O RING 108 1 41867 COUNTERBALANCE VALVE 109 1 44736 INTELLIGUARD LOGO PLATE 110 OMIT 111 OMIT 112 OMIT 113 1 29043 RETAINING RING 114 1 31543 O RING 115 ...

Page 26: ...26 VISCOSITY CHART ...

Page 27: ...57 45 106 80 64 1 2 20 85 64 51 120 90 72 9 16 12 109 82 65 153 115 92 9 16 18 122 91 73 172 129 103 5 8 11 150 113 90 212 159 127 5 8 18 170 128 102 240 180 144 3 4 10 266 200 160 376 282 226 3 4 16 297 223 178 420 315 252 7 8 9 430 322 258 606 454 364 7 8 14 474 355 284 668 501 401 1 8 644 483 386 909 682 545 1 14 721 541 433 1019 764 611 1 1 8 7 794 596 475 1288 966 772 1 1 8 12 890 668 534 144...

Page 28: ...28 RUFNEK 80 ISOMETRIC DRAWING DO NOT USE MAGNETS ON OR AROUND WINCH TWG PO Box 1130 Jenks OK 74037 1130 USA Phone 918 298 8300 www dovertwg com ...

Reviews: