16
Installation Instructions
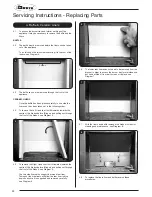
7.5 Once the logs are in there are two embers which can be
loosely placed at the front of the fuel bed and cover the tabs
securing the burner tray, see Diagram 9.
Embers
9
7.6 Use some of the Embaglow provided and cover the ports in
the burner tray with a liberal amount of fibres, see Diagram 10.
It is essential to cover the port in the middle of the
burner tray in order to get the most visually appealing
flame picture.
NOTE: It is not necessary to use all of the Embaglow.
It is essential to
cover the
central port
Embaglow
10
7.7 Fix log bar into position, see Diagram 11.
11
8. Completion of Assembly
8.1 Use a ceramic glass product generally sold for cleaning
ceramic hobs to clean the glass front.
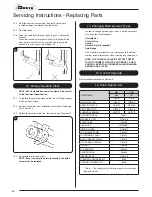
8.2 Ensure that the rope seal on the back of the glass frame is
intact and replace the screws working from the top down.
Tighten the screws evenly DO NOT OVER TIGHTEN, see
Diagram 12.
NEVER OPERATE THE APPLIANCE WHEN THE GLASS
FRAME IS REMOVED, OR THE GLASS IS BROKEN.
12
8.3 Replace ALL of the securing screws ensuring that a screw is
present in all fixing slots.
UNDER NO CIRCUMSTANCES SHOULD THE
APPLIANCE BE USED IF ANY OF THE GLASS
FRAME RETAINING SCREWS ARE LOOSE OR
MISSING.
8.4 With the top still supported or removed refit front by locating
in grooves and lowering into place, see Diagram 13.
13
8.5 Now replace top, see Diagram 14.
14
Summary of Contents for 280
Page 28: ...E O E ...


