background image


USER MANUAL 


NOTE: Check all parts for shipping damage. In case of shipping damage, DO NOT 

use, Contact the Dealer/Carrier for further instruction 


SAFETY SUMMARY 

To ensure the safe operation of the ROLLATOR, these instructions MUST be followed: 

1. GENERAL WARNING 

DO NOT install or use this equipment before reading and understanding this instruction 

sheet. Please keep this manual properly for future reference. If you are unable to 

understand the Warnings, Cautions or Instructions, contact a healthcare professional, 

dealer or technical personnel before attempting to install this equipment 

 otherwise, injure 

or damage may occur. Each individual should always consult with their physician or 

therapist to determine proper adjustment and usage. Rollators are NOT intended to be 

self-propelled while seated. DO NOT use the rollator on the stairs or the elevator (including 

escalators), please be careful when using on slope. A physical/occupational therapist 

should assist in the height adjustment of the rollator for maximum support and correct 

brake activation, the fixture of the screw, the position of the quick release/assembly kits. 

Always ensure screws are fastened to the connector, so that the connector can’t move 

when forced. Ensure all copper balls fully protrude through adjustment holes. Failure to 

follow these warnings can result in personal injury. Care should be taken to ensure that 

ALL hand and height adjustment are secure and that casters and moving parts are in good 

working order before using this or any mobility aid. In the process of using all wheels must 

always stick to the ground. This is to ensure that the balance of the rollator. Before use the 

seat, the brake must be in the locking position. When using a rollator in the stationary state, 

the hand brake must be locked. 


2. STABILITY WARNINGS 

The Rollator can provide ambulatory assistance to an individual weighing up to 136kg 

(300lbs), INCLUDING the loading of the bag. The Rollator bag has a weight limitation of 

5kg. 


3. FOLDING/ASSEMBLING WARNIGN   

After unfolding or assembling the rollator, to ensure that the seat support tube is securely 

locked in the side slot and the quick release/assembly kits are in their correct position and 

well locked. Ensure rollator level to the ground before using. All screw must be tightened, 

assure they are no movement. 

DO NOT hang anything on either the left or right side frames. This will cause: A. cause 

side tube bending, and make the rollator mechanical instability. B. this may also cause 

Summary of Contents for Premium 73068

Page 1: ...Ge rau hsa leitu g User a ual Ma uel D Utilisatio Gebruikershandleiding Artikelnr 73068 Bezeichnung Rollator Premium PZN 11369688 HMV Nr 10 50 04 1163...

Page 2: ...nden Sie den Rollator KEINESFALLS auf Treppen und im Aufzug einschlie lich Rolltreppen Seien Sie vorsichtig wenn Sie den Rollator auf geneigten Fl chen benutzen Lassen Sie sich von einem Physio Ergoth...

Page 3: ...etzungen oder Sch den f hren kann 4 WARNHINWEISE ZUR INSTALLATION Stellen Sie sicher dass s mtliche Kupferkugeln aus den Einstellungs ffnungen des Griffrohrs herausragen Dies bedeutet dass die Griffro...

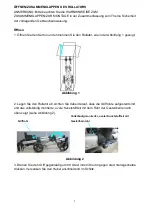
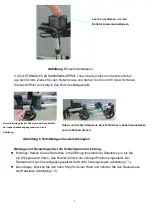
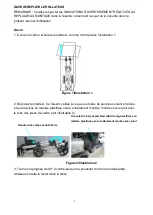
Page 4: ...Abbildung 1 gezeigt 2 Legen Sie den Rollator ab Achten Sie dabei darauf dass die Griffrohre aufgestellt sind und das vollst ndig montierte ovale Kunststoffteil mit dem Rohr der Gestellbeine nach oben...

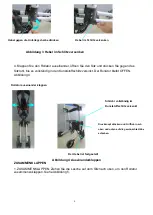
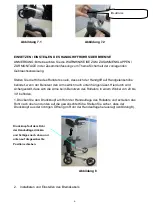
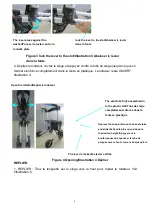
Page 5: ...hen Sie die Lasche auf dem Sitz nach oben um den Rollator zusammenzuklappen Siehe Abbildung 5 Hebel gegen die Unterlegscheibe dr cken Hebel im Schlitz versenken Abbildung 3 Hebel im Schlitz versenken...

Page 6: ...ren Das Rad ist damit in der richtigen Position eingerastet Der Radsatz wird auch bei entgegengesetzter Kraft nicht herausgezogen Abbildung 7 1 Demontage Dr cken Sie den roten Knopf mit einer Hand un...

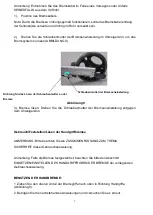
Page 7: ...durch wird sichergestellt dass sich die Arme beim Benutzen des Rollators in einem Winkel von 20 bis 30 befinden 1 Dr cken Sie den Druckknopf am Rohr der Handauflage des Rollators und schieben das Rohr...

Page 8: ...eneinstellung entgegen dem Uhrzeigersinn Gebrauch Feststellen L sen der Handgriffbremse ANMERKUNG Bitte beachten Sie die ZUSAMMENFASSUNG ZUM THEMA SICHERHEIT dieser Gebrauchsanweisung Anmerkung Falls...

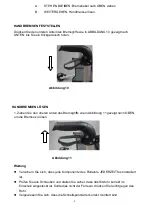
Page 9: ...n oberen Anteil des Bremsgriffs wie in Abbildung 11 gezeigt nach OBEN um die Bremse zu l sen Wartung Versichern Sie sich dass jede Komponente des Rollators JEDERZEIT fest installiert ist Pr fen Sie al...

Page 10: ...digte oder verschlissene Komponenten unverz glich PFLEGE DER REIFEN Reinigen Sie die Reifen mit warmem Wasser und einem neutralen Reiniger und trocknen Sie sie anschlie end mit einem sauberen Tuch ab...

Page 11: ...rews are fastened to the connector so that the connector can t move when forced Ensure all copper balls fully protrude through adjustment holes Failure to follow these warnings can result in personal...

Page 12: ...nt wheels 4 Curb climber designed pm rear legs to maneuver over blocks 5 Underneath brake system for both running and parking 6 Reflectors onto the handgrips front and back wheels parts 7 Adjustable h...

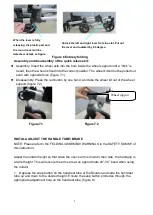
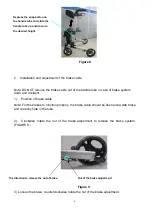
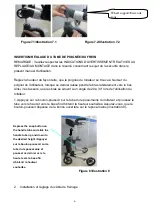
Page 13: ...ainst the washer and then lock the lever to the slot 4 Open the rollator open the seat and press the seat tube until fully assembled in to the plastic slot The rollator will remain OPEN Figure 4 Oval...

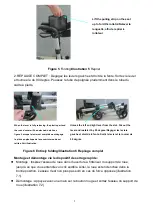
Page 14: ...out the lever and roatate it by 90 degree Put down the handle tube to the foot tube carefully Lift the pulling strip on the seat up to fold the rollator Figure 5 Folding Figure 4 Opening The seat tube...

Page 15: ...nstruction Adjust the rollator height so that when the user s arm is down to their side the handgrip is at wrist height This will ensure the arms are at an approximate 20 30 bend when using the rollat...

Page 16: ...the brake cable should be flush along side brace and correctly hide in the tube 2 Clockwise rotate the nut of the brake adjustment to release the brake system FIGURE 9 3 Loosen the brake counterclock...

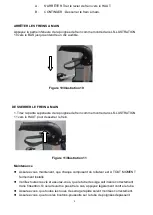
Page 17: ...rtion of the brake handles up towards the hand grips figure 9 2 Follow the instruction below and try again A REMAIN STATIONARY hold the brake handle UP B CONTINUE MOBILITY release the brake handle LOC...

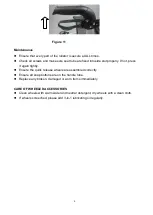
Page 18: ...ress it again tightly Ensure the quick release wheels are assembled correctly Ensure all snap bottons are on the handle tube Replace any broken damaged or worn items immediately CARE OF WHEELED ACCESS...

Page 19: ...e de conduite N utilisez EN AUCUN CAS le rollateur dans des escaliers et dans des ascenseurs y compris escaliers roulants Soyez prudent quand vous utilisez le rollateur sur des surfaces inclin es Lais...

Page 20: ...IVES A L INSTALLATION Assure vous que toutes les boules en cuivre d passent des ouvertures de r glage du tube de poign e Cela signifie que les tubes de poign e sont solidement enclench s Les dispositi...

Page 21: ...teur Ce faisant veillez ce que les tubes de poign es soient en place et que la pi ce en mati re plastique ovale enti rement mont e montre vers le haut avec le tube des pieds de cadre voir illustration...

Page 22: ...e lock the lever to the slot Abaisser le levier dans la fente Figure 3 lock the lever to the slot Illustration 3 Abaisser le levier dans la fente Open the rollator D plier le rollateur Figure 4 Openin...

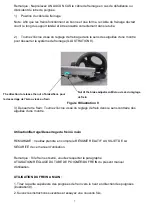
Page 23: ...z avec une main sur le bouton rouge et sortez l essieu du support de roue illustration 7 2 Lift the pulling strip on the seat up to fold the rollator Relever la languette afin de replier le rollateur...

Page 24: ...tion du rollateur 1 Appuyez sur le bouton poussoir sur le tube du repose mains du rollateur et poussez le tube vers le haut et vers le bas afin d obtenir la hauteur souhait e Assurez vous que le bouto...

Page 25: ...ns le sens contraire des aiguilles d une montre Utilisation Serrage Desserrage du frein main REMARQUE Veuillez prendre en compte le R SUM RELATIF AU SUJET DE LA S CURIT de ce manuel d utilisation Rema...

Page 26: ...L ILLUSTRATION 11 vers le HAUT pour desserrer le frein Maintenance Assurez vous maintenant que chaque composant du rollateur est A TOUT MOMENT fermement install V rifiez toutes les vis et assurez vous...

Page 27: ...mmag ou us SOIN DES PNEUS Nettoyez les pneus avec de l eau chaude et un produit de nettoyage neutre et s chez les par la suite avec un chiffon propre Si les pneus devaient grincer veuillez les lubrifi...

Page 28: ...eut moet helpen bij de hoogteverstelling van de rollator voor maximale ondersteuning en correcte remactivering de bevestiging van de schroef de positie van de quick release montagekits Zorg er altijd...

Page 29: ...hulpstukken VOOR gebruik goed en stevig zijn vergrendeld Producteigenschappen 1 Opvouwbaar van links naar rechts voor eenvoudig opbergen 2 Opvouwbaar van boven naar beneden voor het maken van een zeer...

Page 30: ...eelding 2 3 Draai de hendel 90 graden linksom door tegen de ring te drukken en vergrendel de hendel dan in de sleuf Ovalen plastic volledig gemonteerd met de poot buis De hendel drukt weer tegen de ri...

Page 31: ...r op te vouwen Zoals in afbeelding 5 2 VOLLEDIG VOUWEN Ontgrendel de linker en rechterhendel uit de sleuf Trek de Trek aan de trekstrip op de zitting om de rollator op te vouwen Afbeelding 5 Vouwen Op...

Page 32: ...ENVATTING van deze instructie Stel de rollatorhoogte zo in dat wanneer de arm van de gebruiker naast het lichaam is de handgreep zich op polshoogte bevindt Dit zal zorgen dat de armen in een bocht van...

Page 33: ...van de remmen moet de remkabel langs de brace lopen en correct verborgen zijn in de buis 2 Draai de moer van de remaanpassing naar rechts om het remsysteem vrij te maken AFBEELDING 9 3 Maak de rem los...

Page 34: ...e remhendels in de richting van de handgrepen Afbeelding 2 Volg de onderstaande instructie en probeer het opnieuw A STATIONAIR BLIJVEN hou de remhendel OMHOOG B BLIJF IN BEWEGING laat de remhendel los...

Page 35: ...stevig aan Zorg ervoor dat de quick release wielen juist zijn gemonteerd Zorg ervoor dat alle snap knoppen op de handgreepbuis zijn Vervang gebroken beschadigde of versleten artikelen direct ZORG VOOR...

Reviews: