Copyright © 2001-2018, Dr Robot Inc. All Rights Reserved.
www.DrRobot.com
V.03.02.18.Q
- 21 -
Device Default Network Settings
Note: The Ethernet modules are configured to serial-to-Ethernet mode in Jaguar platform.
Ethernet Module 1
192.168.0.60
Port 1
Port 10001 to Main Motion/Sensor Controller
PMS5006
TCP 115200. 8, N, 1, no flow control
Port 2
Port 10002 to Laser Range Sensor
TCP 115200. 8, N, 1, no flow control
Ethernet Module 2
192.168.0.61(reserved)
Port 1
Port 10001 to Pan/Tilt Unit
TCP 115200. 8, N, 1, no flow control
Port 2
Port 10002 to second Laser port
TCP 115200. 8, N, 1, no flow control
Ethernet Module 3
192.168.0.63
Port 1
Port 10001, Manipulator Arm Joint 1/2 motor
driver board
TCP 115200. 8, N, 1, no flow control
Port 2
Port 10002 Manipulator Arm Joint
3/4(rotate/gripper),motor driver board
TCP 115200. 8, N, 1, no flow control
Ethernet Module 4
192.168.0.62
Port 1
Port 10001, Manipulator Arm Joint pan/Tilt
motor driver board
TCP 115200. 8, N, 1, no flow control
Port 2
Port 10002 reserved
TCP 115200. 8, N, 1, no flow control
Camera
IP
Port
User ID
Password
Front camera
192.168.0.65
Port 8081
root
drrobot
Zoom camera(option)
192.168.0.64
Port 8082
root
drrobot
Optional
embedded
PC(Ubuntu with ROS)
192.168.0.68 user name:drrobot password:
drrobot
Optional Hokuyo UTM-
30LX-EW Laser Ranger
Scanner
192.168.0.69 port: 10940
Advanced Network Settings
You could also change the Wireless AP/router settings such as IP and SSID etc., if you need to do so, you are
required to change the network settings on the Ethernet modules on the robot by following the guidelines as
illustrated on the Ethernet Module manual.
Please contact
if you need further support.
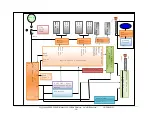
Hardware Architecture
The diagram below illustrates the inter-connection between the core electronic circuits and modules (some are
optional accessories).


