CONTACT US AT
w w w .D Rpow e r .com
27
Replacing the Wheels
Tools and Supplies needed:
Channel Lock Pliers
Clean Rags
Adjustable Wrench
Needle Nose Pliers
Jack and Jack Stands
Hammer and Wood Block
1.
Jack the Splitter off the ground and secure with Jack Stands.
2.
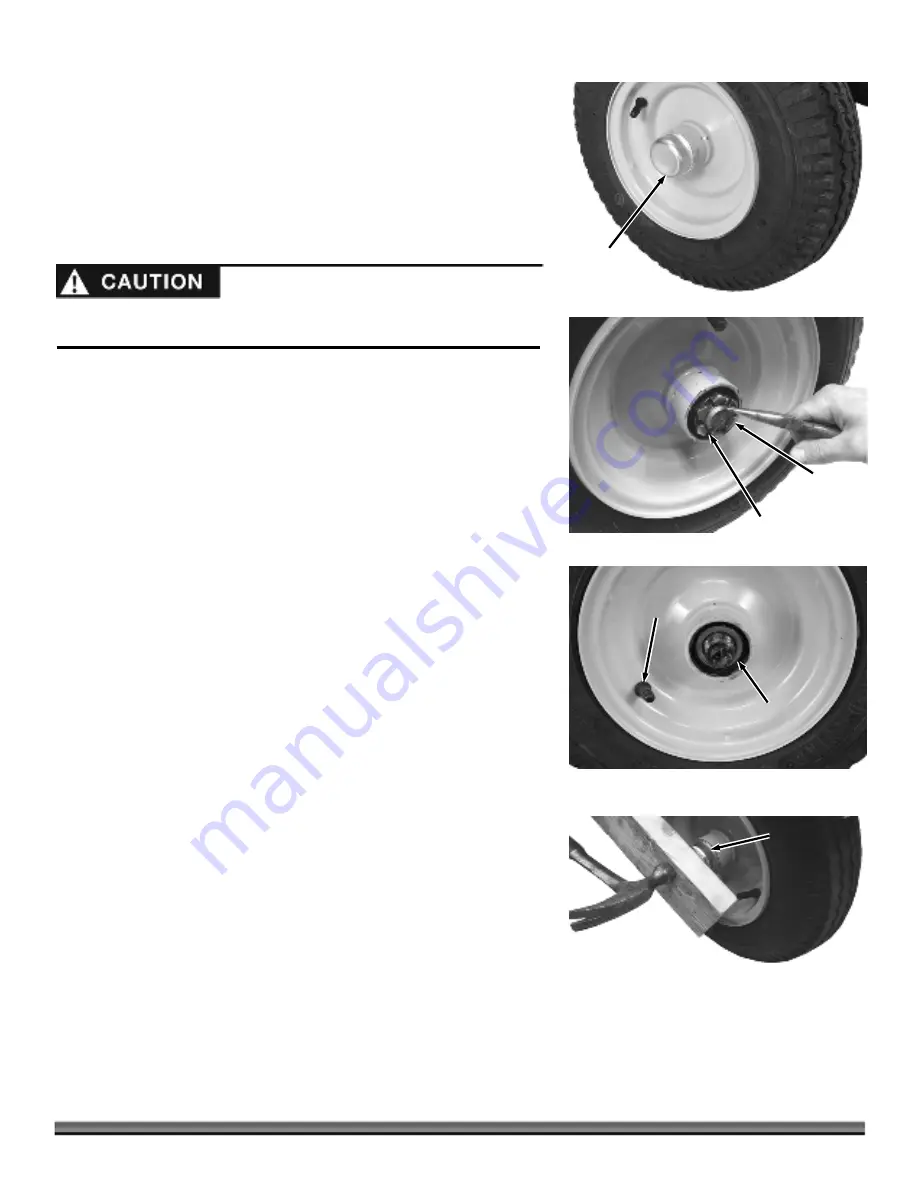
Remove the Dust Cap from the Wheel Assembly with Channel Lock Pliers
(
Figure 64
).
3.
Straighten the ends of the Cotter Pin with Needle Nose Pliers so the Cotter
Pin can be pulled from the hole in the Axle (
Figure 65
).
4.
Remove the Castle Nut with the Channel Lock Pliers.
5.
Pull the Wheel assembly and Taper Bearing from The Axle (
Figure 66
).
6.
Slide a Wheel Assembly onto the Axle Shaft with the Valve Stem facing out.
The open side of the Wheel Hub with the loose Taper Bearing will be facing
towards you.
7.
Screw the Castle Nut onto the Axle and tighten it with an Adjustable Wrench
to seat the Bearings (
Figure 65
).
8.
Back the Castle Nut off and then snug it up to the Bearing lightly. Ensure the
slots of the Castle Nut align with the hole in the Axle.
9.
Insert a Cotter Pin through the slots of the Castle Nut and into the hole in
the Axle.
10.
Bend the ends of the Cotter Pin with Needle Nose Pliers to secure it.
11.
Place the Dust Cap onto the Wheel Assembly and secure it by placing a piece
of wood over it and lightly tapping with a Hammer until it is seated against
the lip (
Figure 67
).
12.
Jack the back of the Splitter up and remove the Jack Stands.
13.
Lower the Splitter to the ground.
14.
Check the Tire Pressure. Refer to the “Checking the Tire Pressure” section in
Chapter 2.
The Splitter must be supported carefully so it does not tip over when jacking
or it could cause Splitter damage or personal injury.
Dust Cap
Figure 64
Figure 65
Castle
Nut
Cotter Pin
Figure 67
Wheel
Assembly
Dust Cap
Figure 66
Taper
Bearing
Valve
Stem


