background image

8. ASSEMBLY

- 10 -

FIG.5

FIG.6

FIG.7

FIG.8

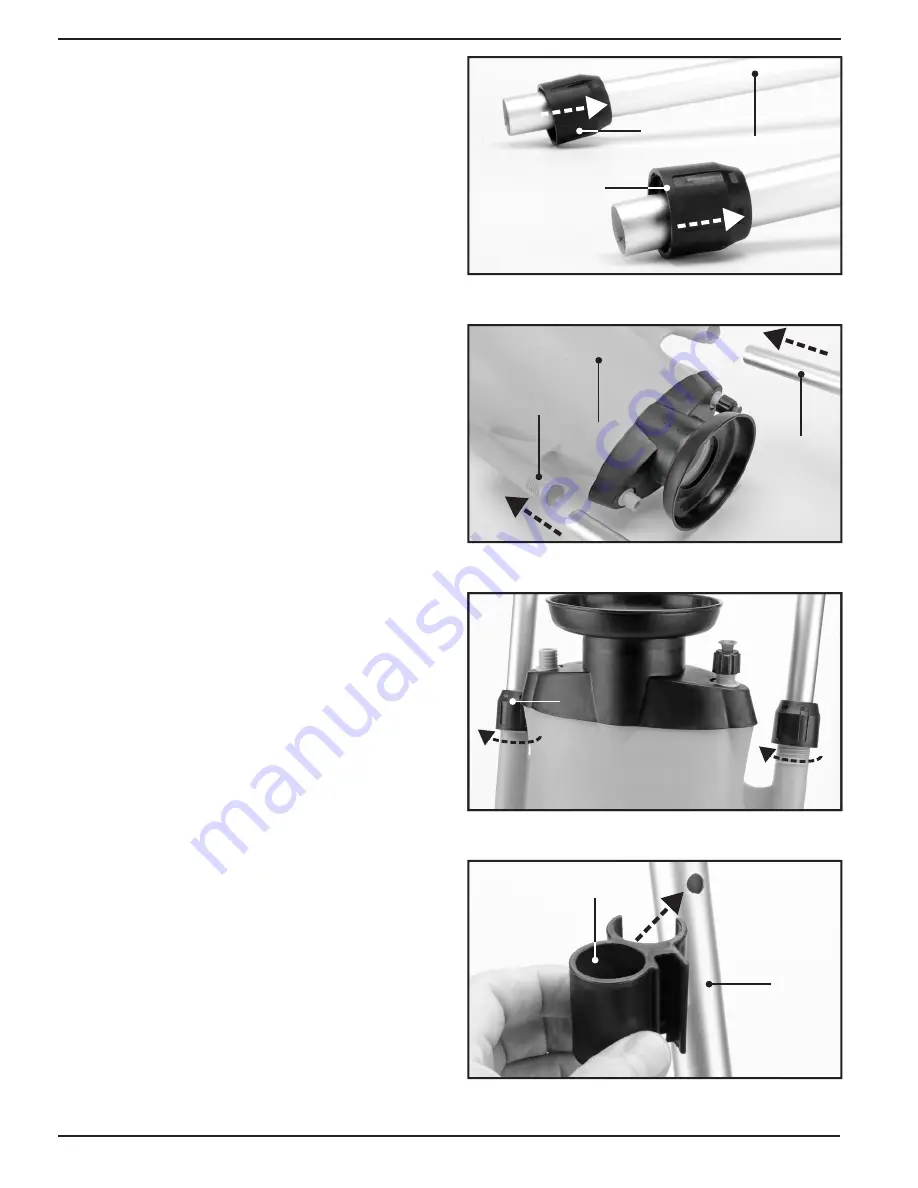
8.2 HANDLE ASSEMBLY 

(82583 only) 

– FIGS. 5 – 8

–   Slide the 2 handle fixings 

over the 

handle section 

.

–   Slide the 2 shafts of the handle 

over 

the handle mounting sections moulded into 
the spray bottle 

 .

–   Turn the 2 handle fixings 

clockwise to 

secure the handle in place .

–   Position the lance holder 

onto the 

handle 

, locating it with the hole in the 

shaft.

–   Press fit the lance holder into place on the 

shaft.

Summary of Contents for 82460

Page 1: ...ry information to ensure its correct and safe use By following all the general safety instructions contained in this manual it will ensure both product and operator safety together with longer life of the product itself AlI photographs and drawings in this manual are supplied by Draper Tools to help illustrate the operation of the product Whilst every effort has been made to ensure the accuracy of...

Page 2: ... UNDERSTANDING THIS MANUALS SAFETY CONTENT WARNING Information that draws attention to the risk of injury or death CAUTION Information that draws attention to the risk of damage to the product or surroundings 1 4 COPYRIGHT NOTICE Copyright Draper Tools Limited Permission is granted to reproduce this publication for personal and educational use only Commercial copying redistribution hiring or lendi...

Page 3: ...CRIPTION 6 1 IDENTIFICATION 7 7 UNPACKING AND CHECKING 7 1 PACKAGING 8 7 2 WHAT S IN THE BOX 8 8 ASSEMBLY 8 1 WHEEL ASSEMBLY 9 8 2 HANDLE ASSEMBLY 10 8 3 LANCE ASSEMBLY 11 8 4 NOZZLE ASSEMBLY 11 8 5 ATTACHING THE HOSE 11 9 OPERATION AND USE 9 1 FILLING THE SPRAY BOTTLE 12 9 2 PRESSURISATION 12 9 3 SAFETY PRESSURE VALVE 13 9 4 SPRAY OPERATION 13 9 5 FLOW RATE 13 9 6 VARIABLE SPRAY PATTERN 13 10 MAI...

Page 4: ...out when the guarantee period is 90 days from the date of purchase The guarantee is extended to 24 months for parts only This guarantee does not apply to normal wear and tear nor does it cover any damage caused by misuse careless or unsafe handling alterations accidents or repairs attempted or made by any personnel other than the authorised Draper warranty repair agent Note If the tool is found no...

Page 5: ...erature water glycol detergents acid organic and inorganic bleaching agents and hydraulic oils 4 2 SPECIFICATION Stock No s 82460 82583 Part No s EWS 10 EPDM B EWS 12 EPDM Bottle capacity 10L 15L Working capacity 8L 12L Max working pressure 40psi 40psi Weight empty sprayer only 1 181kg 3 960kg 5 ...

Page 6: ...MATION 6 Never open the pump when under pressure Do not leave the sprayer exposed to heat sources or intense cold Do not use for spraying food products wine milk etc Variable spray nozzle Use suitable protective clothing during use Use suitable face mask and eye protection Do not eat drink or smoke during use Do not spray on windy days Wash hands and face after use Keep out of the reach of childre...

Page 7: ...mp handle Safety valve Wheel Wheel cover Spray bottle Nozzle Lance Fill inlet Trigger assembly Hose Foam handle grip Handle Lance holder Carry strap Ɨ Applicable to Stock No 82583 only ƗApplicable to Stock No 82460 only Stock No 82583 Stock No 82460 ...

Page 8: ...e the machine needs to be returned for repair Warning Some of the packaging materials used may be harmful to children Do not leave any of these materials in the reach of children If any of the packaging is to be thrown away make sure they are disposed of correctly according to local regulations 7 2 WHAT S IN THE BOX There are a number of parts in the box which need to be assembled 8 Pump handle Wh...

Page 9: ... the bottom of the spray bottle Slide one of the wheels onto the axle Thread a wheel washer over the end of the axle Using a pair of long nose pliers not supplied insert a locking pin into the hole at the end of the axle to lock the wheel in place Place a wheel cover onto the wheel and press fit in place Repeat the above steps for the other wheel 9 ...

Page 10: ...he handle section Slide the 2 shafts of the handle over the handle mounting sections moulded into the spray bottle Turn the 2 handle fixings clockwise to secure the handle in place Position the lance holder onto the handle locating it with the hole in the shaft Press fit the lance holder into place on the shaft ...

Page 11: ...he trigger and lance 8 4 NOZZLE ASSEMBLY FIG 11 If not already in place make sure the rubber gasket and compression fitting are in place on the end of the lance Slide the nozzle onto the end of the lance Tighten the compression fitting to secure the nozzle in place 8 5 ATTACHING THE HOSE FIG 12 If not already in place make sure the rubber seal is in situated on the hose inlet Insert the suction tu...

Page 12: ...let incorporates a flanged rim to help avoid spillages the additional use of a large funnel may be adviseable especially when using potentially hazardous liquids Replace the pump handle assembly and screw anti clockwise to close 9 2 PRESSURISATION FIG 16 Working spraying pressure is achieved by pumping the handle approximately 30 times Note Try to avoid overfill with either air or liquid Air will ...

Page 13: ...us spraying pull the metal locking catch forward and locate onto the plastic lug locking the trigger in the open position Note Stock No 82460 incorporates a slightly different mechanism in it s trigger assembly 9 5 FLOW RATE FIG 19 The force of the spray can be regulated using the flow adjustment dial located on the trigger assembly Turn the dial anti clockwise for increased flow rate and clockwis...

Page 14: ... as not to damage the gasket 10 2 TROUBLESHOOTING Fault Weak or no spray Distorted spray Non pressurisation Loss of pressure Obstruction Obstruction Check and tighten connections if necessary Check gaskets are lubricated and show no signs of wear replace if necessary Check for possible blockage in nozzle trigger or outlet hose Check for possible debris partially obstructing nozzle Leakage Possible...

Page 15: ...ollection schemes in your area In all circumstances Do not incinerate Do not abandon in the environment When using chemical products consult the corresponding documentation for the correct method of disposal of any excess materials If in any doubt seek advise from your local authority or a certified disposal contractor Do not dispose of excess chemicals into drainage sewerage systems or into the n...

Page 16: ... Agent For aftersales servicing or warranty repairs please contact the Draper Tools Helpline for details of an agent in your local area Published by Draper Tools Limited No part of this publication may be reproduced stored in a retrieval system or transmitted in any form or by any means electronic mechanical photocopying recording or otherwise without prior permission in writing from Draper Tools ...

Reviews: