background image

11

8.   PREPARING THE SANDER

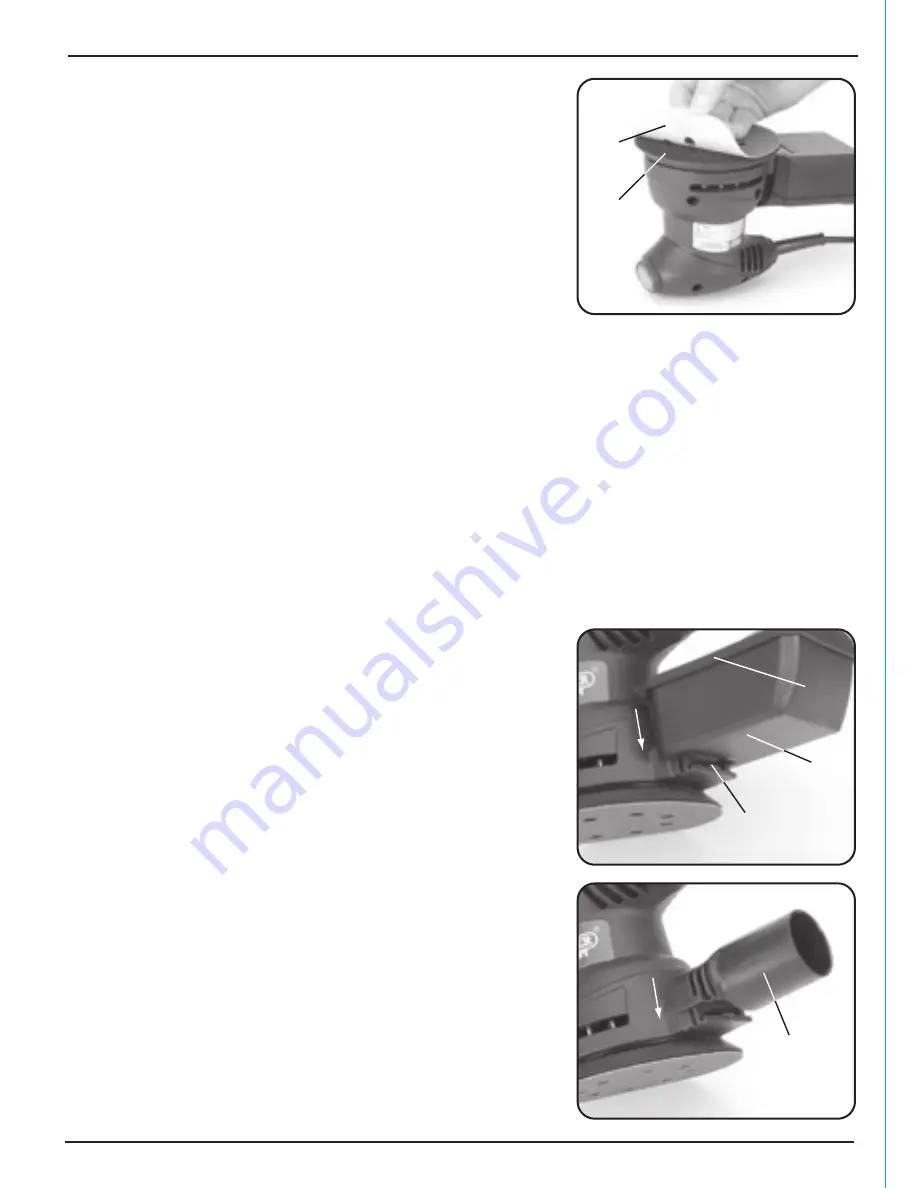
8.2 ABRASIVE DISC 

INSTALLATION/REPLACEMENT – FIG.2

The backing pad and the abrasive disc are considered 
consumable items. The abrasive discs 

 simply push on 

to the backing pad 

 and are held in place with a 

hook and loop fastening. To ensure optimum removal 
of dust ensure the holes in the abrasive disc are aligned 
with those in the backing pad.
To remove the worn abrasive disc, simply pull away 
from the hook and loop and re-apply a new disc.

8.3 DUST EXTRACTION FACILITY: – FIGS. 3 & 4

COLLECTION BOX:

To attach the collection box 

 to the machine slide it 

down over the appature 

. Ensure it locates 

corrrectly in the guide slots and is pushed down fully, 
covering the outlet.
To empty the box, slide it off the machine over a waste 
recepticle, remove the lid 

 which is clipped over the 

box’s rim.

VACUUM ADAPTER:

The vacuum adaptor attaches to the sander in the same 
manner as the collection box.
With the collection box removed, attach the adapter 

 to the sander. Insert a vacuum cleaner nozzle to 

achieve efficient dust removal.

GENERAL SANDING INFORMATION:

Select the correct grit to obtain the desired finish. The 
higher the grit number the finer the finish. For 
removing larger amounts of material a 60/80 grit is 
ideal. When removing paint from a wood surface the 
grit will have a tendency to clog. 
Replace abrasive disc when clogged with material or 
when surface/edge has rips, cracks or worn areas. 
NOTE: Abrasive disc and the sander backing pad are 
consumable items.

FIG.2

FIG.3

FIG.4

Summary of Contents for 83639

Page 1: ... This manual has been compiled by Draper Tools describing the purpose for which the product has been designed and contains all the necessary information to ensure its correct and safe use By following all the general safety instructions contained in this manual it will ensure both product and operator safety together with longer life of the product itself AlI photographs and drawings in this manua...

Page 2: ... 1 3 UNDERSTANDING THIS MANUALS SAFETY CONTENT WARNING Information that draws attention to the risk of injury or death CAUTION Information that draws attention to the risk of damage to the product or surroundings 1 4 COPYRIGHT NOTICE Copyright Draper Tools Limited Permission is granted to reproduce this publication for personal educational use only Commercial copying redistribution hiring or lendi...

Page 3: ...STRUCTIONS FOR POWER TOOL USE 6 5 2 ADDITIONAL SAFETY INSTRUCTIONS FOR SANDERS 7 5 3 CAUTION RISK OF ELECTRIC SHOCK DO NOT OPEN 7 6 TECHNICAL DESCRIPTION 6 1 IDENTIFICATION 8 7 UNPACKING CHECKING 7 1 PACKAGING 9 7 2 WHAT S IN THE BOX 9 8 PREPARING THE SANDER 8 1 SWITCH 10 8 2 ABRASIVE DISC INSTALLATION REPLACEMENT 11 8 3 DUST EXTRACTION FACILITY 11 9 MAINTENANCE PARTS REPLACEMENT 12 10 TROUBLESHOO...

Page 4: ...re hired out when the guarantee period is 90 days from the date of purchase The guarantee is extended to 24 months for parts only This guarantee does not apply to normal wear and tear nor does it cover any damage caused by misuse careless or unsafe handling alterations accidents or repairs attempted or made by any personnel other than the authorised Draper warranty repair agent Note If the tool is...

Page 5: ...d power level 92 3dB A Vibration level 6 1m s2 Weight machine only 1 4kg 4 3 HANDLING STORAGE Although this machine is small in size care must still be taken when handling and lifting Dropping this machine will have an effect on the accuracy and may also result in personal injury This machine is not a toy and must be respected The environment will have a negative result on its operation if you are...

Page 6: ...roduce different vibration levels You should always refer to the specifications and relevant Health and Safety guide 10 DUST EXTRACTION If your tool is fitted with a dust extraction fitting always ensure that it is connected and being used with a dust extractor Vacuum cleaners can be used if suitable for the material being extracted 11 PROTECT YOURSELF FROM ELECTRIC SHOCK When working with power t...

Page 7: ...DDITIONAL SAFETY INSTRUCTIONS FOR SANDERS When using your Random Orbital Palm Sander follow these basic safety precautions WARNING Wear dust protection with sanders Exposure to dust can be detrimental to health Connect dust extraction equipment If the tool is provided for the connection of dust extraction and collecting equipment ensure these are connected and properly used 5 5 CAUTION RISK OF ELE...

Page 8: ...8 6 TECHNICAL DESCRIPTION 6 1 IDENTIFICATION On Off Rocker Switch Hand Grip BS Moulded Plug Cable Backing Pad ...

Page 9: ...the tool The packaging material should be retained at least during the guarantee period in case the machine needs to be returned for repair Warning Some of the packaging materials used may be harmful to children Do not leave any of these materials in the reach of children If any of the packaging is to be thrown away make sure they are disposed of correctly according to local regulations 7 2 WHAT S...

Page 10: ... to damage to the backing pad NOTE Excess pressure when sanding reduces the effectiveness of tool and will cause the motor to overload Do not overload this machine Replace abrasive discs when clogged with material or when surface edge has rips cracks or worn areas Inhalation of dust particles can be detrimental to health The dust outlet must be connected with a dust extraction machine NOTE Due to ...

Page 11: ...nd is pushed down fully covering the outlet To empty the box slide it off the machine over a waste recepticle remove the lid which is clipped over the box s rim VACUUM ADAPTER The vacuum adaptor attaches to the sander in the same manner as the collection box With the collection box removed attach the adapter to the sander Insert a vacuum cleaner nozzle to achieve efficient dust removal GENERAL SAN...

Page 12: ... working condition The motor must be correctly ventilated during tool operation For this reason avoid blocking the air inlets After use disconnect the tool from the power supply and vacuum the ventilation slots If the replacement of the supply cord is necessary this has to be done by the manufacturer or his agent in order to avoid a safety hazard ...

Page 13: ...HE MACHINE OFF AND REMOVE THE PLUG FROM THE POWER SUPPLY BEFORE CARRYING OUT ANY MAINTENANCE OR TROUBLE SHOOTING Motor does not start 1 Fuse 3 Other 1 Replace 5 Amp time delay fuse or reset circuit breaker Reduced sanding efficiency 1 Abrasive disc worn clogged or cracked 1 Replace abrasive disc 2 Have brushes replaced by an authorised service centre 3 Contact an authorised service centre 2 Brushe...

Page 14: ...ispose of Waste Electrical Electronic Equipment in with domestic rubbish For indoor use Do not expose to rain Warning Wear dust mask Warning Read instruction manuals before operating and servicing this equipment Warning Wear goggles Class II construction Double insulated ...

Page 15: ...posed of according to national regulations Contact your local authority for details of collection schemes in your area In all circumstances Do not dispose of power tools with domestic waste Do not incinerate Do not abandon in the environment Do not dispose of WEEE as unsorted municipal waste Waste Electrical Electronic Equipment ...

Page 16: ... U K Helpline 023 8049 4344 Sales Desk 023 8049 4333 General Enquiries 023 8026 6355 Service Warranty Repair Agent For aftersales servicing or warranty repairs please contact the Draper Tools Helpline for details of an agent in your local area YOUR DRAPER STOCKIST RDMC0416 drapertools com ...

Reviews: