background image

Section 13 -

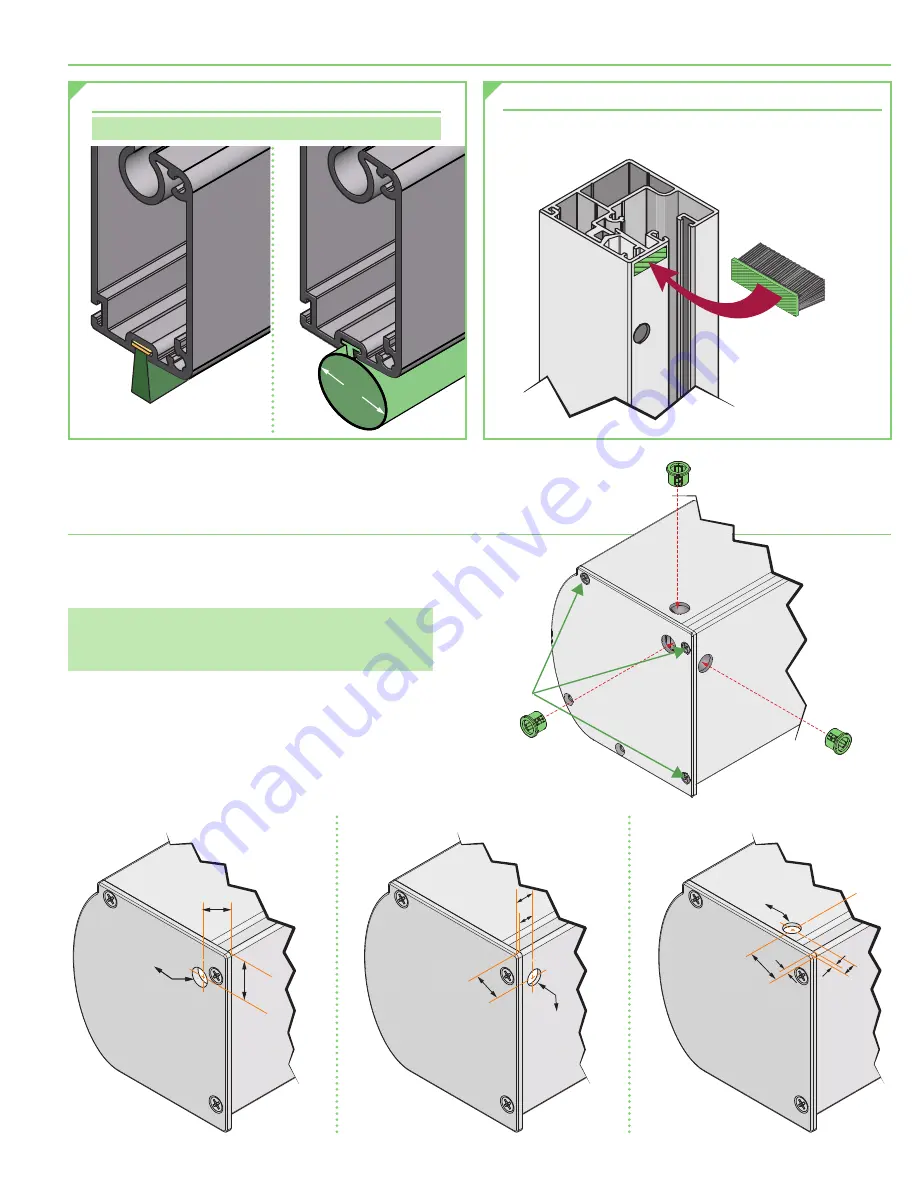
 Cable Exit

The FlexShade

®

 ZIP XL can be ordered with a cable exit 

pre-drilled in the top or back of the Headbox. If no 

Cable Exit is provided, installer must drill a Cable Exit. 

Please Note:

 If no Cable Exit is chosen, the cable is 

routed through the bottom of the headbox and down 

the side channel.

1.   Remove all 3 screws from the motor end of 

Headbox 

2.   Drill  a 

1/2

(13 mm)

 diameter hole in one of three 

locations suggested 

(Fig. 7-A – 7-C)

.

Remove 

three screws 

from Endcap.

BUSHING

(ONLY 1 REQUIRED)

BUSHING

(ONLY 1 REQUIRED)

BUSHING

(ONLY 1 REQUIRED)

Cable Exit 

Hole Ø:

(11mm)

Figure 6

(19mm)

(17mm)

Cable Exit:

SIDE

TOP

BAC

K


(13mm)

SIDE

 (Endc

ap)

FR

ON

T

FR

ON

T

(9.5mm)

(13mm)

(22mm)

1

(25mm)

Cable Exit:

TOP

TOP

BAC

K


(13mm)

SIDE

 (Endc

ap)

FR

ON

T

FR

ON

T

(9.5mm)

(13mm)

1

(30mm)

Cable Exit:

BACK

TOP

BAC

K


(13mm)

SIDE

 (Endc

ap)

FR

ON

T

FR

ON

T

FR

ON

T

Figure 7-A

Figure 7-B

Figure 7-C

Section 12 -

 Anti-Insect Brush Seals 

(Optional)

1.


 Remove the double-sided tape and 

apply to the Side Channels. 

(Fig. 5)

.

2.


 Install  brush 

seals on each 

of the Side 

Channels.

Insect Barrier 

Brush Seal

TOP O

SIDE 

CHAN

NEL

Figure 5

HE

M

BA

R

VINY

L BUL

B SEA

L

HEM B

AR LI

NER

(17mm

)

HE

M

BA

R

HEM B

AR

LINE

R

Section 11 -

 Hem Bar Liner 

(Optional)

Please Note:

 Liner is factory installed 

(if ordered)

.

page 9 of 11

FlexShade

®

 ZIP XL

Summary of Contents for FlexShade ZIP XL

Page 1: ...d IN 47385 draperinc com 765 987 7999 800 238 7999 2021 All Rights Reserved FORM FS_ZIPXL_Inst20 FlexShade ZIP XL XL exterior shading system ZIP detail creates weather shading barrier that protects against wind sun snow and insects to maintain a comfortable space INSTRUCTIONS INSTALLATION OPERATION If you have any difficulties installing or servicing your FlexShade ZIP XL call your dealer or Drape...

Page 2: ...adboxes pockets wall clips and other hardware must be installed level Unit must be level and square 6 Never leave the area while operating the unit during installation maintenance or normal operation unless it is secure and safe 7 Before testing or operation carefully inspect the entire area and path of the shade and areas underneath the shade to be sure no persons or objects are in the area 8 Tur...

Page 3: ... brackets are level and aligned 4 Attach Headbox to brackets and tighten Set Screws Fig 3 A 5 Mount the Side Channels Section 3 1 Attach Mounting Brackets to ceiling using 10 flat head screws installed flush with bracket USE ALL FOUR 4 mounting holes Fig 3 B 2 Attach Headbox to brackets and tighten Set Screws Fig 3 B 3 Mount the Side Channels Section 3 Caution Hem Bar does not retract into the Hea...

Page 4: ...d Pocket Optional FlexShade ZIP XL can also be installed in a pocket in ceiling 4 Mark wall or jamb and drill small pilot holes in mounting surface Please Note Recommended attachment of Side Channel to structure is minimum of every 24 61cm B A C DO NOT remove Neoprene cushions If they come off reattach with double sided tape SIDE CHANNEL COVER Jam b M ount Pilot Hole W all M ount Pilot Hole Wall M...

Page 5: ...ngaged in Headbo 2 Insert Zipper on one side of Hem Bar into Fabric Retainer in Side Channels 4 Attach Side Channel to mounting surface using appropriate fasteners IMPORTANT Side Channels must be installed parallel plumb and square with a tolerance of 1 8 3mm 5 Repeat Steps 2 4 for the other Side Channel 6 Re attach Side Channel Covers using the screws removed in Step 1 Please Note Failure to use ...

Page 6: ...e remaining Side Channel mounting location Please Note Installer is responsible for providing space and clearance to mount headbox above wall structure W A L L W A L L 2 51mm 1 Insert provided U Channel PN C090 061 into recessed cavity in building structure Secure the U Channel using appropriate hardware by others Please Note Installer is responsible for selecting mounting hardware appropriate for...

Page 7: ...tons until motor moves down then release Use UP and DOWN buttons to move shade to correct lower limit and press MY STOP 4 While motor is at lower limit hold UP and MY STOP buttons until motor moves up then release The shade should move to upper limit and stop 5 Next hold MY STOP button for five seconds until motor jogs 6 Put motor into USER MODE by pressing small programming button Fig 4 on the ba...

Page 8: ...ach limit switch must be set prior to connecting to system Motor must be installed so limit switches are pointed up or accessible 7 Operate shade to desired down stop position Set limit by turning proper socket toward to lower limit and to raise it 8 Operate shade to desired up stop position Set limit by turning proper screw toward to raise limit and to lower it Please Note Each full rotation of t...

Page 9: ...HING ONLY 1 REQUIRED Cable Exit Hole Ø 11mm Figure 6 19mm 17mm Cable Exit SIDE TOP BACK 13mm SIDE Endcap F R O N T F R O N T 9 5mm 13mm 22mm 1 25mm Cable Exit TOP TOP BACK 13mm SIDE Endcap F R O N T F R O N T 9 5mm 13mm 1 30mm Cable Exit BACK TOP BACK 13mm SIDE Endcap F R O N T F R O N T F R O N T Figure 7 A Figure 7 B Figure 7 C Section 12 Anti Insect Brush Seals Optional 1 Remove the double side...

Page 10: ...eadbox Height B 5 127mm 1 41mm Celing Mount Option Wall Mount Option Top View Down 8mm 5 127mm 3 92mm 5 127mm 1 41mm SHADE HEIGHT 7 184mm Ceiling Mounted Headbox with Jamb Mounted Side Channels Top View Down 5 127mm 3 92mm 1 41mm SHADE HEIGHT 8mm 7 184mm 5 127mm Wall Mounted Headbox with Deck Mount Option Wall Mount Option FlexShade ZIP XL page 10 of 11 ...

Page 11: ...8mm 6 152mm 1 25mm 1 44mm 2 57mm 1 25mm 1 41mm 9 5mm 1 41mm 19mm 2 51mm 1 25mm 5 127mm 5 127mm 5 127mm Curved Headbox Angled Headbox Optional Channel Adaptors Side Channel Dimensions Hem Bar Dimensions Headbox Dimensions 1 38mm 1 38mm 2 4mm 19mm C073 002 6mm 1 29mm 1 41mm 19mm 1 6mm 9 5mm C090 053 3mm 1 32mm 1 38mm C104 148 1 29mm 1 41mm 1 44mm 1 6mm 9 5mm 6mm C090 054 2 51mm 2 51mm 3 2mm C090 061...

Reviews: