OPERATION & USE
- 16 -
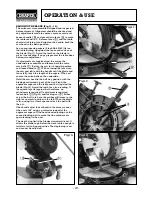
FILLER BLOCKS FOR CUTTING CROWN
MOULDINGS
The majority of crown mouldings have contact
surfaces of 52º and 38º to the rear surface of the
moulding. When joining the face of the filler block
these angles must be maintained. The following
illustrations show two methods that can be used when
cutting crown mouldings depending on how the filler
block is attached to the fence.
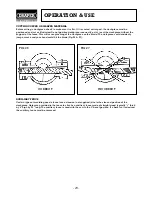
When the filler blocks are attached with the face of
the filler blocks pointing upwards, the moulding must
be placed on the table upside down (Fig.28).
VERTICAL BEVEL CUTTING
To make a mitre cut in a 2 x 4 workpiece in the
vertical position (on edge) a spacer, such as the
auxiliary fence (not supplied) described on the
previous page, is required. The fence is located in the
front fence position (Fig.30).
When the filler blocks are attached to the fence with
the face of the filler blocks pointing downwards, the
moulding must be placed on the table right side up.
This is the same position as it would be when nailed
between the ceiling and wall.
Make two filler blocks 10" long. Fasten blocks
securely to fence. For block face pointing downwards,
you may need to drill new fastener holes in the fence
(Fig.29).
Fig.28.
Fig.29.
Fig.30.
FENCE
FILLER BLOCK FACE
POINTING UPWARD
MOULDING
TABLE
52º
38º
FENCE
38º
FILLER BLOCK
FACE
POINTING
DOWNWARD
MOULDING
TABLE
FENCE
SPACE BLOCK
WORKPIECE
3
1
⁄
2
" (89mm)
1
5
⁄
8
" (41mm)
Summary of Contents for MS250
Page 22: ...NOTES 21 ...
Page 23: ...NOTES 22 ...


