1. Remove Appearance Panel
–
Note:
Panels may vary based on vehicle year. Using a flat head screwdriver remove (2) plastic appearance panels
from the driver side. (4) push pins per panel (8 push pins total). Then remove the (5) push pins from the center appearance panel. Finally remove
the remaining (2) push pins attaching the fascia tabs.
NOTE:
Return the center appearance panel and (5) push pins to the vehicle owner. All other
panels and push pins will be reinstalled in step 5.
2. Remove Bumper Bolts
–
Using a 12mm socket remove the (1) lower bolt and (1) inboard bolt from the bumper (each side) and return (4) bolts to
vehicle owner.
NOTE:
Leave the outer bolts attached to the vehicle.
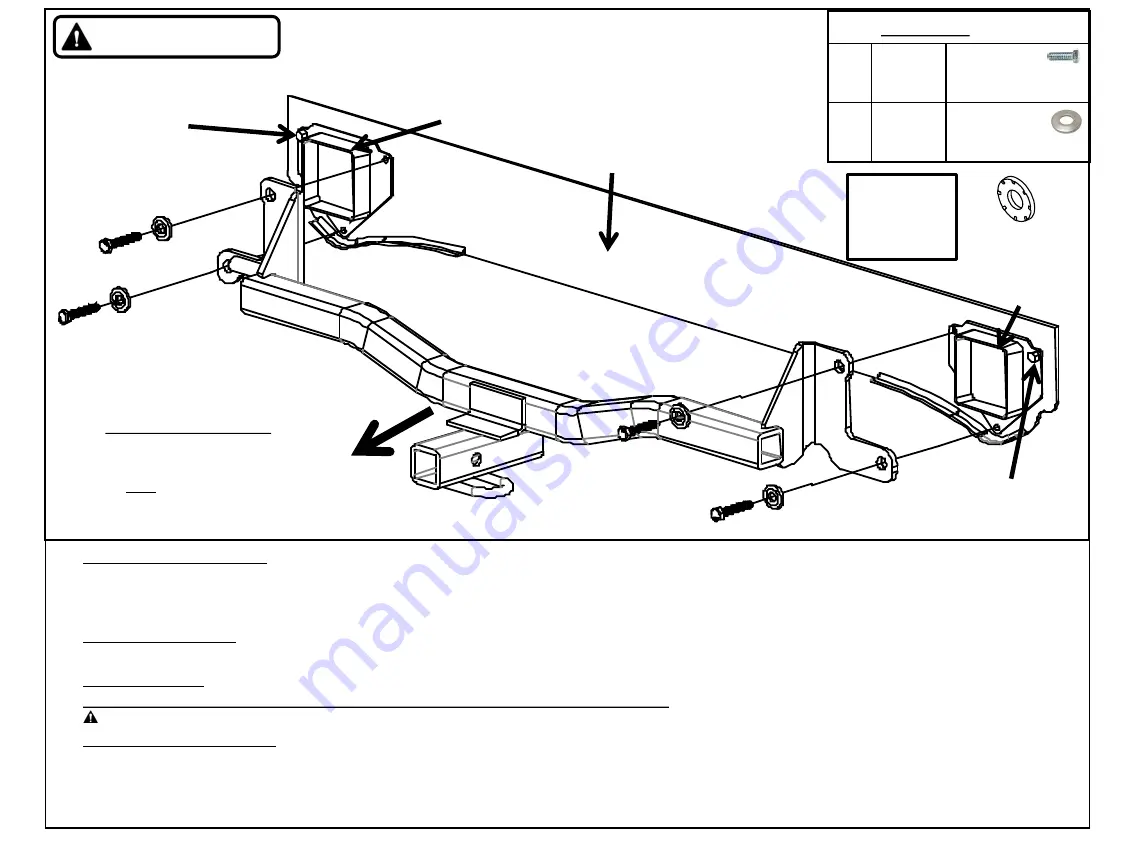
3. Hitch installation
–
Rotate the passenger side of the hitch over the exhaust and raise into position. Then install items
j
and
k
each side.
4. Torque Fasteners
–
Using a 13mm socket Torque all 8mm fasteners to 27 ft-lb (37 N-M)
5. Reinstall Appearance Panels
–
Reinstall the (2) driver side appearance panels removed in step one. Then reattach the (2) fascia tabs from step one.
Fastener Kit:
24971F
j
Qty. (4)
Hex Bolt
M8x1.25x30mm
CL10.9
k
Qty. (4)
Conical Washer
3/8”
Part# 01292006
Note: check hitch frequently, making sure all fasteners and ball are properly tightened. If hitch is removed, plug all holes in trunk pan or other body panels to prevent entry of water and
exhaust fumes. A hitch or ball which has been damaged should be removed and replaced. Observe safety precautions when working beneath a vehicle and wear eye protection. Do not cut
access or attachment holes with a torch. This product complies with safety specifications and requirements for connecting devices and towing systems of the state of New York, V.E.S.C.
Regulation V-5 and SAE J684.
Installation Instructions
PART NUMBERS: 24971, 77971, CQT24971
Proper torque is needed to keep the hitch secure to the vehicle when towing.
Always wear SAFETY GLASSES
when installing hitch
Fasteners
typical
both sides
Conical Washer
Teeth side
Against hitch
j
k
BULK HEAD
BUMPER
BUMPER
k
j
k
j
j
k
Outer Bolt
Do not Remove
Outer Bolt
Do not Remove
Authorized Drawbar Kit:
3593
(Sold Separately)
Drawbar must be used in the
RISE
position only.
Rear


