background image

Getting Started


Safety Instructions


Please make sure to read the following precautions and information before operating the 
treadmill. Failure to adhere to the following will void warranty  


Caution  

Warning 

During a service/cleaning the treadmill or for a period of non-operation, remove the 
power plug from the electrical outlet. Don’t dis-assemble the Motor Cover ASSY except 
permitted person.  
Never operate the treadmill in case that abnormal noise or damages are detected. Please 
Contact DRAX INC. Customer Support Center.  

• The owner of treadmill must inform all users of the safety instructions and the 

methods how to use treadmill correctly 

• Always operate the treadmill in accordance with the instructions 
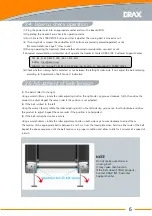
• During installation, Treadmill is to be horizontally aligned with ground and For 

Safety please make 2.5m space in treadmill rear side. 

• The treadmill must be installed in the environment where it is low humidity and 

low dust area. 

• Do not make operation until treadmill is normally installed.(refer to “Installation” 

instruction) 

• Before operating the treadmill, keep children or animals off treadmill. 
• The maximum weight supported by the treadmill is 180kg. 
• Do not use  the treadmill simultaneously more than 2 persons. 
• The user is to wear appropriate clothes and shoes during using the treadmill.  

Avoid the Baggy clothes for safety 

• Do not bend, or place heavy objects on the power cord. Stepping on or allowing 

the power cord to be crushed by a heavy object could result in electrical shock 
or fire. Do not remove the plug by pulling on the cord and do not handle the 
plug with wet hands. This could result in electric shock or fire. 

• Do not spill food or drink on the treadmill. 
• Regularly check the treadmill to keep it in the normally operation. 
• There shall be a safe space of 2,000 mm × 1,000 mm behind the treadmill. 

Summary of Contents for REDON NR20

Page 1: ...New REDON Series User s MANUAL Be sure to read the manual before using the product in order to use safely and correctly Please keep user manual at a place to be available easily...

Page 2: ...t Tension 6 3 How to use 7 3 1 Detail of Display Console 7 3 2 Display and Console 8 4 Function of Program 10 4 1 Main Screen 10 4 2 Wi Fi Setup 12 4 3 Bluetooth Setup 13 4 4 TV Setup 13 4 5 Mirroring...

Page 3: ...ake 2 5m space in treadmill rear side The treadmill must be installed in the environment where it is low humidity and low dust area Do not make operation until treadmill is normally installed refer to...

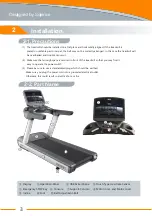
Page 4: ...d If the treadmill is placed on unstable pad or carpet the belt may not be correctly arranged In this case the treadmill will be overloaded and trouble can occur 2 Make sure that enough space is secur...

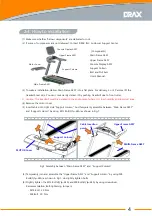
Page 5: ...e is M12 Bolt 30 N m M8 Bolt 20 N m 4 Cable Insertion point Fig 1 Assembly between Main Frame ASSY and Support Column MOTOR Cover Support Column MAIN Frame ASSY Upper Frame ASSY Motor Cover Console Di...

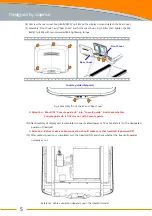
Page 6: ...ide rib is fitted or not with Console guide 9 After Assembly of display unit is completed connect cables power or TV cable and etc to the designated position of treadmill Attention Before make a cable...

Page 7: ...26 Jeonpa Ro 62 Beon Gil Manan Gu Anyang Si Kyeonggi Do KOREA 14086 NOTE Do not make over stress in running belt It may cause mal function If the belt doesn t fitted properly Contact DRAX INC Customer...

Page 8: ...be attached into your clothes and the other side magnetic should be attached into treadmill In case that magnetic side is detached from treadmill treadmill automatically stopped Attach magnetic side...

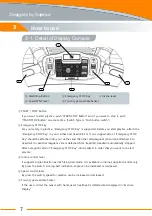
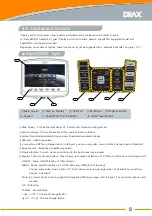
Page 9: ...ons They allows you to make a selection of TV USB or Smart phone mirroring and etc ON OFF Power ON OFF Button of Main Screen MENU Device Selection Button i e TV USB Mirroring HDMI for Set top box You...

Page 10: ...control is optimized for the user who want to run in treadmill SPEEDSYNC COMFORT button Speed control is optimized for the user who want to practice jogging walking mode Quick Speed Button There are 3...

Page 11: ...the USB terminal below the motion display window WORKOUT You can exercise with the built in target program You can exercise by choosing MANUAL FATBURN CARDIO PROGRAM INTERNET You can enjoy the web an...

Page 12: ...quick start button to get you started right away Language You can change your language When the power is turned off and on the default language is changed SETUP You can make settings for the equipmen...

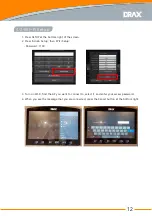
Page 13: ...2 Press Admin Setup then WiFi Setup Password 1100 3 Turn on Wi Fi find the AP you want to connect to select it and enter your access password 4 When you see the message that you are connected press th...

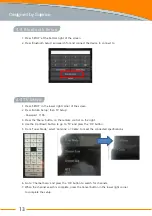
Page 14: ...d 1100 3 Press the Menu button on the remote control on the right 4 Use the Up Down button to go to TV and press the OK button 5 From Tuner Mode select Antenna or Cable to meet the connected specifica...

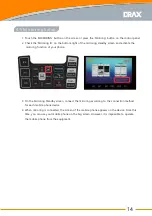
Page 15: ...mirroring function of your phone 3 On the Mirroring Standby screen connect the mirroring according to the connection method for each mobile phone device 4 When mirroring is connected the screen of the...

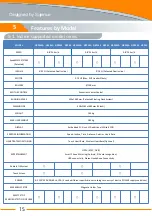
Page 16: ...xH WEIGHT 190 kg MAX USER WEIGHT 180 kg DISPLAY Embedded 21 5 inch LCD additional White 6 FND EXERCISE INFORMATION Speed Incline Time Distance Calories Heart Rate HEART RATE MONITORING Touch Heart Rat...

Page 17: ...Y Embedded 21 5 inch LCD additional White 6 FND EXERCISE INFORMATION Speed Incline Time Distance Calories Heart Rate HEART RATE MONITORING Touch Heart Rate Wireless Heart Rate Optional ENTERTAINMENT H...

Page 18: ...Part List 6 NR30SXA 17 NR30SXA...

Page 19: ...18 Part List 6...

Page 20: ...rtation charges prepaid accompanied by sufficient proof of purchase All returns must be pre autorized by DRAX This warranty does not extend t o any product or damage to a product caused by or attribut...

Page 21: ...DRAX Inc 26 Jeonpa ro 62Beon gil Manan gu Anyang si Gyeonggi do KOREA 14086 Tel 82 31 459 8530 Fax 82 31 459 8531 Web www draxfit com E mail drax draxfit com...

Reviews: