background image


Vigor2955 Quick Start Guide


4


This page is left blank. 


Summary of Contents for Vigor2955

Page 1: ...Vigor2955 Quick Start Guide i ...

Page 2: ...Vigor2955 Quick Start Guide ii ...

Page 3: ...Vigor2955 Quick Start Guide iii Vigor2955 Dual WAN SSL VPN Appliance Quick Start Guide Version 1 0 Date 25 09 2009 ...

Page 4: ... on conservation of the environment Warranty We warrant to the original end user purchaser that the router will be free from any defects in workmanship or materials for a period of two 2 years from the date of purchase from the dealer Please keep your purchase receipt in a safe place as it serves as proof of date of purchase During the warranty period and upon proof of purchase should the product ...

Page 5: ...o radio communications However there is no guarantee that interference will not occur in a particular installation If this equipment does cause harmful interference to radio or television reception which can be determined by turning the equipment off and on the user is encouraged to try to correct the interference by one of the following measures z Reorient or relocate the receiving antenna z Incr...

Page 6: ...Vigor2955 Quick Start Guide vi ...

Page 7: ... Installation 5 2 2 Printer Installation 6 3 Configuring Web Pages 11 3 1 Basic Configuration 11 4 Trouble Shooting 17 4 1 Checking the Hardware Status 17 4 2 Checking the Network Connection Settings on Your Computer 18 4 3 Pinging the Router from Your Computer 20 4 4 Checking the ISP Settings 21 4 5 Resetting the Router to Factory Default Settings 23 4 6 Contacting Your Dealer 24 ...

Page 8: ......

Page 9: ...irewall policy with ease CSM Content Security Management provides users control and management in IM Instant Messenger and P2P Peer to Peer more efficiency than before By the way DoS DDoS prevention and URL Web content filter In addition Vigor2955 supports USB interface for connecting USB printer to share printer or 3G USB Modem for accessing Internet F Fe ea at tu ur re es s f fo or r V Vi ig go ...

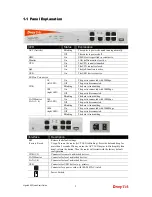
Page 10: ...Blinking The data is transmitting On The port is connected with 100Mbps Off The port is disconnected 100 left LED Blinking The data is transmitting On The port is connected with 1000Mbps Off The port is disconnected LAN Monitor LAN 1 4 1000 right LED Blinking The data is transmitting Interface Description RST Factory Reset Restore the default settings Usage Turn on the router ACT LED is blinking P...

Page 11: ...Vigor2955 Quick Start Guide 3 1 1 2 2 P Pa ac ck ka ag ge e C Co on nt te en nt t nQuick Start Guide oCD pRJ 45 Cable Ethernet q UK type power cord The maximum power consumption is 17 Watt ...

Page 12: ...Vigor2955 Quick Start Guide 4 This page is left blank ...

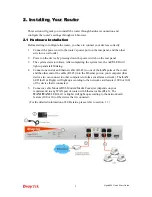
Page 13: ...tarts to initiate After completing the system test the ACT LED will light up and start blinking 4 Connect one end of an Ethernet cable RJ 45 to one of the LAN ports of the router and the other end of the cable RJ 45 into the Ethernet port on your computer that device also can connect to other computers to form a small area network The LAN LED Left or Right will light up according to the network ca...

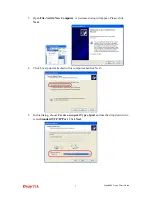
Page 14: ...All the PCs connected this router can print documents via the router The example provided here is made based on Windows XP 2000 For Windows 98 SE please visit www draytek com Before using it please follow the steps below to configure settings for connected computers 1 Connect the printer with the router through USB port 2 Open Start Settings Printer and Faxes ...

Page 15: ...a New Computer A welcome dialog will appear Please click Next 4 Click Local printer attached to this computer and click Next 5 In this dialog choose Create a new port Type of port and use the drop down list to select Standard TCP IP Port Click Next ...

Page 16: ...ollowing dialog type 192 168 1 1 router s LAN IP in the field of Printer Name or IP Address and type IP_192 168 1 1 as the port name Then click Next 7 Click Standard and choose Generic Network Card 8 Then in the following dialog click Finish ...

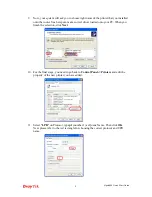
Page 17: ...rrect driver loaded onto your PC When you finish the selection click Next 10 For the final stage you need to go back to Control Panel Printers and edit the property of the new printer you have added 11 Select LPR on Protocol type p1 number 1 as Queue Name Then click OK Next please refer to the red rectangle for choosing the correct protocol and UPR name ...

Page 18: ...or other additional functions are not supported If you do not know whether your printer is supported or not please visit www draytek com to find out the printer list Open Support FAQ find out the link of Printer Server and click it then click the What types of printers are compatible with Vigor router link Note 2 Vigor router supports printing request from computers via LAN ports but not WAN port ...

Page 19: ...our computer to get IP dynamically from the router or set up the IP address of the computer to be the same subnet as the default IP address of Vigor router 192 168 1 1 For the detailed information please refer to the later section Trouble Shooting of the guide 2 Open a web browser on your PC and type http 192 168 1 1 A pop up window will open to ask for username and password Please type admin as t...

Page 20: ...ter the login password on the field of New Password and retype it on the field of Confirm Password Then click Next to continue 5 On the next page as shown below please select the WAN interface that you use Choose Auto negotiation as the physical type for your router Then click Next for next step ...

Page 21: ...rnet access type according to the information from your ISP For example you should select PPPoE mode if the ISP provides you PPPoE interface Then click Next for next step PPPoE if you click PPPoE or PPPoA as the protocol please manually enter the Username Password provided by your ISP Then click Next ...

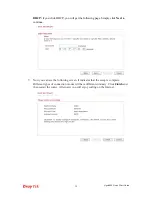
Page 22: ... following page Please type in all the information originally provided by your ISP Then click Next for next step Static IP if you click Static IP you will get the following page Please type in the IP address information originally provided by your ISP Then click Next for next step ...

Page 23: ...llowing page Simply click Next to continue 7 Now you can see the following screen It indicates that the setup is complete Different types of connection modes will have different summary Click Finish and then restart the router Afterward you will enjoy surfing on the Internet ...

Page 24: ...Vigor2955 Quick Start Guide 16 This page is left blank ...

Page 25: ... Router to Factory Default Settings If all above stages are done and the router still cannot run normally it is the time for you to contact your dealer for advanced help 4 4 1 1 C Ch he ec ck ki in ng g t th he e H Ha ar rd dw wa ar re e S St ta at tu us s Follow the steps below to verify the hardware status 1 Check the power line and WLAN LAN cable connections Refer to 2 1 Hardware Installation f...

Page 26: ...section if the link is stilled failed please do the steps listed below to make sure the network connection settings is OK F Fo or r W Wi in nd do ow ws s The example is based on Windows XP As to the examples for other operation systems please refer to the similar steps or find support notes in www draytek com 1 Go to Control Panel and then double click on Network Connections 2 Right click on Local...

Page 27: ...tically and Obtain DNS server address automatically F Fo or r M Ma ac cO Os s 1 Double click on the current used MacOs on the desktop 2 Open the Application folder and get into Network 3 On the Network screen select Using DHCP from the drop down list of Configure IPv4 ...

Page 28: ...ter correctly F Fo or r W Wi in nd do ow ws s 1 Open the Command Prompt window from Start menu Run 2 Type command for Windows 95 98 ME or cmd for Windows NT 2000 XP Vista The DOS command dialog will appear 3 Type ping 192 168 1 1 and press Enter If the link is OK the line of Reply from 192 168 1 1 bytes 32 time 1ms TTL 255 will appear 4 If the line does not appear please check the IP address setti...

Page 29: ...ccess page and then check whether the ISP settings are set correctly Click Details Page of WAN1 WAN2 to review the settings that you configured previously F Fo or r P PP PP Po oE E U Us se er rs s 1 Check if the Enable option is selected 2 Check if Username and Password are entered with correct values that you got from your ISP ...

Page 30: ... is selected 2 Check if WAN IP Network Settings is set appropriately 3 Check if IP Address Subnet Mask and Gateway are set correctly must identify with the values from your ISP if you choose Specify an IP address F Fo or r P PP PT TP P L L2 2T TP P U Us se er rs s 1 Check if the Enable option for PPTP Link is selected ...

Page 31: ...fore Make sure you have recorded all useful settings before you pressing The password of factory default is null S So of ft tw wa ar re e R Re es se et t You can reset the router to factory default via Web page Go to System Maintenance and choose Reboot System on the web page The following screen will appear Choose Using factory default configuration and click OK After few seconds the router will ...

Page 32: ...he router again to fit your personal request 4 4 6 6 C Co on nt ta ac ct ti in ng g Y Yo ou ur r D De ea al le er r If the router still cannot work correctly after trying many efforts please contact your dealer for further help right away For any questions please feel free to send e mail to support draytek com ...

Reviews: