


VigorBX 2000 Series User’s Guide
326
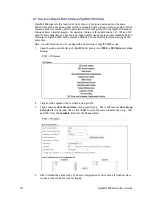
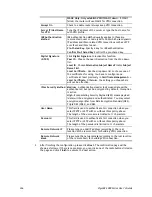
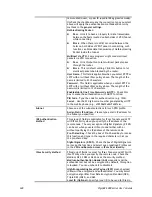
WAN2 Only: Only establish VPN if WAN1
down
- If WAN1
failed, the router will use WAN2 for VPN connection.
Always On
Check to enable router always keep VPN connection.
Server IP/Host Name
for VPN
Type the IP address of the server or type the host name for
such VPN profile.
IKE Authentication
Method
IKE Authentication Method usually applies to those are
remote dial-in user or node (LAN to LAN) which uses dynamic
IP address and IPsec-related VPN connections such as L2TP
over IPsec and IPsec tunnel.
Pre-Shared Key-
Specify a key for IKE authentication.
Confirm Pre-Shared Key-
Confirm the pre-shared key.
Digital Signature
(X.509)
Click
Digital Signature
to invoke this function.
Peer ID
– Choose the peer ID selection from the drop down
list.
Local ID
– Choose
Alternative Subject Name First
or
Subject
Name First
.
Local Certificate
– Use the drop down list to choose one of
the certificates for using. You have to configure one
certificate at least previously in
Certificate Management >>
Local Certificate.
Otherwise, the setting you choose here
will not be effective.
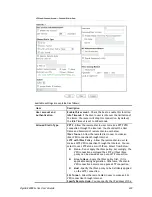
IPsec Security Method Medium -
Authentication Header (AH) means data will be
authenticated, but not be encrypted. By default, this option
is active.
High -
Encapsulating Security Payload (ESP) means payload
(data) will be encrypted and authenticated. You may select
encryption algorithm from Data Encryption Standard (DES),
Triple DES (3DES), and AES.
User Name
This field is used to authenticate for connection when you
select PPTP or L2TP with or without IPsec policy above.
The length of the user name is limited to 11 characters.
Password
This field is used to authenticate for connection when you
select PPTP or L2TP with or without IPsec policy above.
The length of the password is limited to 11 characters.
Remote Network IP
Please type one LAN IP address (according to the real
location of the remote host) for building VPN connection.
Remote Network
Mask
Please type the network mask (according to the real location
of the remote host) for building VPN connection.
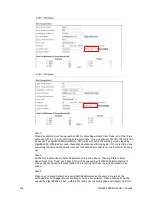
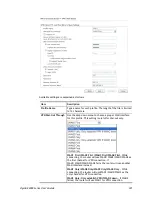
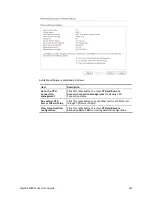
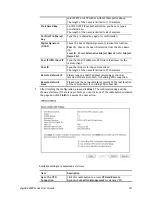
3.
After finishing the configuration, please click
Next.
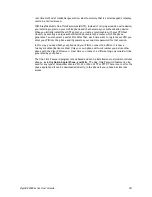
The confirmation page will be
shown as follows. If there is no problem, you can click one of the radio buttons listed on
the page and click
Finish
to execute the next action.
Summary of Contents for VigorBX 2000 Series
Page 1: ......
Page 12: ......
Page 62: ...VigorBX 2000 Series User s Guide 50 This page is left blank ...
Page 122: ...VigorBX 2000 Series User s Guide 110 ...
Page 145: ...VigorBX 2000 Series User s Guide 133 ...
Page 163: ...VigorBX 2000 Series User s Guide 151 ...
Page 180: ...VigorBX 2000 Series User s Guide 168 ...
Page 222: ...VigorBX 2000 Series User s Guide 210 This page is left blank ...
Page 248: ...VigorBX 2000 Series User s Guide 236 This page is left blank ...
Page 330: ...VigorBX 2000 Series User s Guide 318 This page is left blank ...
Page 419: ...VigorBX 2000 Series User s Guide 407 ...
Page 428: ...VigorBX 2000 Series User s Guide 416 The items categorized under OTHERS ...
Page 454: ...VigorBX 2000 Series User s Guide 442 This page is left blank ...
Page 467: ...VigorBX 2000 Series User s Guide 455 ...
Page 532: ...VigorBX 2000 Series User s Guide 520 This page is left blank ...
Page 574: ...VigorBX 2000 Series User s Guide 562 This page is left blank ...
Page 597: ...VigorBX 2000 Series User s Guide 585 ...
Page 604: ...VigorBX 2000 Series User s Guide 592 ...
Page 608: ...VigorBX 2000 Series User s Guide 596 ...
Page 610: ...VigorBX 2000 Series User s Guide 598 This page is left blank ...


