• Read all instructions.
• Do not touch hot surfaces. Use lifting handle to remove basket contents.
• To protect against electrical shock, do not immerse appliance in water or other liquid.
• Close supervision is necessary when any appliance is used near children.
• Unplug from outlet when not in use and before cleaning. Allow to cool before putting on or taking
off parts.
• Do not operate any appliance with a damaged cord or plug or after the appliance malfunctions or has
been damaged in any manner. Call Handi-Craft’s Customer Service at 1-800-778-9001.
• Misuse of the product may cause potential injury.
• The heating element surface is subject to residual heat after use.
• The use of accessory attachments not recommended by Handi-Craft Company may cause injuries.
• Do not use outdoors. Household and indoor use only.
• Do not let cord hang over edge of table or counter or touch hot surfaces.
• Do not place on or near a hot gas or electric burner or in a heated oven.
• Extreme caution must be used when moving an appliance containing hot liquids.
• To operate, plug cord into wall outlet. To disconnect, turn any control to “off”, then remove plug from
wall outlet.
• Do not use appliance other than for intended use.
• Never immerse the warmer or power cord in water.
• When in use, the warmer contains hot water. Be careful to avoid spilling or splashing any water on
yourself when removing contents from the warmer.
• Before serving, be sure food is at a safe temperature.
• Warming food for long periods is not recommended.
• Before feeding, pour a few drops of the liquid content from the baby bottle on to the back of your hand
to test the temperature.
CAUTION: Always check the content temperature of the bottle or the small jar before feeding your baby.
• This appliance has a polarized plug (one blade is wider than the other). To reduce the risk of electric
shock, this plug is intended to fit into a polarized outlet only one way. If the plug does not fit fully into the
outlet, reverse the plug. If it still does not fit, contact a qualified electrician. Do not attempt to modify the
plug in any way.
• Before servicing, unplug cord from wall outlet. Do not leave cord within child’s reach.
2
• Always UNPLUG the warmer before removing and installing the reservoir.
Do not add water directly to the chamber, only add water to the reservoir. Do not remove the
reservoir while working.
• The preheating of the appliance is not necessary.
• A short power-supply cord is provided to reduce the risk resulting from becoming entangled
in or tripping over a longer cord.
CAUTION: Do not use an extension cord.
• Use Distilled Water Only. Using tap water may shorten the life of the unit.
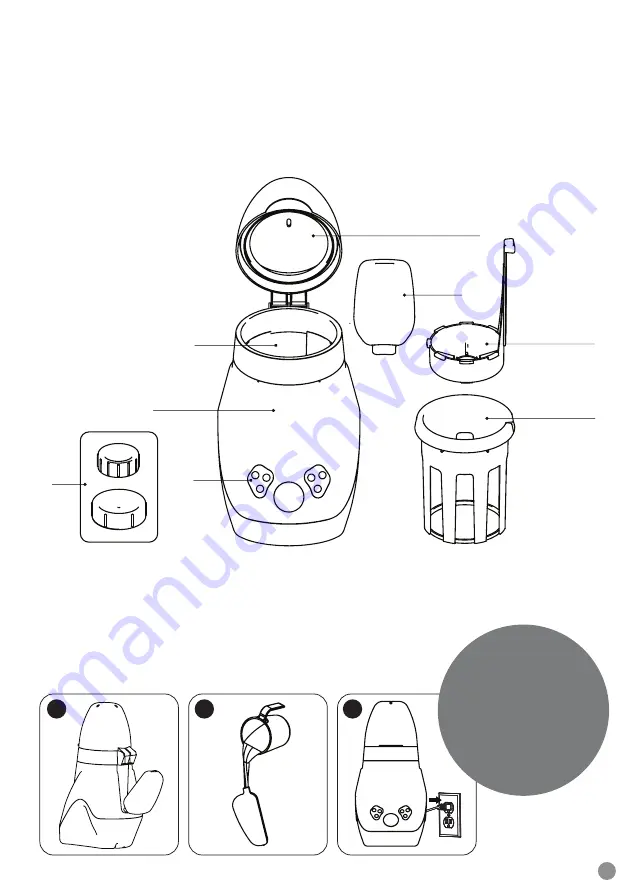
Parts of the Deluxe Bottle
Warmer with Sterilizer:
1. Deluxe Warmer
2. Controls
3. Warming Chamber
4. Lid
5. Basket
6. Basket Riser
7. Reservoir
8. Storage Caps
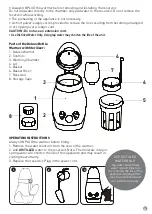
OPERATING INSTRUCTIONS
Always UNPLUG the warmer before filling.
1. Remove the water reservoir from the rear of the warmer.
2. Add DISTILLED water to the reservoir. Note: The minerals in tap or
spring water will shorten the life of this appliance and may result in
voiding the warranty.
3. Replace the reservoir. Plug in the power cord.
5
6
7
4
1
8
3
2
1
3
2
USE DISTILLED
WATER ONLY!
Tap water and bottled
water contain minerals
that shorten the life of this
appliance. Damage from
use of non-distilled water
will void the warranty.


