background image

Start the 

DreamUp software

on your computer.

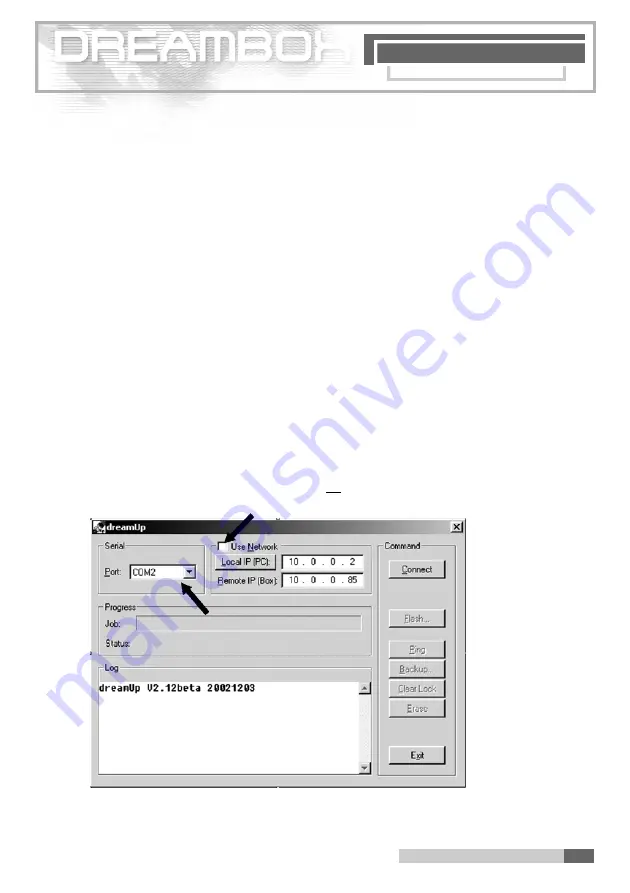
Select the COM interface which you have connected with  your 

D r e a m b o x

.

M a ke  sure that the  ch e ckbox 

"Use Network”

is n o t t i cke d .

You have now configured the softwa re according to your needs.

D R E A M U P

2 7 .D r e a m U p

71

2 7 . D reamUp - operating softwa re update

You can obtain  the DreamUp softwa re and the operating softwa re from 

w w w. d m 5 6 0 0 . d e

.

!!!!   Please study these instructions thoroughly before you begin   !!!!

In order to connect the Dreambox with your computer, you need  a PC with a serial interface
(COM1 or COM2) and a null modem  cable. In  these instructions we assume that  you create a
connection to your  Dreambox via the COM1 interface. If many questions  arise, ask your dealer
for assistance, or contact  our technical hotline at 

w w w. d r e a m - m u l t i m e d i a - t v. d e

.

The unit is switched off. Please remove all cables from your Dreambox.
Plug only the serial cable into your Dreambox.

2 7 . 1 D reamUp - preparing the softwa re

2 7 .   D r e a m U p

Summary of Contents for DM 5600-S

Page 1: ...I N H A L T 3 I n ha lt s ver ze ic hnis Bedienungsanleitung Instruction Manual Mode d emploi...

Page 2: ...x PCMCIA Schnittstelle f r CA Module zum Empfang von freien und verschl sselten ASTRA und EUTELSAT DVB Programmen 1x Smartcard Schnittstelle RF Modulator Segment Anzeige Rev 1 0_dm5k6_dd Deutsche Vers...

Page 3: ...1 Fer nbedienung 1 Fernbedienung 3 H I L P R T U A C B D E F G N V K J S Q O M...

Page 4: ...2 G er te Ansichten 2 Ger te Ansichten 4...

Page 5: ......

Page 6: ...8 Audio Video Einstellungen 19 19 Jugendschutz Parental Lock 20 20 Common Interface 20 21 Eigene Bouquets Favoriten erstellen verwalten 21 22 Aktivieren des Expert Mode 22 22 1 Skip Confirmation nur i...

Page 7: ...ie Uhrzeit im Display angezeigt Durch nochmaliges Dr cken der Power Taste schalten Sie Ihre Dreambox wieder ein Reboot Now Startet das Betriebssystem neu Goto Standby Ihre Dreambox f hrt in den Ruhezu...

Page 8: ...il nach oben Taste Ist kein OSD Men auf Ihrem Fernsehger t gew hlt sichtbar schaltet die Pfeil nach oben Taste zum n chsten Service Sender Befinden Sie sich in einer Kanalliste benutzen Sie diese Tast...

Page 9: ...ger t gew hlt sichtbar Sie befinden sich im TV Modus schaltet die Rote Options Taste direkt in den EPG des jeweils gew hlten Services Senders Bedenken Sie dass nicht jeder Sender ein EPG Electronic Pr...

Page 10: ...lt sichtbar Sie befinden sich im TV oder Radio Modus bringt die INFO Taste den Infobar hervor W hrend der Infobar auf dem Bildschirm ist k nnen Sie durch nochmaliges Dr cken der INFO Taste direkt in d...

Page 11: ...Sie befinden sich im TV Modus bringt die TV Taste die zuletzt gew hlte Kanalliste hervor Befinden Sie sich im Radio Modus schaltet die TV Taste in den TV Modus zur ck Radio Taste Ist kein OSD Menu au...

Page 12: ...ten Stellen Sie keine Vasen oder andere mit Fl ssigkeit gef llten Beh ltnisse auf das Ger t Das Ger t darf keinem Tropf oder Spritzwasser ausgesetzt werden Es d rfen keine brennbaren Gegenst nde wie K...

Page 13: ...umgehend vom Netz zu trennen wenn es Feuchtigkeit ausgesetzt wurde oder Feuchtigkeit eingedrungen ist Das Ger t ist umgehend vom Netz zu trennen wenn starke u ere Besch digungen festgestellt werden Se...

Page 14: ...V und falls vorhanden mit einem Videorecorder oder DVD Player Scartbuchse VCR Stecken Sie das Netzanschlusskabel in eine geeignete Steckdose 230V 50Hz 7 1 HIFI Verst rker 7 1 1 Analog Um Ihre Dreambox...

Page 15: ...finden sich im TV oder Radio Modus es ist kein OSD Men gew hlt sichtbar Dr cken Sie die Dream Taste navigieren Sie auf den Men punkt Einstellungen und best tigen Sie Ihre Auswahl mit der OK Taste Das...

Page 16: ...te Navigieren Sie bei Bedarf auf die angezeigten Satelliten und ndern diese ggf ab Haben Sie in der Satellitenkonfiguration die Option mehrere Satelliten mit DiSEqC Rotor gew hlt m ssen Sie danach im...

Page 17: ...e den unterlegten Service Sender aus Durch dr cken auf die EXIT Taste verlassen Sie die Kanalliste Ist die Kanalliste sichtbar haben Sie die M glichkeit dessen Ansicht Inhalt zu ndern Die Gelbe Option...

Page 18: ...er Lesen Sie den Abschnitt 5 Wichtige Hinweise zur Bedienung bevor Sie anfangen Dr cken Sie die Dream Taste navigieren Sie auf den Men punkt Videorecorder und best tigen Sie Ihre Auswahl mit der OK Ta...

Page 19: ...Bedienung bevor Sie anfangen Dr cken Sie die Gelbe Options Taste um in den Einstellmodus zu gelangen In diesem Modus stellen Sie die u eren Ecken des Videotextfensters ein Dr cken Sie die Rote Option...

Page 20: ...n Sie die Dream Taste navigieren Sie auf den Men punkt Einstellungen navigieren Sie auf den Men punkt System Settings navigieren Sie auf den Men punkt A V Settings und dr cken Sie jedes Mal die OK Tas...

Page 21: ...Dream oder Rote Options Taste Setzen Sie einen Haken in das Feld vor Setup lock so k nnen Sie durch Vergabe eines vierstelligen Codes Ihrer Wahl das Men Einstellungen gegen Zugriff sch tzen Speichern...

Page 22: ...n Sie die Gr ne Options Taste um Ihre Einstellung zu speichern Um zu verifizieren ob Ihr Bouquet erstellt wurde gehen Sie auf den Men punkt Edit bou quets und dr cken die OK Taste Dann w hlen Sie den...

Page 23: ...as Menu Einstellungen mit der EXIT Taste so dass Sie das OSD Hauptmen erreichen Dann w hlen Sie wieder den Men punkt Einstellungen Sie sehen jetzt den neuen Men punkt Expert Setup 22 1 Skip Confirmati...

Page 24: ...e Skin zu aktivieren Ein neues Skin wird erst nach einem Reboot aktiv 24 Fernbedienung Remote Control nur im Expert Mode Lesen Sie den Abschnitt 5 Wichtige Hinweise zur Bedienung und den Abschnitt 22...

Page 25: ...r OK Taste setzen Sie k nnen nun bestimmen an welchen Tagen dies geschehen soll indem Sie wieder mit der OK Taste ein Kreuz in die Felder vor den jeweiligen Tagen setzen Die Start und Endzeit k nnen S...

Page 26: ...erbindung zur Dreambox herstellen Treten zu viele Fragen auf wenden Sie sich bitte vertrauensvoll an Ihren H ndler oder an unse re technische Hotline unter Kontakte auf www dream multimedia tv de Das...

Page 27: ...D reamUp 27 2 DreamUp Verbindung herstellen Nun Klicken Sie auf Connect Die Software zeigt Ihnen mit der Statusmeldung an dass sie f r eine Verbindung vorbereitet ist Schalten Sie jetzt Ihre Dreambox...

Page 28: ...hen Ihrer Dreambox vor Verfolgen Sie den Status Das Display zeigt die Laufschrift 5600 boot So sieht es aus wenn die Software eine Verbindung zu Ihrer Dreambox hergestellt hat 27 3 DreamUp Backup Funk...

Page 29: ...reamUp Nach dem Klick ffnet sich folgendes Fenster Hier k nnen Sie einen Dateinamen f r Ihr zu sicherndes Image w hlen und abspeichern Nachdem Sie auf Speichern geklickt haben wird die Betriebssoftwa...

Page 30: ...e Meldung von der Software wie folgt Best tigen Sie diese Meldung mit einem Klick auf OK 27 4 DreamUp Betriebssoftware l schen Klicken Sie auf Erase um die vorhandene Betriebssoftware Image zu l schen...

Page 31: ...27 4 DreamUp 30 D R E A M U P 2 7 4 Dr eamUp Verfolgen Sie den Status Hier sehen Sie die Meldung dass das L schen Erase erfolgreich abgeschlossen ist Klicken Sie auf OK...

Page 32: ...E A M U P 2 7 5 Dr eamUp 27 5 DreamUp Betriebssoftware flashen Klicken Sie auf Flash Sie werden nun nach der Betriebssoftware Image gefragt die Sie aufspielen m chten W hlen Sie Ihr Image aus und kli...

Page 33: ...p 32 D R E A M U P 27 5 D reamUp Danach wird die Betriebssoftware auf Ihre Dreambox hochgeladen Verfolgen Sie den Status Ist das Hochladen beendet wird der Flash Ihrer Dreambox gel scht Verfolgen Sie...

Page 34: ...mUp D R E A M U P 27 5 D reamUp Das Hochgeladene Image wird gepr ft Verfolgen Sie den Status Nachdem das Flashen beendet ist bekommen Sie von der Software eine Meldung dass alles in Ordnung ist Klicke...

Page 35: ...iehen Sie das Serielle Kabel heraus Warten Sie 30 Sekunden Stecken Sie den TV Scart Stecker und das Koaxialkabel Satellitenanlage in Ihre Dreambox Schalten Sie Ihre Dreambox ein Sofort nach dem Einsch...

Page 36: ...quet Listen indirect unlimitiert EPG Unterst tzung electronic program guide Unterst tzung von mehrfach LNB Umschaltung DiSEqC adaptierbare OSD in vielen Sprachen Skin Unterst tzung SPDI F optischer An...

Page 37: ...Ausgang Analog Ausgangspegel L R 0 5 Vss an 600 Ohm THD 60 dB 1 Khz bersprechen 65 dB Ausgang Digital Ausgangspegel 0 5 Vss an 75 Ohm Abtastfrequenzen 32 kHz 44 1 kHz 48 kHz S PDIF Ausgang optisch AC...

Page 38: ...Abschaltung im Standby Mode Anzahl aktiver Satellitenpositionen DiSEqC 1 0 1 2 SAT POSITION SAT OPTION DiSEqC Rotor Steuerung Leistungaufnahme 20W im Betrieb horizontal Polarisation 400mA LNB Strom 1...

Page 39: ...ce CI ist folgender F r die vielen kostenpflichtigen Fernseh und Radioprogramme Internet oder Software Angebote gibt es eine einheitliche Schnittstelle Damit Sie mit den Satelliten Recei vern Irdeto C...

Page 40: ...ehe im Gegensatz dazu unter Analog Die neuesten digitalen Satelliten Receiver haben die Zukunft somit implementiert DiSEqC Digital Satellite Equipment Control sprich deis ck entwickelt von Philips f r...

Page 41: ...c Versatile steht f r vielseitig DSP Digital Sound Processor Ein Audio Verst rker mit Digital Eing ngen zur Verarbeitung des AC3 Tonsignals EPG Electronic Program Guide Der elektronische Programmf hre...

Page 42: ...Low Noise Converter Speisesystem Setzt die Downlink Satellitenfrequenzen in die 1 Sat ZF um Empfangsteil an oder in der Satellitenantenne der die hohen Frequenzen der Satelliten empf ngt verst rkt und...

Page 43: ...einer viertel halben oder ganzen Stunde wird derselbe Film auf verschiedenen Kan len aufs neue gesendet OSD On Screen Display Beim Bedienen des Receivers werden die Funktionen als Bildschirm Men ins F...

Page 44: ...lau besitzen und so direkt gesteuert werden k nnen RS232 Eine weit verbreitete Schnittstelle zwischen Computern und anderen seriellen Ger ten wie Modems Druckern und M usen ber den RS232 Anschluss bei...

Page 45: ...t bietet USB Universal Serial Bus Ein offener lizenzfreier plug and play tauglicher serieller Bus f r den Anschluss von Ger ten die bis zu 12 MBits Sekunde verarbeiten aber auch f r langsamere Ger te...

Page 46: ...Access Modulen verschiedener Hersteller Hier kann man zwischen ein oder zwei Common Interface Slots w hlen Auch sie kann m helos nach ger stet werden Die Multi Access Module geben die gr sstm gliche...

Page 47: ...N T I E 3 0 Ga ra n t i e s ch e i n G A R A N T I E S C H E I N 30 Garantieschein Ger tetyp Model Ser Nr Mac Nr Service Bericht Adresse des Endkunden Name Stra e PLZ Ort Adresse des H ndlers Name Str...

Page 48: ...SetTopbox with 2x PCMCIA interfacefor CA modules for receiving clear and encoded ASTRA and EUTELSAT DVB programmes 1x Smartcard interfaceRF modulatorSegment display English Dreambox DM5600S Instructio...

Page 49: ...H I L P R T U A C B D E F G N V K J S Q O M 1 Remote contro l 49 1 Remote control...

Page 50: ...2 Dreambox views 50 2 Dre ambo x views...

Page 51: ...o settings 65 19 Parental Lock 66 20 Common Interface 66 21 Edition and management of own Bouquets favourites 67 22 Activating the Expert mode 68 22 1 Skip confirmation only within Expert mode 68 22 2...

Page 52: ...chosen and confirm with OK To put your Dreambox into Standby mode briefly press the Power key The display shows the time To re activate your Dreambox press the Power key again Reboot Now Re starts th...

Page 53: ...he last Channel list chosen on the screen with the OK key and you can navigate as usual Up arrow key When no OSD menu is displayed on your screen you can switch to the next service with the Up arrow k...

Page 54: ...ectly to the EPG of the chosen service with the Red Option key Please consider that not every service sends an EPG Electronic Programm Guide Green Option key The functions of this key change depending...

Page 55: ...up the Info bar While the Info bar is on the screen you can access the EPG information of the chosen service by pressing once again the INFO key To stop the EPG information either press the INFO key...

Page 56: ...ode without any OSD menu displayed on your screen you can call up the last chosen Channel list with the TV key When you are in the radio mode you can switch back to the TV mode with this key Radio key...

Page 57: ...ed The cover of the unit must not be covered and there must be sufficient distance from other equipment The ventilation ports of the device must always remain unobstructed so that the warm air can be...

Page 58: ...e The unit must immediately be disconnected from the mains power supply if it is exposed to dampness or if dampness penetrates it The unit must immediately be disconnected from the mains power supply...

Page 59: ...r with a Scart cable to your television Scart socket TV and to a video recorder or DVD player Scart socket VCR Plug the mains cable into the receiver and then into a suitable 230 V 50 Hz power socket...

Page 60: ...nguage Please read 5 Important notes on operation before starting You are in the TV or radio mode and no OSD menu is displayed Press the Dream key navigate to Settings and confirm your settings with t...

Page 61: ...cated navigate to them and change them In case you have chosen the option Several satellites with DiSEqC rotor in the satellite con figuration then in the menu Service Searching you have to select Rot...

Page 62: ...ing service By pressing the EXIT key you leave the Channel list When the Channel list is displayed you can amend the feature contents of it The Yellow option key allows to change to the DVB Bouquets d...

Page 63: ...the OK key 14 Video recorder Please read 5 Important notes on operation before starting Press the Dream key navigate to Video recorder and confirm your selection with the OK key Choose this selection...

Page 64: ...tes on operation before starting You are in the TV or radio mode and no OSD menu is displayed Press the Yellow option key to access the setting mode In this mode you set up the outer corners of the vi...

Page 65: ...s displayed Press the Dream key navigate to Settings navigate to System Settings navigate to A V Settings and press the OK key after each step The direction keys allow to choose the colour format whic...

Page 66: ...function either with the Dream or the Red option key Mark a cross in the box in front of Setup lock and enter a four digit code of your choice to prevent any access to the menu Settings Store your set...

Page 67: ...o store your settings To verify whether your bouquet has been set up press the OK key in the sub menu Edit bouquets Navigate to User bouquets TV and press the OK key There you can see your new bouquet...

Page 68: ...n menu Then once again you select Settings and you can see the new setting Expert set up 22 1 Skip Confirmations only within the Expert mode At Skip Confirmations press the OK key and a green tick app...

Page 69: ...Green option key again to activate the chosen skin A new skin does not become active until you reboot 24 Remote Control only within the Expert mode Please read 5 Important notes on operation and 22 A...

Page 70: ...x in front of Repeat timer with the OK key Now you can define the days when changes should be excecuted by putting a cross in the boxes in front of the chosen days with the OK key You can also influen...

Page 71: ...de Please study these instructions thoroughly before you begin In order to connect the Dreambox with your computer you need a PC with a serial interface COM1 or COM2 and a null modem cable In these in...

Page 72: ...2 7 2 DreamUp 27 2 DreamUp 72 27 2 DreamUp establish connection Now click on Connect The software informs you with a status message that it is prepared for a connection Only now should you switch on...

Page 73: ...ary for flashing your Dreambox Observe the status The display indicates the progress bar 5600 boot This is how it looks when the software has established the connection with your Dreambox 27 3 DreamUp...

Page 74: ...7 3 DreamUp 74 After the click the following window opens This allows you to select a file name for the image you are going to save and store it After you have clicked on Save the operating software i...

Page 75: ...eceive a message from the software as follows Acknowledge this message by clicking OK 27 4 DreamUp delete operating software Click on Erase to delete the existing operating software image This is no M...

Page 76: ...D R E A M U P 2 7 4 D reamUp 27 4 DreamUp 76 Observe the status Here you see the message that the erase has been successfully completed Click on OK...

Page 77: ...A M U P 27 5 D reamUp 27 5 DreamUp 77 27 5 DreamUp flash operating software Click on Flash You will now be asked for the operating software image which you want to record Select you image and click o...

Page 78: ...M U P 27 5 D reamUp 27 5 DreamUp 78 The operating software will then be uploaded to your Dreambox Observe the status When the upload is complete the flash of your Dreambox will be erased Observe the...

Page 79: ...5 D reamUp 27 5 DreamUp 79 The uploaded image will be checked Observe the status After the flashing is complete you will receive a message from the software that everything has been completed successf...

Page 80: ...Dreambox Wait 30 seconds Plug the TV Scart plug and the coaxial cable satellite system into your Dreambox Switch on your Dreambox Directly after having switched on the Dreambox press and hold down the...

Page 81: ...s indirect unlimited EPG support electronic program guide support for multiple LNB switching DiSEqC adaptable OSD in many languages skin support SPDI F optical connection AC 3 DTS RF modulator and vid...

Page 82: ...Hz 24 kHz Analog output Output level L R 0 5 Vss to 600 Ohm THD 60 dB 1 Khz Crosstalk 65 dB Digital output Output level 0 5 Vss to 75 Ohm Sampling frequencies 32 kHz 44 1 kHz 48 kHz S PDIF output opti...

Page 83: ...ch off in standby mode Number of active satellite positions DiSEqC 1 0 1 2 SAT POSITION SAT OPTION DiSEqC rotor control Power consumption 20W in operation horizontal polarisation 400mA LNB power 11W i...

Page 84: ...here is a uniform standard interface for the many television and radio program mes Internet and software products for which charges are levied To enable you to receive encrypted programmes with the sa...

Page 85: ...implement the future by this way DiSE qC Digital Satellite Equipment Control pronounced die sec Developed by Philips for Eutelsat Anyone who wants to receive analog and digital programs from Astra Eu...

Page 86: ...nals EPG Electronic Program Guide The electronic programme guide shows you information on the broadcast selected Gateway Entrance gate This is a computer which links two networks together In the more...

Page 87: ...llite frequencies to 1 Sat ZF Receiver component on or in the satellite antenna which receives the high frequencies of the satellites amplifies them and converts them to the lower medium fre quency LO...

Page 88: ...hourly half hourly or hourly OSD On Screen Display When operating the receiver the functions are displayed as an on screen menu blended into the television picture The OSD of most satellite receivers...

Page 89: ...trol led RS232 A widely used interface between computers and other serial devices such as modems printers and mice Software updates can be fed in over the RS232 connection for Windows computers the CO...

Page 90: ...ission mode USB Universal Serial Bus An open public domain plug and play capable serial bus for connecting devices which operate at up to 12 Mbits second and also for slower devices such as keyboard m...

Page 91: ...o common interface slots They can also be added later without any difficulty The multi access modules provide the greatest possible security to reign supreme in the world of encrypted digital programm...

Page 92: ...t y c a rd W A R R A N T Y C A R D 30 Warranty card 92 30 Warranty card Device type Model Ser No Mac No Service Report Customer address Name Street Postcode Town Retailer address Name Street Postcode...

Page 93: ...vec 2 x emplacement PCMCIA pour modules CA d acc s la r ception de programmes DVB libres et crypt s ASTRA und EUTELSAT 1x emplacement pour carte lectronique modulateur RFRF afficheur France Dreambox D...

Page 94: ...H I L P R T U A C B D E F G N V K J S Q O M 1 T l commande 1 T l commande 9 5...

Page 95: ...2 Vue 96 2 Vues...

Page 96: ...ri re d acc s 112 20 Common Interface Interface commune 112 21 Cr er et g rer des bouquets individuels favorites 113 22 Activer le mode Expert 114 22 1 Confirmation Skip uniquement en mode Expert 114...

Page 97: ...r avec OK Pour amener votre Dreambox en mode Veille Standby appuyez bri vement sur la touche Power L heure est affich e Appuyez de nouveau sur la touche Power pour rallumer votre Dreambox Reboot Now R...

Page 98: ...t vous pouvez naviguer comme d habitude Touche Fl che vers le haut Quand aucun menu OSD est s lectionn affich sur votre cran la touche Fl che vers le haut permet d acc der la cha ne suivante Dans uns...

Page 99: ...d acc der directement l EPG de la cha ne choisie Veuillez tenir compte du fait que non toutes les cha nes mettent un EPG Touche d Options verte Cette touche poss de de diff rentes fonctions qui d pen...

Page 100: ...ouche INFO fait appara tre la barre d informations Pendant que la barre d informations est affich e vous pouvez regarder les informations EPG de la cha ne s lectionn e en appuyant de nouveau sur la to...

Page 101: ...he TV fait apprara tre la derni re liste de canaux En mode radio la touche TV vous ram ne en mode TV Touche RADIO Quand aucun menu OSD est s lectionn affich sur votre cran et vous tes en mode TV la to...

Page 102: ...suffisante d autres appareils Les ou s de l appareil devront toujours rester d gag es afin que la chaleur produite l int rieur puisse s chapper Ne placez aucun vase ni autre recipient rempli de liquid...

Page 103: ...l appareil du secteur s il a t expos l humidit ou si de l humidit l a p n tr D branchez imm diatement l appareil du secteur s il pr sente de forts d g ts l ex t rieur N exposez pas la Dreambox aux ra...

Page 104: ...r sent un magn toscope ou lecteur de DVD prise SCART VCR Branchez le cordon d alimentation lectrique dans le r cepteur puis dans un prise femel le en 230 V 50 Hz appropri e 7 1 Amplificataeur HiFi 7 1...

Page 105: ...op ration veuillez lire section 5 Consignes d utilisation impor tantes Aucun menu OSD est s lectionn affich sur votre cran et vous tes en mode TV Appuyez sur la touche Dream naviguez sur le point r gl...

Page 106: ...sur les satellites indiqu s et modifiez les Si dans la configuration de satellites vous avez choisi l option plusieurs satellites avec roteur DiSEqc vous devez naviguer sur R glages de roteurs dans l...

Page 107: ...uyant sur la touche EXIT vous quittez la liste des canaux Quand la liste des canaux est affich e vous avez la possibilit de modifier la pr sentation le contenu de celle ci La touche d option jaune per...

Page 108: ...nus fen tres par la touche EXIT ou les confirmer par OK 14 Magn toscope Avant de commencer veuillez lire section 5 Consignes d utilisation importantes Appuyez sur la touche Dream naviguez sur magn tos...

Page 109: ...veuillez lire section 5 Consignes d utilisation importantes Appuyez sur la touche d option jaune afin d acc der au mode de r glage Dans ce mode vous ajustez les angles ext rieurs de la fen tre vid o A...

Page 110: ...u OSD est s lectionn affich sur votre cran et vous tes en mode TV ou radio Appuyez sur la touche Dream naviguez sur r glages naviguez sur System Settings naviguez sur A VSettings et confirmez chaque o...

Page 111: ...er par la touche Dream ou la touche d option rouge Pour prot ger l acc s du menu r glages cocher la case devant Setup lock et rentrez un code 4 chiffres Sauvegardez vos reglages par la touche d option...

Page 112: ...touche d option verte pour sauvegarder vos r glages Afin de v rifier si votre bouquet a t cr e naviguez sur Edit bouquets appuyez sur OK Ensuite selectionnez User bouquets TV et appuyez sur OK Vous ve...

Page 113: ...ipal OSD Ensuite vous s lectionnez de nouveau le point R glages du menu et vous verez le nou veau point Expert Setup 22 1 Skip Confirmations uniquement dans le mode Expert Quand vous appuyez sur OK Ta...

Page 114: ...ctiver la pr sentation choisie Une nouvelle pr sentation ne deviendra active qu apr s avoir effectu un Reboot 24 T l comande uniquement dans le mode Expert Avant de commencer veuillez lire section 5 C...

Page 115: ...OK Ensuite vous pouvez d ter miner ces jours de changement en mettant par OK une croix devant le jour choisi De plus vous pouvez influencer l heure du commencement et de la fin en naviguant par les to...

Page 116: ...notice d utilisation Vous aurez besoin d un PC avec carte r seau et d une interface s rie COM1 ou COM2 ainsi que d un cable s rie simulateur de modem pour raccorder la Derambox votre ordinateur Dans l...

Page 117: ...2 7 2 Dr eamUp 27 2 DreamUp 118 27 2 DreamUp Etablissement de la liaison Cliquez sur Connect Sur la ligne de statut le logiciel vous indique qu il est pr t pour l tablissement d une liaison Rallumez v...

Page 118: ...n es dans la m moire Flash de la Dreambox Observez le statut La barre de progr s indique 5600 boot Quand le logiciel a tabli une liaison avec votre Dreambox la fen tre se pr sente ainsi 27 3 DreamUp F...

Page 119: ...eamUp 120 Apr s avoir cliqu la fen tre suivante s ouvre Ici vous pouvez choisir le nom du fichier de l image sauvegarder puis le m moriser Apr s avoir cliqu Enregistrer le syst me sauvegarde le logici...

Page 120: ...e suivant Confirmez ce message en cliquant OK 27 4 DreamUp Effacer le logiciel d exploitation Cliquez sur Erase pour effacer le logiciel d exploitation Image pr install Ceci n est PAS OBLIGATOIRE Par...

Page 121: ...D R E A M U P 27 4 Dr eamUp 27 4 DreamUp 122 Observez le statut Ensuite s affiche une fen tre indiquant que l effacement Erase s est achev avec succ s Cliquez OK...

Page 122: ...mUp 27 5 DreamUp 123 27 5 DreamUp Enregistrement du logiciel sur m moire Flash Cliquez Flash Le syst me vous demandera quel logiciel d exploitation Image vous voulez enregistrer Choississez l image vo...

Page 123: ...5 DreamUp 124 Ensuite le syst me charge le logiciel d exploitation dans votre Dreambox Observez la ligne de statut Quand le chargement est termin le contenu de la m moire Flash de votre Dreambox s ffa...

Page 124: ...E A M U P 27 5 Dr eamUp 27 5 DreamUp 125 Le syst me v rifie l image charg e Observez le statut Quand l op ration en m moire Flash est termin e le logiciel vous indique que tout s est bien pass Cliquez...

Page 125: ...secondes Raccordez le c ble Scart TV et le cable coaxial installation satellite la Dreambox Mettez votre Dreambox en route Ceci fait maintenez la touch sup rieure gauche de votre Dreambox appuy e et n...

Page 126: ...t de l EPG electronic program guide Support de la commutation multiple LNB DiSEqC Fonction adaptable OSD en plusieurs langues support skin Prise optique SPDI F AC 3 DTS Modulateur RF Modulator et Vide...

Page 127: ...Niveau de sortie L R G D 0 5 Vss 600 ohms THD 60 dB 1 Khz Diaphonie 65 dB Sortie num rique Niveau de sortie 0 5 Vss 75 ohms Fr quences d chantillonage 32 kHz 44 1 kHz 48 kHz Sortie optique S PDIF AC3...

Page 128: ...re en mode Veille Standby Nombre de positions satellites actives DiSEqC 1 0 1 2 SAT POSITION SAT OPTION DiSEqC commande du roteur Puissance absorb e 20W en service polarisation horizontale intensit LN...

Page 129: ...les nombreux programmes radio et television payants ainsi que les programmes Internet et logiciels payants Afin que vous puissiez recevoir avec les r cepteurs satellites des programmes crypt s avec I...

Page 130: ...ecevoir les programmes analogiques et num riques d Astra Eutelsat et ventuellement d aut res satellites La Set Top box fournit ici des signaux pilotes sous forme num rique permettant de choisir diff r...

Page 131: ...ns le disque dur La carte de commande n a donc plus s occuper du pilotage comme avant avec l AT L IDE est relativement primitif compar au SCSI mais aussi un peu moins cher raison pour laquelle il s es...

Page 132: ...on n utilisant qu un transpondeur pour plusieurs canaux voir gale ment SCPC MHz M gahertz Nombre d oscillations d un signal par seconde Unit de mesure le hertz Un kilo hertz kHz repr sente mille oscil...

Page 133: ...Il s agit d un ordinateur reliant deux r seaux entre eux Au sens strict il s agit de passerelles entre deux syst mes en ligne diff rentes par ex CompuServe et Internet ou entre des r seaux Mailbox Fi...

Page 134: ...espectivement ce qui permet de les pilo ter directement RS232 Interface tr s courante entre les ordinateurs et d autres appareils liaison s rie comme les modems imprimantes et souris L interface RS232...

Page 135: ...t en Italie Gr ce et dans les pays du B n lux ainsi que dans de nombreux autres pays du monde Entretemps Irdeto appartient au groupe Mindport 3 Viaccess Ce syst me de cryptage d velopp par France Tele...

Page 136: ...iers souris et moni teurs Il a t d velopp par Intel en collaboration avec Microsoft IBM Compaq DEC NEC et Northern Telecom Autres caract ristiques de l USB un seul type de connecteur jusqu 127 apparei...

Page 137: ...ntie C A R T E D E G A R A N T I E 30 Carte de Garantie 138 30 Carte de garantie Type Model No de Ser No Mac Rapport de Service Adresse du client Nom Rue Code postal Ville Adresse du magasin Nom Rue C...

Reviews: