background image

Assembly

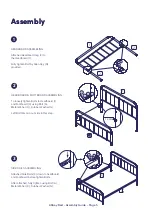
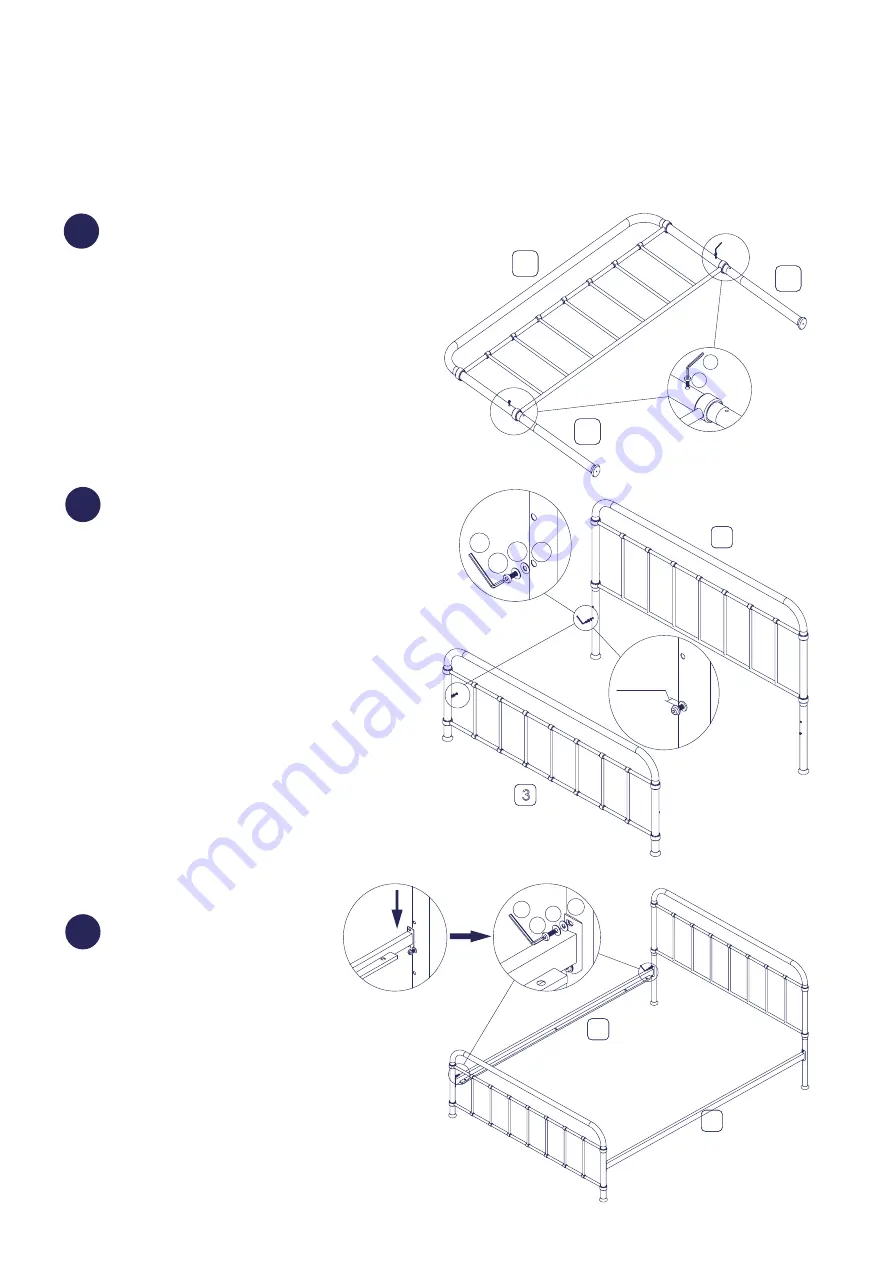
HEADBOARD ASSEMBLING

Attached Headboard Leg (2) to 

the Headboard (1).

Fully tighten Bolt by Allen Key (N)

provided.

1

Abbey Bed - Assembly Guide - Page 5

Assembly

HEADBOARD & FOOTBOARD ASSEMBLING

To loosely tighten Bolts to Headboard (1) 

and Footboard (3) using Bolt (A), 

Metal Waher (D),  Rubber Washer (G). 

Left Bolt 10mm in out side in this step.

2

SIDE RAILS ASSEMBLING

Attached Side Rails (4) down to headboard 

and Footboard before tighten Bolts.

After attached, fully tighten using Bolt (A), 

Metal Waher (D),  Rubber Washer (G).

3

D

A

G

N

10 mm

3

1

N

A

2

2

1

G

D

A

N

4

4

Summary of Contents for Abbey Bed Single

Page 1: ...Abbey Bed Single Two person assembly 3 4 hour approx assembly time...

Page 2: ...ild your new bed in the room you d like it to be located this will help prevent any risk of damage to your newly built sofa bed whilst moving it Top tip Safety and care It s really important to ensure...

Page 3: ...slats sprung slats or with Sleepmotion Please identify which base you have purchased as the assembly method may change If you have purchased solid or sprung slats please follow the instructions below...

Page 4: ...apping Screw 5 x 43mm Center legs F x 6 G x 8 H x 1 I x 1 Allen Key N x 2 Metal Washer 21 E x 6 Bolt M6 x 20mm Bolt M5 x 35mm Bolt M5 x 25mm Metal Washer 16 A x 10 B x 4 C x 6 D x 14 0 1 2 3 4 5 6 7 8...

Page 5: ...OOTBOARD ASSEMBLING To loosely tighten Bolts to Headboard 1 and Footboard 3 using Bolt A Metal Waher D Rubber Washer G Left Bolt 10mm in out side in this step 2 SIDE RAILS ASSEMBLING Attached Side Rai...

Page 6: ...SYSTEM ASSEMBLING 4 Abbey Bed Assembly Guide Page 6 Assembly Identify the slat system your have purchased Sprung slat system Turn to steps A 5 Standard wooden slat system x1 Adjustable Foot I Turn to...

Page 7: ...washer E SLAT SYSTEM ASSEMBLING Take out standard wooden slat sysem 6 Take out Center legs I make sure the foot can be adjustable A Put the standard wooden slat sysem 6 on the bedframe fully tighten u...

Page 8: ...den leg to the centre slat there is a pre drilled hole on the centre slat as shown C Fully tighten using Bolt C Inner bolt F Metal washer D and Metal washer E D Abbey Bed Assembly Guide Page 8 Assembl...

Page 9: ...ch of our wooden pieces are unique meaning that markings and shade can vary slightly between beds Over a period of time the wood might lighten or fade slightly due to light exposure Metal Metal tends...

Page 10: ...Little dreamers Keep the little ones entertained while you assemble your new purchase...

Page 11: ......

Reviews: