background image

    215-00945 (Solid slats)


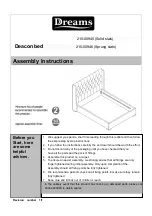
Deacon bed


215-00946 (Sprung slats)

Assembly Instructions

1. We suggest you spend a short time reading through this leaflet and then follow

the simple step by step instructions.

2. If you follow the instructions carefully the end result should be worth the effort.

3. Do not discard any of the packaging until you have checked that you

have all the parts and the pack of fittings.

4. Assemble this product on a carpet.

5. To ensure an easier assembly, we strongly advise that all fittings are only 

finger tightened during initial assembly. Only upon completion of the.

Assembly should all fixing points be fully tightened.

6. We recommend a periodic check on all fixing points to make sure they remain

fully tightened.

7. Keep glue and fittings out of children

s reach.

In  the  unlikely  event  that  this  product  has missing  or  damaged  parts,  please call   

03442 920000 to obtain spares 

Before you 
Start, here 
are some 
helpful 
advices. 

Revision    number    1/1


Summary of Contents for Deacon bed

Page 1: ...the pack of fittings 4 Assemble this product on a carpet 5 To ensure an easier assembly we strongly advise that all fittings are only finger tightened during initial assembly Only upon completion of the Assembly should all fixing points be fully tightened 6 We recommend a periodic check on all fixing points to make sure they remain fully tightened 7 Keep glue and fittings out of children s reach I...

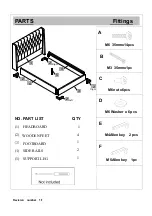
Page 2: ...x6pcs M6 Washer x 6pcs M4Allen key 2pcs M5Allen key 1pc Revision number 1 1 PARTS Fittings QTY 1 4 2 1 A B D 1 NO PART LIST 1 HEADBOARD 2 FOOTBOARD 3 WOODEN FEET 4 SIDE RAILS 5 SUPPORT LEG C E F 5 1 2 3 2 2 2 4 4 Left Left Right Right ...

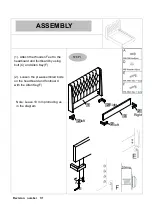
Page 3: ...he headboard and footboard by using bolt C and Allen Key F 2 Loosen the pre assembled bolts on the headboard and footboard with the Allen Key F Note Leave 10 mm protruding as in the diagram Revision number 1 1 E A 1 2 3 2 2 2 left left Right Right ...

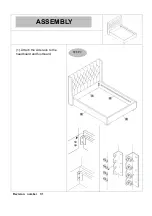
Page 4: ...ASSEMBLY STEP 2 1 Attach the side rails to the headboard and footboard Revision number 1 1 ...

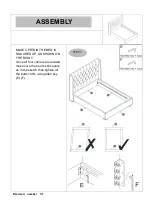
Page 5: ... 3 MAKE CERTAIN THE BED IS SQUARED UP AS SHOWN ON THE RIGHT Once all four comers are located make sure the bed is still square as in the sketch then tighten all the bolts 100 using Allen key E F Revision number 1 1 ...

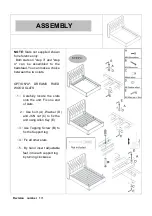
Page 6: ...e between the two slats OPTION A DREAMS FIXED WOOD SLATS 1 Carefully locate the slats onto the unit Fix one end of slats 2 Use bolt A Washer D and JCN nut C to fix the unit using Allen Key E 3 Use Tapping Screw B to fix the Support leg 4 Fix all other slats 5 By hand insert adjustable feet into each support leg by turning clockwise Revision number 1 1 ...

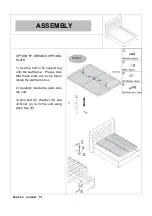
Page 7: ... the bolt to fix support leg onto the slat frame Please note that these bolts are to be found inside the slat frame box 2 Carefully locate the slats onto the unit 3 Use bolt A Washer D and JCN nut C to fix the unit using Allen Key E Revision number 1 1 ...

Reviews: