background image

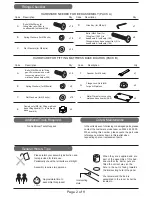
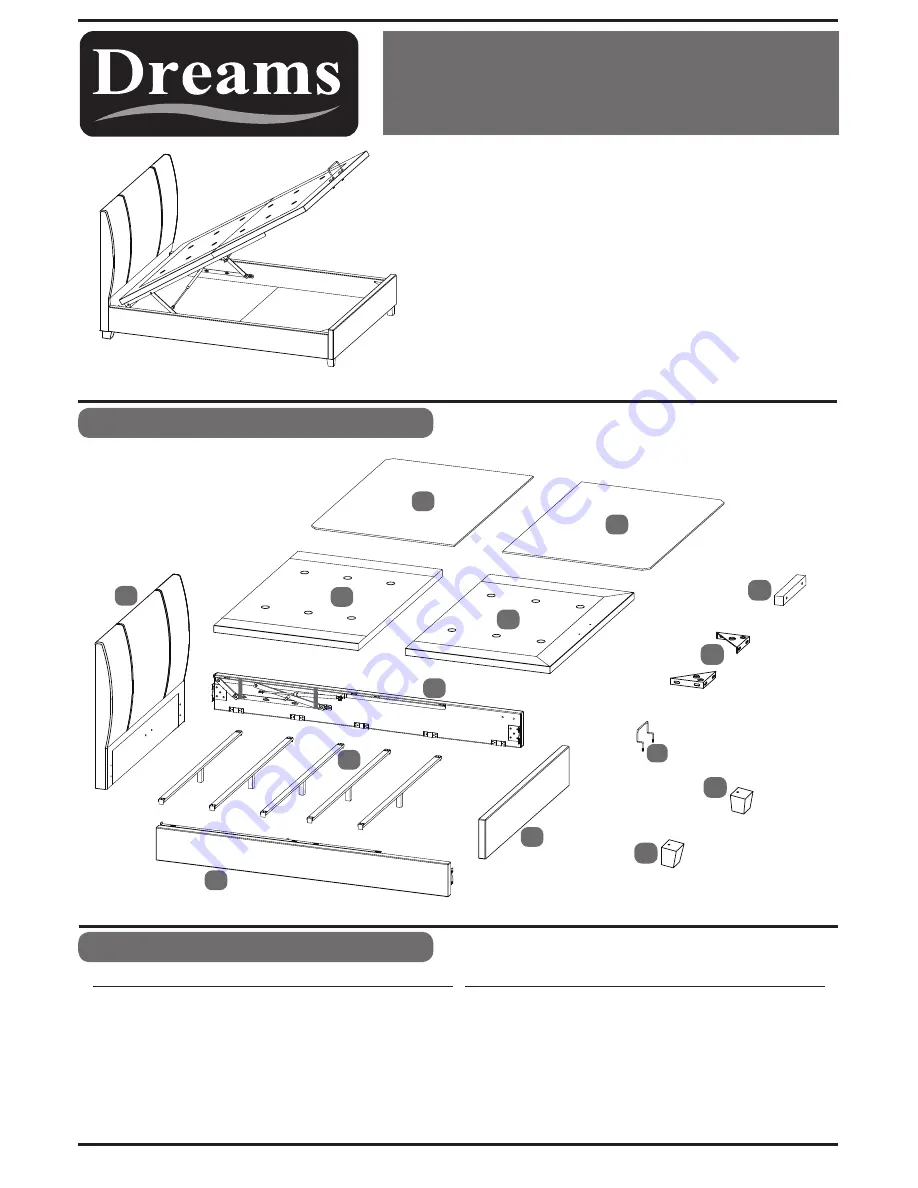
Parts Identification

Parts Checklist

Page 1 of 9  

FRANCIS OTTOMAN BED

 GAS LIFT

170227

PLEASE  READ   this sheet prior to assembly to familiarise

yourself with the various stages of construction. Carefully 

open the pack supplied and check the contents against the 

parts and fittings check list. 
Do not destroy any of the packaging until you are certain 

that you have all the necessary parts for the assembly. 

Please ensure that the packaging is disposed of in a safe 

environmentally friendly way.

CAUTION:  There are small components used in the 

construction of this unit. These loose items should be kept  

away from young children during assembly, to avoid the 

danger of choking.

IMPORTANT: BEFORE STARTING TO ASSEMBLE THE BED - PLEASE READ THESE INSTRUCTIONS CAREFULLY. 

Qty

Qty

Ref.

Description

Description

Ref.

1

2

3

4

12

6

5

8

9

1

1

1

1

2

5

1

2

1

Feet - Left

13

2

Feet - Right

7

2

Headboard

Footboard

Side Rail - Left

Side Rail - Right

Mattress Base Board - Headend

Mattress Base Board - Footend

Base Boards

Base Board Support Rails (Wood)

Mattress Base Support Rails (Wood)

10

2

Angle Brackets

11

1

Mattress Base Lifting Handle

8

7

7

5

6

11

1

2

3

4

10

9

12

13

L

R

Summary of Contents for FRANCIS OTTOMAN BEDGAS LIFT

Page 1: ...mentally friendly way CAUTION There are small components used in the construction of this unit These loose items should be kept away from young children during assembly to avoid the danger of choking...

Page 2: ...Washers for M8 bolts B In the unlikely event of missing or damaged parts please contact the customer service team on 0344 292 00 00 When calling this number please quote the part code reference number...

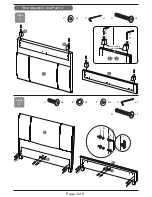
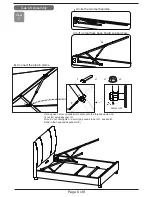
Page 3: ...R R L L Page 3 of 9 Stage 2 Bed Assembly Use Pack A x8 B x8 A C x12 D x1 Stage 1 x4 H C x4 D x1 H A BC C 2 9 1 C H D C H D 12 1 1 2 2 13 x4 H A BC H C 9 Note angles point inside C B A D 10mm...

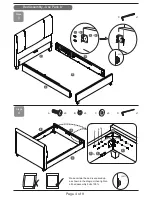
Page 4: ...Stage 3 Bed Assembly Use Pack A Stage 4 D x1 1 2 3 4 D 3 4 1 2 90 2 10 3 A B C 4 A x8 B x8 C x8 D x1 4 4 3 2 100 Make certain the bed is squared up as shown in the diagram then tighten all bed assembl...

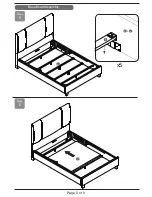
Page 5: ...Page 5 of 9 Stage 5 Stage 6 Base Board Assembly x5 8 3 4 7 8...

Page 6: ...bars i Un tie the two mechanisms SMALL GAP F G G G x2 F x1 Hold up each arm and slide piston stem onto the threaded axle and fit nut G using spanner F Note do not overtighten a small gap needs to be l...

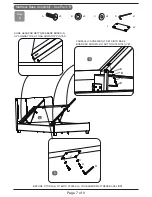
Page 7: ...x8 A C J x8 x2 D x1 5 A A D D B C C J 5 BEFORE FITTING 6 FIT BOTH PLATES J TO HEADEND MATTRESS BASE FIRST SLIDE HEADEND MATTRESS BASE BOARD 5 UP AGAINST THE LIFTING ARM STOP PLATES CAREFULLY SCREW BO...

Page 8: ...D x1 Page 8 of 9 Stage 9 6 A C A D B C E F C A B C 100 E x2 F x1 9 6 SLIDE FOOTEND MATTRESS BASE BOARD 6 INTO POSITION LOOSLEY CONNECT THE PLATES SCREWING ALL 8 SETS OF BOLTS INTO PLACE WHEN ALL BOLT...

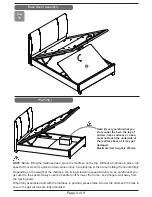
Page 9: ...t used to the speed Always use the handle to lift or lower the frame keep fingers well away from the moving parts When fully assembled and with the mattress in position please raise lower the ottoman...

Reviews: