background image

Two person 

assembly

1.5 hour approx 

assembly time

MK1 22060

3

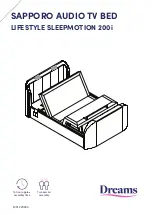
SAPPORO AUDIO TV BED

LIFESTYLE SLEEPMOTION 200i

Summary of Contents for SAPPORO LIFESTYLE SLEEPMOTION 200i

Page 1: ...Two person assembly 1 5 hour approx assembly time MK1 220603 SAPPORO AUDIO TV BED LIFESTYLE SLEEPMOTION 200i ...

Page 2: ...es with your product or any missing parts please contact our Help Centre on 0800 652 6750 where a member of our team will be happy to help For customers based in Northern Ireland please call 028 9050 8300 Safety and care It s really important to ensure children and animals are kept away from the assembly area as there are small components used in this bed which could present a choking hazard All p...

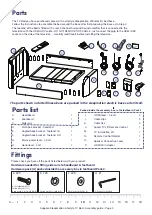
Page 3: ...ase carton itself 1 A Headboard B Footboard C Side rails 1 2 D E 1 F 1 1 G H I 2 J 5 K 5 1 1 M 1 Packed inside the accessory box in thefootboard Pack 2 Mains power lead 3 5 mt Aerial lead 4 mt L 1 1 F E D A O P C Flat hook bracket headend Angled hook bracket footend LH Angled hook bracket footend RH Spring washer for M8 bolts Bolts M8x30mm for fitting side rails C to headboard footboard A B a x20 ...

Page 4: ... to build the bedstead around the electric bed base Please read Step 8 carefully before fitting the television Tools required Please check you have all these below Important A B D E d a b c 10mm a x12 x12 d x1 1 D F TV Support Slide M8 x 25mm Bolt set Counter sunk screw set M6x12mm Counter sunk screw set M4x12mm Allen key 2 5mm Allen key 4mm k x2 j choose a suitable Allen key h choose a pair of su...

Page 5: ...rd bracket D using two bolt sets a b c tighten 90 with Allen key d Make sure the bed base is facing the correct way with mattress stopper at the footend then carefully lift the base and place it into the corner between headboard and side rail as shown it is heavy so please get help Prepare the electric bed base before assembling the bed frame Screw in the eight longer 6 15cm legs as shown Mattress...

Page 6: ... this must be an earthed power supply iii Raise both the head end and foot end of the bed base using the remote control x2 b Connecting power to the the electric base b a c RH Side Rail Foot board 90 Connect the right side rail to the footboard bracket F using another two bolt sets a b c Tighten the bolts using Allen key d but only tighten 90 Place footboard in position and connect the RH side rai...

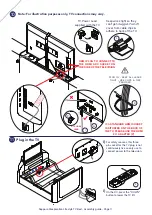
Page 7: ...rrect position ii Note This is for illustration purposes only TV connections may vary If more leads such as standard HDMI aerial or other media connection leads need to be fitted push them through either duct from the top choosing the best side to use depending on where the connection ports are on back of the TV please make sure the wires are not hanging loose If it is necessary to cross over lead...

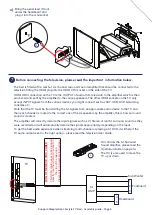
Page 8: ...connected to the television fitting the HDMI plug into the HDMI ARC socket on the side of the TV HDMI ARC connection on the TV is the OUTPUT of audio from television to the amplifier which is then processed and sent by the amplifier to the various speakers The other HDMI sockets on the TV only accept INPUT signals from the various devices you might connect such as SKY USB DVD Gaming consoles etc N...

Page 9: ...n to suit ii Loosen the two column adjustment bolts slide column so the curved lid lifter is just above the TV and re tighten the two bolts iii The upper part of each support k slides to hold front of television in place please follow the instructions on how to correctly set these supports in Step 9 Height of TV is normally pre set follow this guide if it needs to be changed ...

Page 10: ...l To make sliding each support easier lift the TV slightly above the support being adjusted Once supports are set lightly push down In the centre of the TV and tighten the two Vesa bolts 100 these should be in the centre of the long holes as shown ii When spacers are provided it is very important that these are fitted in the correct place fit between television the TV mounting bracket x as in this...

Page 11: ...lug in the TV STD HDMI LEAD IF A STANDARD HDMI SOCKET IS SITUATED ON THE BACK OF THE TV PLEASE USE THE HDMI 90º ADAPTER P HDMI PLUG TO CONNECT TO THE HDMI ARC SOCKET ON THE SIDE OF THE TELEVISION For safety reasons this three pin socket for the TV plug is not continuously live so only use to connect power to the television D O N O T R E M O V E T H I S C A B L E T h is H D M I c a b le n e e d s t...

Page 12: ...ard LH side rail Make sure the bed is squared up as shown 100 i ii iii Make sure everything is connected safely then fit the left hand side rail Check the bolts on the side rails are sitting down in the keyhole slots then tighten all x20 bolt sets 100 Fit the side rail then tighten all x4 bolt sets 90 using Allen key d a b c ...

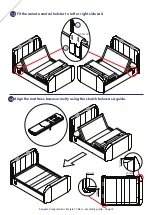
Page 13: ...pmotion Lifestyle TV Bed Assembly guide Page 13 13 14 10mm 20mm 10mm 20mm Fit the remote control holster to left or right side rail RC for TV N Align the mattress base correctly using the sketch below as a guide L ...

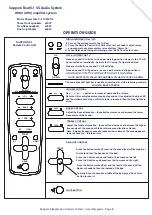
Page 14: ...ted automatically operate the TV using it s Operation Guide Press central button once and TV Lift will stop Press once and TV will go down as soon as the lower resting position is NOTE BLUETOOTH WILL WORK NORMALLY WHEN TV IS UP OR DOWN SAPPORO 5 1 Remote Control W 1 Turn on the mains power to the TV Bed 2 Press the Remote Control RC ON button for 2 seconds to synchronise and prepare the system sys...

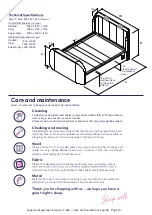
Page 15: ...kings and shade can vary slightly between beds Over a period of time the wood might lighten or fade slightly due to light exposure Fabric Please note depending on the lighting positioning and surroundings of your period of time the colour might lighten or fade slightly due to light exposure Metal Metal tends to be more resilient to everyday wear and tear We recommend to gently dust your metal furn...

Page 16: ...ith or modify any leads already fitted and do not add any extra media leads unless they are routed through the ducts as shown All leads must be tightly connected to back of TV using cable clips provided never hanging loose Never touch moving parts or any part of the equipment if something needs to be checked disconnect the power first Do not insert anything into the footboard as this could serious...

Page 17: ...Little dreamers Keep the little ones entertained while you assemble your new purchase ...

Page 18: ......

Reviews: