Sapporo Sleepmotion Lifestyle TV Bed - Assembly guide - Page 7
G
Electrical & Cable Connections
PLUG
STOCKET
O
H
PLUG
SOCKET
SOCKET
PLUG
Footboard
Head
board
Velcro
tab
Velcro tab
G
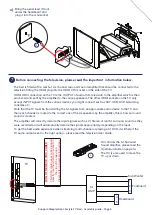
Bring all three leads (G, H & O) across from footboard to
headboard in a straight line, fix to velcro tab at each end.
iv)
O
G
Mains power lead
H
Aerial
l
ead
TV Power
l
ead that
came with the TV
SOCKET
PLUG
O
Headboard
sp
eaker
connection lead
EV
O
M
ER
T
O
N
O
D
VT
o
t
ni
ylt
ce
ri
d
e
l
b
a
C
C
R
A
I
M
D
H
g
u
l
P
s
no
i
tc
u
r
t
sn
I y
lb
me
s
s
A
ot
re
fe
r
e
sa
el
P
EV
O
M
ER
T
O
N
O
D
VT
o
tn
i
ylt
ce
ri
d
e
l
ba
C
C
R
A I
M
D
H
g
ul
P
s
no
i
t
cu
rt
sn
I y
lb
m
e
ss
A
ot r
ef
er
es
ae
l
P
If the HDMI (ARC) socket is
on the left rear side of the
TV,
gently
pull
the lead
across as shown.
6
HDMI PLUG FOR
CONNECTION TO HDMI
ARC SOCKET ON THE
SIDE OF THE TELEVISION
MARKED: HDMI (ARC)
If the HDMI (ARC) socket is on
rear right hand side of the TV,
the plug is in the correct
position.
ii)
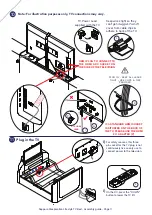
Note: This is for illustration purposes only, TV connections may vary.
If more leads, such as
standard
HDMI, aerial or other media connection leads need to be fitted - push them
through either duct from the top choosing the best side to use depending on where the connection ports are on
back of the TV - please make sure the wires are not hanging loose.
If it is necessary to cross over leads from one side of the bed to the other, do this in front of the TV lift as shown in
the sketch below right.
The HDMI
ARC
cable is positioned at the right rear side of the
television
ready to plug into the HDMI ARC socket
on the side of the TV.
If necessary it can be moved
across
to the opposite side
,
gently
draw out
some
the cable
from the duct and c
r
oss
it
over
passing the lead under the back of the TV supports
.
Use
cable clip
s
(U)
to
keep the cable from snagging.
i)
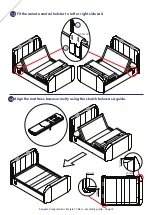
Plug the small power
plug on one end of the
mains power lead (G)
into the socket at the
bottom of the footboard.
On the other end of the
lead, bring the 3 pin plug
out under the headboard
and connect it to your
wall socket - for safety
this must be an earthed
power supply.
L
Pr
ess the “UP”
button to raise
the TV Lift.
iii)

