background image

Thank you


Hello, thanks for choosing to purchase your bed from Dreams - you're now on your way to your best 
ever night's sleep. Before you begin building your bed, please take a moment to read through the 
instructions and make sure that you've got all the relevant parts listed on the following pages.


Assembly tips


Before you begin, it’s best to identify all parts and fittings to build your bed. 
We advise laying these out on the floor to check you have everything, and 
familiarising yourself before building.


Top tip


We recommend that you build your new bed in the room you’d like it to be 
located - this will help prevent any risk of damage to your newly built bed 
whilst moving it.


Safety and care


It’s really important to ensure children and animals are kept away from the 
assembly area, as there are small components used in this bed which could 
present a choking hazard. All plastic and wrapping materials should also be 
kept away from children and animals to prevent any risk of su

ocation. 

To  keep your little ones busy, there is a colouring page inside the back cover.


Help and support


At Dreams, it’s our mission to give the whole nation a great night’s sleep - this 
means that the quality of our products is of utmost importance to us. If there 
are any issues with your product or any missing parts, please visit our website 
at www.dreams.co.uk/help


Recycling


Please ensure that packaging is disposed of in a safe and environmentally 
friendly way, and recycle where possible. Our assembly instructions are 
printed on recycled paper. Please keep your assembly instructions safe 
to refer back to in the future.


Duke Bed - Assembly Guide - Page 2

Top tip


We recommend that you build your new bed in the room you’d like it to be 
located - this will help prevent any risk of damage to your newly built bed 
whilst moving it.


Reign Ottoman Bed - Assembly Guide - Page 2

Summary of Contents for TEMPUR Reign Ottoman

Page 1: ...1 hour approx assembly time Two person assembly Reign Ottoman Bed ...

Page 2: ...this bed which could present a choking hazard All plastic and wrapping materials should also be kept away from children and animals to prevent any risk of suffocation To keep your little ones busy there is a colouring page inside the back cover Help and support At Dreams it s our mission to give the whole nation a great night s sleep this means that the quality of our products is of utmost importan...

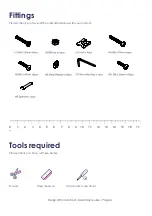
Page 3: ...ign Ottoman Bed Assembly Guide Page 3 Parts list A Headboard 1pcs B Footboard 1pcs C Side panel Left Right 2pcs D Base boards 2pcs E Slat frame 2pcs F Ottoman arms Left Right 2pcs G Piston 2pcs H Bar 2pcs I Mattress stopper 2pcs J Rope 2pcs ...

Page 4: ...listed below with your product 0 1 2 3 4 5 6 7 8 9 cm 10 11 12 13 14 15 16 17 Tools required Please check you have all these below Scissors Tape measure Cross head screwdriver Duke Bed Assembly Guide Page 2 Reign Ottoman Bed Assembly Guide Page 4 ...

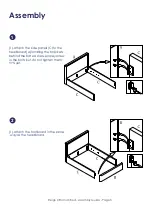
Page 5: ...2 Reign Ottoman Bed Assembly Guide Page 5 1 Attach the side panels C to the behind the flat washers Loosley screw in the bolts but do not tighten them 1 Attach the footboard in the same headboard A locating the brackets yet way as the headboard ...

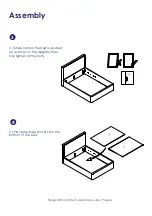
Page 6: ...Duke Bed Assembly Guide Page 2 Reign Ottoman Bed Assembly Guide Page 6 1 Make certain the bed is squared fully tighten all the bolts 1 Place the base boards into the up as shown in the diagram then bottom of the bed ...

Page 7: ...Reign Ottoman Bed Assembly Guide Page 7 1 Attach the lock to the ottoman arm F H3 1 Attached the piston to the ottoman arm make sure the piston is assembled the correct way round the black section attaches to the top of the frame as per the image ...

Page 8: ...to the side rail C and fully tighten all 1 Attach the bar to the slat frame H11 Using bolts nut metal washers E fit two bar of the slat frame using allen key and spanner tighten H5 H2 H6 H7 2 Using bolts nut metal washers fit two slat frame using and spanner tighten all bolts H4 H2 H6 allen key H7 the bolts H9 all bolts H9 ...

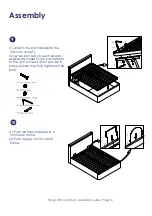
Page 9: ...e to the behind the flat washers Loosley screw 1 Push mattress stoppers x 2 ottoman arms F looslet fix the slat frame to I into metal frame 2 Push rope x 2 J frame into metal E Using two bolt sets on each side H1 H2 H6 H7 H9 to the arm once all 4 bolt sets are in place please then fully tighten all the bolts ...

Page 10: ...eces are unique meaning that markings and shade can vary slightly between beds Over a period of time the wood might lighten or fade slightly due to light exposure Fabric Please note depending on the lighting positioning and surroundings of your room the colour of the fabric can sometimes appear slightly di fferent Over a period of time the colour might lighten or fade slightly due to light exposure...

Page 11: ...Little dreamers Keep the little ones entertained while you assemble your new purchase ...

Page 12: ......

Reviews: