background image

32

Starting a Massage

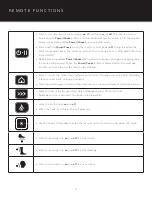
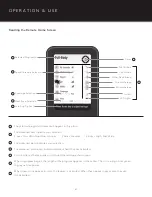
•  Ensure remote power in ON. The Power/Pause button will glow white.

•  Use the Remote navigation arrows to scroll through the menus. As you navigate the menus, the black highlight 
  indicates where the cursor is within the menu.

•  Once your desired selection is highlighted, press the OK button to activate the selection.

•  Upon activation, a green dot will appear to the right of the currently running selection(s), and the upper section of    
  the remote screen will display the name of the massage(s) selected. The timer in the upper right corner indicates  


  estimated massage duration.

•  Choreographed massages that automatically combine the massage mechanism, air massage, and other features,    
  are offered in the Programmed & Focused menus (except in Full Body Air, which is an air massage only program).

•  Manual menu options activate a specific back mechanism function or set of functions. Neither the air massage, 
  or the additional roller motor mechanisms in the chair (foot, calf, neck roller), are automatically combined.

•  Massages within the Manual Air menu are those that activate only the air cells. Neither the massage mechanism, 
  or the additional roller motor mechanisms in the chair (foot, calf, neck roller), are automatically combined.

Shoulder Scan & ScanSave

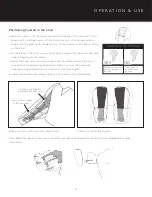
To experience a massage as intended, it is extremely important to define the shoulder position prior to the start of 
a massage session. To ensure massage accuracy, please follow the steps below:

When the head pillow is properly placed...

•  The massage chair will Auto-Detect shoulder position. 

• 

Fine Tune Shoulder Position:

 Once Auto-Detect is complete, the remote will beep, the roller buttons glow white,  


  and the help text “Use roller buttons to fine tune shoulder position now” appears at the bottom of the screen. Roller   
  position can be adjusted by pressing and holding the Roller Up or Down arrows until the mechanism is located in the  
  proper position at the tops of the shoulder.

When the head pillow is not properly placed OR not being used...

•  The Auto-Detect function is disabled and the user must adjust the roller position once the remote starts beeping, the 
  roller buttons illuminate, and text “Use roller buttons to fine tune shoulder position now” appears at the bottom of    
  the screen. At this time the roller position can be adjusted by pressing and holding the Roller Down arrow until the    
  mechanism is located in the proper position at the tops of the shoulder.

•  ScanSave remembers your body profile for all massages performed during the same power cycle. The chair will only 
  scan once while powered on, upon the first Programmed or Focused massage selection. If a second program is 
  selected the scan from the first program is remembered and used for the new selection. Anytime a new user enters 
  the chair, the remote, if it has been left on from a previous user, should be powered off and back on to ensure that    
  the new user is properly scanned.

O P E R A T I O N   &   U S E

Summary of Contents for M.8

Page 1: ...manual thoroughly for the correct methods of usage especially taking note of the section on safety This manual should be kept on hand for easy reference It is your guide to safe and efficient operatio...

Page 2: ...Parts Functions 17 Assembly 23 Moving the Chair 24 Remote Functions 27 Sessions 29 Operation Use 43 Care Storage 44 Troubleshooting 49 Warranty After Sales Service 50 Specifications Note The pictures...

Page 3: ...hat is the culmination of years of research testing and uncompromising attention to detail and design Every DreamWave massage chair has been designed to enhance health and wellness through the healing...

Page 4: ...RNING CAUTION Important Safety Precautions Please follow all basic precautions while using this chair Please read all instructions before using this massage chair Refer to your Owner s Manual for impo...

Page 5: ...ged if it is not working properly if it has been dropped or damaged or if it has been exposed to water If this happens contact the service center for examination and repair Do not carry this appliance...

Page 6: ...of electric shock Check with a qualified electrician or serviceman if you are in doubt as to whether the product is properly grounded Do not modify the plug provided with the product if it will not fi...

Page 7: ...g conductor of the chair can result in the risk of electrical shock If you feel the product is not properly grounded please contact a qualified electrician Please unplug this chair from the electrical...

Page 8: ...a pacemaker or other electronic medical device if you have been restricted to bed rest or if you are planning to use this chair to treat a specific ailment to recover from surgery or for therapy Elder...

Page 9: ...age 15 Do not move the chair while someone is in it Do not stand on this chair Do not sit on any part of the chair other than the seat Do not sit stand or lean on the foot rest unless you are sitting...

Page 10: ...of an emergency push the Pause button on the remote to stop operation immediately Immediately discontinue use of the chair and seek medical advice if you notice any acute pain or unusual physical dis...

Page 11: ...e of malfunction do not attempt to repair Contact DreamWave Service Do not modify any part of the chair Be sure to include this Owner s Manual when transferring this chair to another party Do not disp...

Page 12: ...rotation grasp and knead to massage the sides of the calves gastrocnemues and soleaus Additionally a calf roller massager works the rear of the calf along the medial line This complex set of movements...

Page 13: ...ts USB ports allow convenient access to charge your smartphone tablet or other devices while you relax A USB port is located at the inside front of each arm Unparalleled Design Conceived by world reno...

Page 14: ...Unit Left Speaker Cover Aromatherapy Unit behind cover Bluetooth Module behind cover USB Port Leg Rest Seat Foot Rest Left Speaker behind cover Remote Control Right Arm LED Lights Back Cover Main Pow...

Page 15: ...U N C T I O N S Right Speaker Cover Right Speaker behind cover Headphone Jack Input USB Port Ionizer behind cover Left Shoulder Unit Back Pad Reclining Seat Back Left Arm Phone Pocket and Door Knob L...

Page 16: ...der Air Neck Knead Rollers Shoulder Top Air Delta Massage Engine shown in storage position Right Back Air Left Back Air Right Rear Seat Air Left Rear Seat Air Calf Rollers Calf Rollers Foot Rollers Fo...

Page 17: ...16 C O N T E N T S P A R T S F U N C T I O N S Pillow Heat Hand Heat Seat Heat Foot Heat Back Heat...

Page 18: ...ace to avoid tipping over As the chair is heavy please exercise extra care not to damage the floor when positioning the chair CAUTION Assembly Preparation Ensure there is an allowance of at least 6 25...

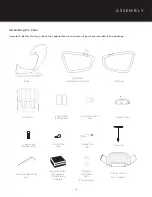
Page 19: ...luded in the package Base Carry Handle Tools x2 Shiatsu Heel Pads x4 Pre installed T wrench Right Arm and Remote Control Left Arm Power Cord Straight Pin x4 Cap Head Screws x24 Aromatherapy Accessorie...

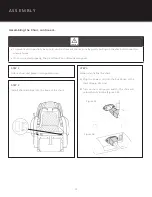
Page 20: ...not connected properly the air cells will not inflate as designed CAUTION STEP 1 Unbox chair and place in designated area STEP 3 Power and incline the chair A Plug the power cord into the back base of...

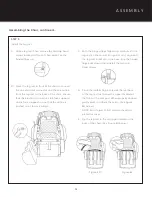
Page 21: ...it will go 20 Assembling the Chair continued C With the hinged flaps flipped up carefully lift the leg rest so the connection points on it align with the leg rest brackets on the base Flip the hinged...

Page 22: ...y install the 4 cap head screws on both the upper and lower hinges Ensure that alignment is perfectly accurate so you do not cross thread screws which will result in stripped screws TIP Hand start 2 d...

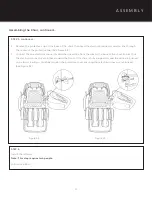
Page 23: ...lectrical connector and air line through the center of the protective cap See Figure 5E F Connect the one electrical connector and the one airline from the arm to the base of the chair Ensure that the...

Page 24: ...fully lift the foot rest end while a second person lifts using the handle on the back of the chair Carry to desired location Attach carry handle as shown slide bolt through carry handle and into frame...

Page 25: ...ert excessive force on the remote control Do not pull the remote control cord forcefully Do not operate the remote control using sharp edged or hard objects Power Pause Home Up Arrow Left Arrow Down A...

Page 26: ...When the Power Pause button is pressed again the massage will resume from the point the session was stopped Press to activate the programmed Quick Massage session When the Quick Massage session is ac...

Page 27: ...le of the leg rest To automatically raise or lower the leg rest press and hold the corresponding foot button for approximately 2 seconds Press to adjust roller position during a manual massage or to f...

Page 28: ...g Energize and refresh Awaken your body and mind Whether you use it first thing in the morning or midday this massage invigorates and boosts energy and is choreographed to move blood from the body s e...

Page 29: ...he lower back and hips with focused kneading and tapping massage focused on the lumbar area Glutes Focuses on the lower back glutes and thighs this session relives tension and relaxes the lumbar area...

Page 30: ...ght position before sitting Do not use the arm or shoulder unit for any area other than your arms and shoulders If your arm comes out of the arm or shoulder unit or your leg foot come out of the foot...

Page 31: ...llers are not in the storage position simply reset by pressing the Power button on the remote control before sitting on the chair Sit back fully in the chair so your entire back is against the back re...

Page 32: ...he remote until you reach desired cord length When tension is released the cord winder will lock To return the remote to its storage slot gently pull until there is slight tension on the cord and then...

Page 33: ...he start of a massage session To ensure massage accuracy please follow the steps below When the head pillow is properly placed The massage chair will Auto Detect shoulder position Fine Tune Shoulder P...

Page 34: ...n arrows located in the center of the remote to navigate to the active program then use the right arrow to get to 3D intensity adjustments Once the desired intensity level is highlighted press OK to s...

Page 35: ...o the active program then use the right arrow to scroll to Width adjustments Once the desired width is highlighted press OK to select Coverage Adjustment Feature available on all Manual massages exclu...

Page 36: ...is active when the button is not illuminated the feature is off Neck Knead in the head pillow Use and Adjustment During Programmed Focused Massages Some Programmed and Focused massages activate the N...

Page 37: ...ecline to the suggested position for the massage If a different reclining angle is desired you can adjust by the following Back Position Adjustment To recline the angle of the chair s back press and h...

Page 38: ...ssage rollers and neck knead rollers located in the pillow Heat can be enjoyed on its own or during any massage session To turn heat on press the Heat button on the remote When heat is on the button w...

Page 39: ...one of the following Press the Home Menu button to access to the Main Menu then use the navigation arrows to navigate to End Massage Once End Massage is highlighted press OK and the massage will ceas...

Page 40: ...o Settings scroll right to access Aromatherapy then press OK to turn the diffuser on Press again to turn Aromatherapy off When on a green dot will appear to the right of the listing when off the dot r...

Page 41: ...leaves the lights on indefinitely and Off mode which makes it so the lights always remain off To change the LED Light setting if not already there press the Home Menu button to access to the Main Men...

Page 42: ...ed Scrolling tip text helps guide you through the massage chair usage When a program begins the length of the program appears in the center The circle will go from green to grey as time passes When th...

Page 43: ...to the Main Menu Then use the navigation arrows to navigate to Settings scroll right to access the About menu Speakers Bluetooth speakers are located in the left and right shoulders so you can enjoy...

Page 44: ...from the wall outlet When not in use the chair should always be stored in its full upright position back rest fully inclined foot rest to its lowest position The chair should be stored in a place of l...

Page 45: ...utton on the remote Other issues may include the wires or plug being damaged the fuse having burned out or an issue with the inner circuit Call DreamWave for service Problem My chair makes a beeping s...

Page 46: ...during the shoulder scan If you wiggle or move around you can trigger a false reading Ensure the back pad is not bunched or folding over itself in any part of the back Try sitting further back in the...

Page 47: ...lease contact DreamWave service for further assistance Problem My chair s doors won t open when the chair is reclined Possible Cause Solution Upon recline the chair s doors automatically lock for your...

Page 48: ...e Cause Solution Congrats You found the chromotherapy feature Enjoy the soothing color patterns the remote can produce When enabled chromotherapy will activate after 90 seconds of remote control inact...

Page 49: ...stance Q How do I make the massage stronger A Try any of the following things Use the 3D button to select maximum pressure Sit back further in the chair so that your weight is against the reclining se...

Page 50: ...dard with all DreamWave chairs and a five year extended warranty is also available Warranties include on site service covering all parts and labor Some restrictions apply See Dreamwave com for full wa...

Page 51: ...t Rest Adjustment Range Approximately 11 28 cm Reclining Angle Approximately 120 to 160 against flat floor Chair Dimensions Upright 60 153 cm L x 36 92 cm W x 49 125 cm H Reclined 77 196 cm L x 36 92...

Page 52: ...ic comfort and relaxation needs If you have any questions at all about the operation of your massage chair contact information for a DreamWave chair expert can be found at www DreamWave com 2019 Dream...

Reviews: