14
|
Dresser
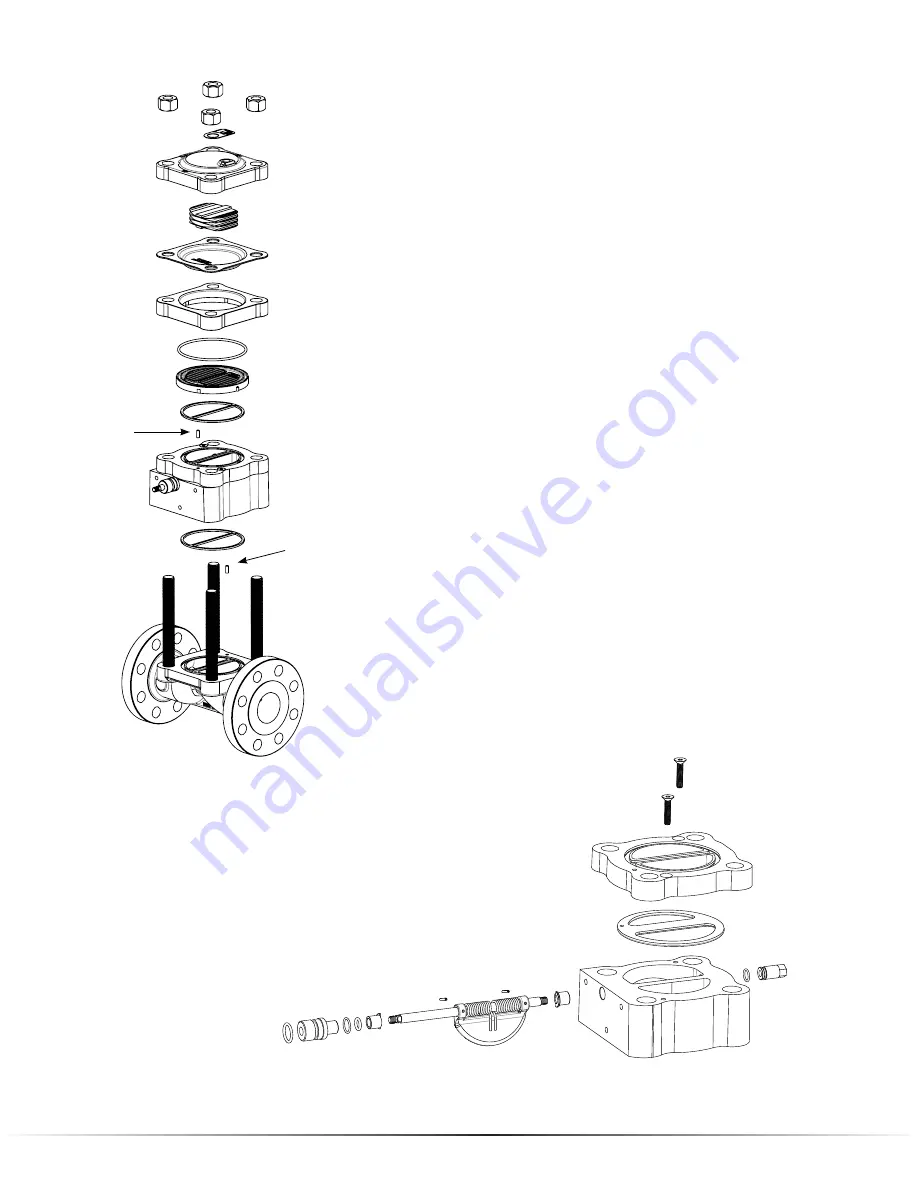
Removal of the Shut-off Valve from the Body and/or
Regulator (2” Large Port Regulator Shown)
1. On slam shut valves integrated into a Flowgrid regulator,
remove the pilots, filter and control lines from the inlet,
and sense ports on slam shut valves and the Flowgrid
regulator.
2. Remove the four nuts on top of the spring case.
Disassemble the Flowgrid regulator according to the
instructions in the Flowgrid IOM manual. On stand alone
slam shut valves remove the cap and cap o-ring. Discard
the o-ring.
3. Remove the shut-off valve assembly and body seal from
the Flowgrid body.
Figure 10 - Removal and installation of the shut
off valve from the regulator or valve body. (2”
shown)
Screw
Right
Spring
Seal
Retainer
Flanged
Bushing
Flapper
Flapper
Shaft
Bushing
Pin
O-Ring
Flapper
Seal
Nut
O-Ring
O-Ring
O-Ring
Flapper
Shaft
Left
Spring
Shutoff Valve
Housing
Flanged
Bushing
Figure 11 - Shut Off Valve Assembly and Disassembly (2” Shown)
Spring
Case
Spacer
O-Ring
Capacity Tag
Body Seal
Diaphragm
Throttle
Plate
Shutoff Valve
Assembly
Nut
Spacer
Main Spring
Roll Pin
Stud
Roll Pin
Body Seal
2” CL 300 RF Flanged
Disassembly of the Shut-off Valve
1. Remove the rear reset nut and discard o-ring. The
threads are right hand on the rear reset nut and must
turned counter clockwise.
2. Using a hex wrench, remove the two flat head screws
holding the seal retainer and slam shut body together.
3. Remove the seal retainer and flapper seal. Discard the
flapper seal.
4. Hold the top face of the flapper flush with the top of the
valve body. Using a punch, drive the two spring pins out
of the flapper and shaft.
5. Remove the shaft from the valve body. The front reset
nut can be used as a handle to remove the shaft.
6. Remove and discard the o-ring from the shaft bore in the
flapper valve body.
7. Inspect the sealing surface of the flapper. Replace the
flapper if the surface that mates with the seal is worn or
pitted.


