SECTION 5
MAINTENANCE
Page 50
OM560C99/1E
DRESSTA
TRANSMISSION AND TORQUE CONVERTER
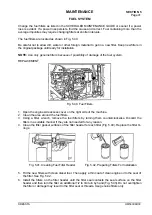
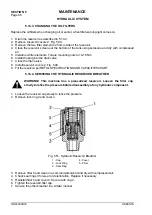
1 - Base
2 - Seal ring
3 - Filter element
4 - Element support
5 - Spring
6 - Case
7 - Sealing washer
8 - Hold-down bolt
4. Turn case 6 upside down to drain the oil.
5. Remove and discard element 3.
6. Remove and discard seal ring 2.
7. Wash all parts thoroughly in solvent and dry with compressed air. Wash the inside of base 1
thoroughly.
8. Insert hold-down bolt 8 with washer 7 through case 6.
9. Install spring 5, element support 4 and new filter element 3. Check that all parts are it is seated
completely.
10. Coat new sealing ring 2 with chassis grease, if necessary, and install into base 1.
11. Install the filter case to the base with hold-down bolt 8 so the case seats squarely in the base.
Torque the hold-down bolt to 140 Nm.
12. Start the engine and let it idle for approximately five minutes. Stop the engine and check the
filters for leakage, correct all leaks.
13. Check the oil level as described in 5.18.1.
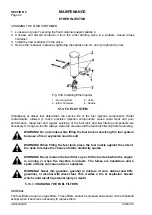
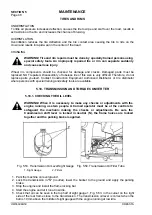
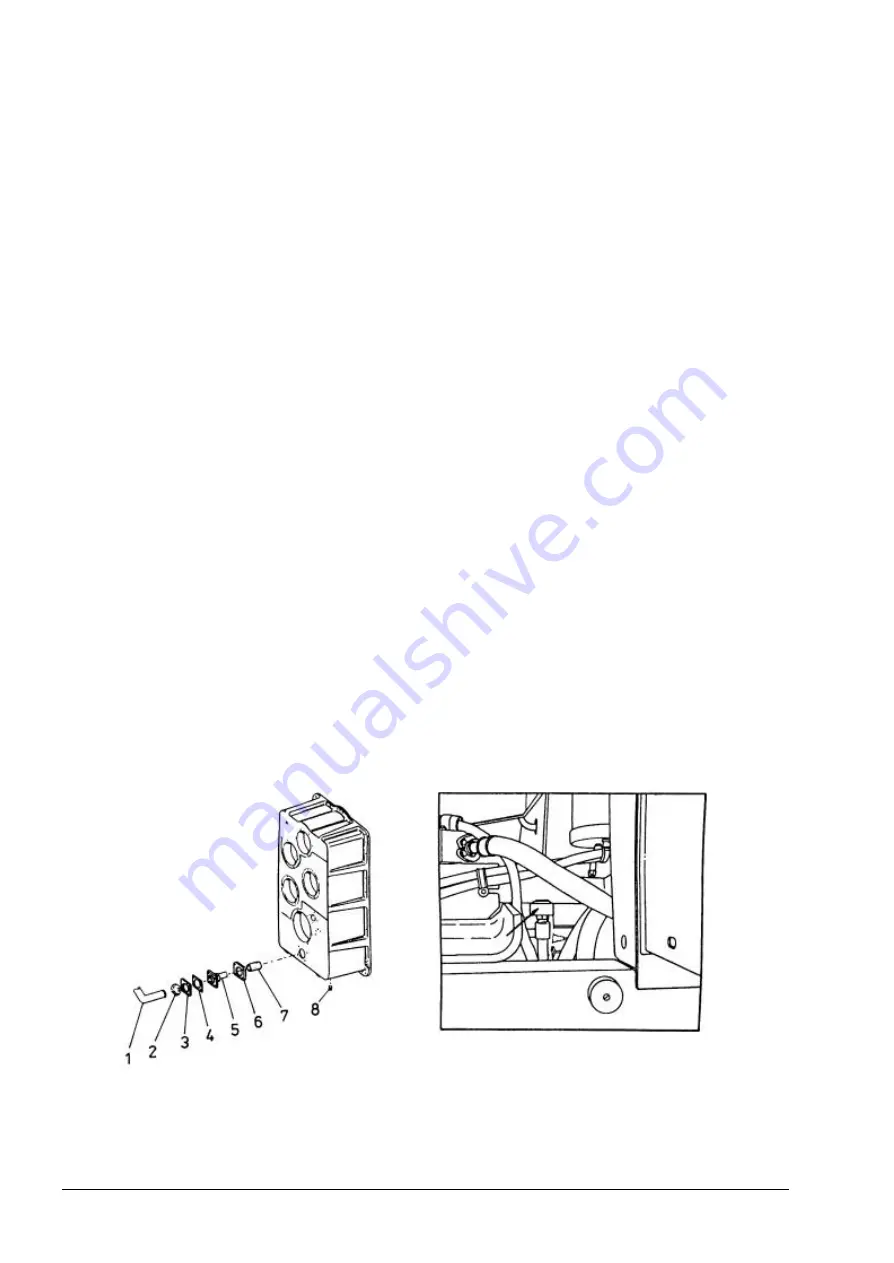
5.18.4. CLEANIING THE TRANSMISSION OIL STRAINER (FIG. 5.56)
1. The transmission should have been drained as described under 5.18.2. Install drain plugs.
2. Disconnect tube 1. Protect its end against contamination.
3. Remove retainer 3, gasket 4 , check valve 5, gasket 6 and strainer assembly 7.
4. Thoroughly clean the gasket material 4 and 6 and replace if necessary.
5. Wash the strainer in a commercial cleaning solvent. Remove ail particles from the magnetic
rods on the strainer. If necessary, the rods can be removed. Dry the strainer with compressed
air, if available.
6. Install strainer assembly 7, gasket 6, check valve 5, gasket 4 and retainer 3.
7. Attach tube 1.
8. Fill the transmission with fresh lubricant in accordance with 5.18.2. Check the sump strainer for
leaks before putting the machine into operation.
Fig. 5.56. Transmission Oil Strainer
Fig. 5.57. Transmission And T.C. Breather
1 - Tube
2 - Split Flange
3 - Retainer
4 - Gasket
5 - Check Valve
6 - Gasket
7 - Strainer
8 - Drain Plug
Summary of Contents for 560C
Page 1: ...OM560C99 1E OPERATOR S MANUAL 560C SERIAL NUMBERS 15001 AND UP ...
Page 3: ......
Page 5: ......
Page 7: ......
Page 10: ...SECTION 1 INTRODUCTION ...
Page 12: ......
Page 16: ...SECTION 2 SAFETY PRECAUTIONS ...
Page 18: ......
Page 32: ...SECTION 3 MACHINE TRANSPORT AND STORAGE ...
Page 34: ......
Page 42: ...SECTION 4 OPERATING ...
Page 43: ......
Page 45: ......
Page 49: ...SECTION 4 OPERATING Page 6 OM560C99 1E DRESSTA UNIVERSAL SYMBOLS FOR INSTRUMENTS AND CONTROLS ...
Page 88: ...SECTION 5 MAINTENANCE ...
Page 141: ...SECTION 6 SPECIFICATIONS ...
Page 143: ......

