background image

  5 

Setting up the CarDAQ-M 


Do not connect the CarDAQ-M to your PC until you 
have installed the software below. 


Installing the CarDAQ-M Software to your PC 

1.


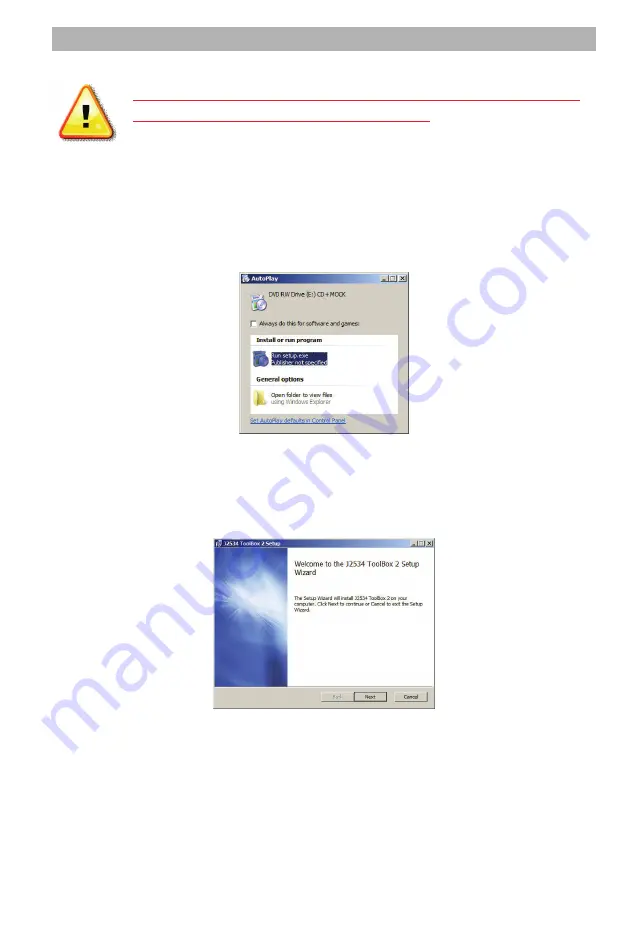
Insert the CD that came with your CarDAQ-M into the CD/DVD slot of 
your PC. Make sure your CarDAQ-M is not connected to the PC at this 

point. The Autoplay options will appear: 


2.


Click on [Run setup.exe] to begin the installation.  


3.


The J2534 ToolBox, Tech2Win Driver and the CarDAQ-M drivers 

will now begin installation. Follow the Setup Wizard instructions.  


4.


When the installation is finished, power up your CarDAQ-M from a 

vehicle with the OBDII cable. 


5.


Connect the USB cable from CarDAQ-M to your PC. The drivers 

will automatically be found and installed on Windows Vista and 7 

computers.  


For Windows XP, a few more steps are required: 


Summary of Contents for CarDAQ-M J2534-1&2 Module

Page 1: ...CarDAQ M J2534 1 2 Module Quick Start Guide...

Page 2: ...ng this website for service information www nastf org While Drew Technologies testing and the experience of thousands of CarDAQ M users have shown the interface to be safe and reliable there is an inh...

Page 3: ...O CARDAQ M 6 4 THE CAPABILITIES OF J2534 AND CARDAQ M 7 REPROGRAMMING WITH J2534 7 J2534 TOOLBOX 7 REGISTERING CREATING AN ACCOUNT 7 J2534 TOOLBOX RESOURCES 9 UPDATING THE CARDAQ M DRIVERS ON YOUR PC...

Page 4: ...AQ CarDAQ2534 and J2534 ToolBox are registered trademarks of Drew Technologies Inc All other trademarks and brand names are the property of their respective owners 2 Getting to Know CarDAQ M Your pack...

Page 5: ...oint The Autoplay options will appear 2 Click on Run setup exe to begin the installation 3 The J2534 ToolBox Tech2Win Driver and the CarDAQ M drivers will now begin installation Follow the Setup Wizar...

Page 6: ...d can run the software they will be using with the CarDAQ M Adding an Expansion Module to CarDAQ M Note Unplug all cables from CarDAQ M before connecting or disconnecting modules To add an expansion t...

Page 7: ...ry diagnostics Use the J2534 Toolbox for more information on the capability provided from each manufacturer J2534 ToolBox The J2534 ToolBox is a program created by Drew Technologies to help distribute...

Page 8: ...ion of the registration will require you to fill out information regarding your J2534 Toolbox account Step 2 Business Information will require some information about your business Step 3 Device Regist...

Page 9: ...ashing This tab has all the information you will need before you get started with a re flash Reference the information here before you get started when you need to do a re flash Diagnostics This tab h...

Page 10: ...omputer is running a 32 or 64 bit version of Microsoft Window Right click on Computer in the Start menu and click on Properties to find this information 3 Download the Drivers Only installer for your...

Page 11: ...ysler SCI J2610 o Compliant to SAE J2534 Feb 2002 and SAE J2534 1 Dec 2004 o Compliant to ISO 22900 1 MVCI physical layer o Programming voltage on J1962 pin 6 9 11 12 13 14 or Aux o Ground pin 9 Speci...

Page 12: ...ansion module is connected to the CarDAQ M with both the Vehicle and Expansion C ports then secured by with metal tabs and screws between the modules Vehicle OBDII cable is connected here Expansion C...

Page 13: ...mation and then provided with a Return Merchandise Authorization number RMA Drew Technologies will use the RMA to track the unit through the repair process Please write this number on the outside of y...

Page 14: ...14 Notes...

Page 15: ...15 Notes...

Page 16: ...running internal programs protocol support for all modern vehicles and six analog inputs Mongoose Pro Drew Technologies family of low cost high performance PassThru SAE J2534 vehicle interfaces Connec...

Reviews: