background image

SKU 95622     

For technical questions please call 1-800-444-3353

   Page 6

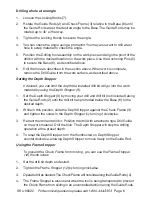
Drilling a hole at an angle

1.

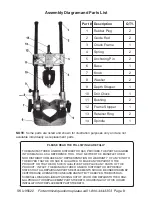
Loosen the Locking Knobs (7).

2.

Rotate the Guide Rods (2) and Chuck Frame (3) relative to the Base (6) until

the Guide Rods are at the desired angle to the Base. The Guide Rods may be
rotated up to 45° either way.

3.

Tighten the Locking Knobs to secure the angle.

4.

You can check the angle using a protractor. You may also want to drill a test

hole in scrap material to check the angle.

5.

Position the Drilling tool assembly on the work piece and align the point of the

drill bit with the desired location on the work piece. Use the Anchoring Pins (5)
to secure the Base (6), as described above.

6.

Drill the hole as described in the section above. When work is complete,

remove the Drill Guide from the work surface, as described above.

Setting the Depth Stopper

If desired, you can limit the depth the installed drill bit will go into the work

material by using the Depth Stopper (9).

1.

Set the Depth Stopper (9) by moving your drill and drill bit (not included) along

the Guide Rods (2) until the drill bit has protruded below the Base (6) to the
desired depth.

2.

While in this position, slide the Depth Stopper against the Chuck Frame (3)

and tighten the screw in the Depth Stopper by turning it clockwise.

3.

Retract the drill and drill bit. Position the drill with attached Angle Drill Guide

on the work material. Drill the hole. The Depth Stopper will stop the drilling
operation at the preset depth.

4.

To reset the Depth Stopper, turn the thumbscrew on Depth Stopper

counterclockwise, allowing Depth Stopper to move freely on the Guide Rod.

Using the Frame Stopper

To prevent the Chuck Frame from moving, you can use the Frame Stopper

(12) thumb screw.

1.

Set the drill bit depth as desired.

2.

Tighten the Frame Stopper (12) by turning clockwise.

3.

Operate drill as desired. The Chuck Frame will not slide along the Guide Rods (2).

4.

The Frame Stopper is also useful when the tool is being transported to prevent

the Chuck Frame from sliding in an uncontrolled fashion along the Guide Rods.

Summary of Contents for 95622

Page 1: ...ny artwork contained herein may be reproduced in any shape or form without the express written consent of Harbor Freight Tools For technical questions and replacement parts please call 1 800 444 3353 95622 Due to continuing improvements actual product may differ slightly from the product described herein To prevent serious injury read and understand all warnings and instructions before use Glove a...

Page 2: ...hen not in use tools must be stored in a dry location to inhibit rust Always lock up tools and keep out of reach of children 5 Use the right tool for the job Do not attempt to force a small tool or attachment to do the work of a larger industrial tool There are certain applications for which this tool was designed It will do the job better and more safely at the rate for which it was intended Do n...

Page 3: ...uch as copper chromium arsenate CCA which can be toxic When cutting these materials extra care should be taken to avoid inhalation and minimize skin contact 13 Check for damaged parts Before using any tool any part that appears damaged should be carefully checked to determine that it will operate properly and perform its intended function Check for alignment and binding of moving parts any broken ...

Page 4: ...components of this product contain lead a chemical known to the State of California to cause birth defects or other reproductive harm California Health Safety code 25249 5 et seq WARNING The warnings cautions and instructions discussed in this instruc tion manual cannot cover all possible conditions and situations that may oc cur It must be understood by the operator that common sense and caution ...

Page 5: ...in the Angle Drill Guide and attaching the drill position the tool on your work material 2 Align the tip of the drill bit with the desired location on the work material 3 To prevent the Base 6 from moving on the work material during drilling you can use the Anchoring Pins 5 Press the Anchoring Pins 5 downward through the Base into the work material This will hold the Base in position 4 Squeeze the...

Page 6: ... material by using the Depth Stopper 9 1 Set the Depth Stopper 9 by moving your drill and drill bit not included along the Guide Rods 2 until the drill bit has protruded below the Base 6 to the desired depth 2 While in this position slide the Depth Stopper against the Chuck Frame 3 and tighten the screw in the Depth Stopper by turning it clockwise 3 Retract the drill and drill bit Position the dri...

Page 7: ...aterial as described on page 5 Maintenance 1 Keep the Angle Drill Guide clean and dry Prevent exposure to water or corrosive materials which may rust or damage the tool 2 To keep the tool working smoothly occasionally apply a light grease to Guide Rods 3 To prevent rust occasionally apply a light oil to all threads and metal surfaces of the tool Storage 1 When not in use store the Angle Drill Guid...

Page 8: ...RTAKEN BY CERTIFIED AND LICENSED TECHNICIANS AND NOT BY THE BUYER THE BUYER AS SUMES ALL RISK AND LIABILITY ARISING OUT OF HIS OR HER REPAIRSTOTHE ORIGI NAL PRODUCT OR REPLACEMENT PARTSTHERETO OR ARISING OUT OF HIS OR HER INSTALLATION OF REPLACEMENT PARTSTHERETO Assembly Diagram and Parts List t r a P n o i t p i r c s e D Y T Q 1 g u l P r e b b u R 2 2 d o R e d i u G 2 3 e m a r F k c u h C 1 4...

Reviews: