background image

|  17

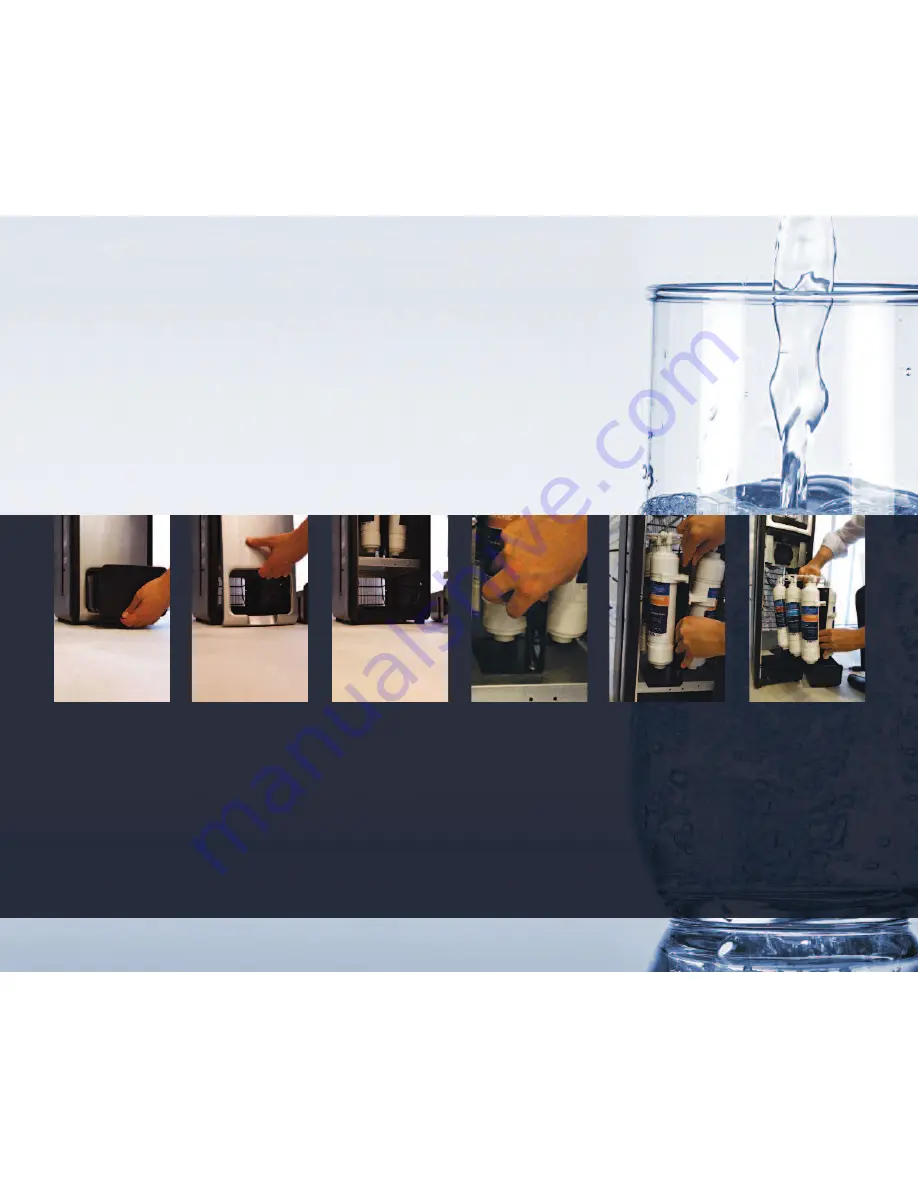
Accessing the filter compartment

Accessing the filter compartment is simple. First, remove the drip tray and set aside. Then, grip the opening of the unit
face and gently pull away. 
Next, with a philips head screw driver, unscrew the single screw holding the filter frame in place. At that point the filter
frame will slide out easily so you can access all of the filters. When changing filters, take care to have a towel on the floor
to catch any accidental leakage.
To reassemble, simple reverse the steps.

Summary of Contents for 500 series

Page 1: ...SERIES 500 owners manual Point of Use Drinking Water Appliance ...

Page 2: ...ater you could ever want Your Drinkpod Series 500 is designed to purify and disinfect tap water at the point of use by utilizing one of the most advanced filtration processes available Once the tap water is treated by a multi stage filter process it enters the cooling tank and hot water tank The hot water tank holds water hot enough for coffee or a cup of soup All of our Drinkpod units include a f...

Page 3: ...ill void the warranty Unpacking the Unit Unwrap the plastic strapping and carefully lift the box over the Series 500 Then remove the protective wrapping and place the unit in the installation area WARNING Plastic bags and wrapping can present a choking hazard for small children Please discard thoughtfully Before first use Before using your Drinkpod Series 500 we suggest reading this manual complet...

Page 4: ...when not in use and before cleaning Always use caution when removing any parts such as filters the drip tray or faucet Use the Series 500 only in dry locations away from direct sunlight in ambient temperatures of 40 F 100 F Do not operate any Series 500 with a damaged cord or plug or after the Series 500 malfunctions or has been dropped or damaged in any manner Return the Series 500 to your author...

Page 5: ... is used the marked electrical rating of the extension cord must be at least as great as the electrical rating of the Series 500 Ensure the extension cord is arranged so that it does not drape over the counter or tabletop where it can be pulled on or tripped over The power supply cord has a polarized plug one blade is wider than the other To reduce the risk of electrical shock this plug will fit i...

Page 6: ...er Supply Drainage Plug Water Source Inlet RO Drain Line Outlet Serial Number Hot and Cold Compressor Switches Drip Collector getting to know your Series 500 6 Included with your Series 500 25 Food Grade PVC Tubing Self piercing Saddle Valve Shut Off Ball Valve Brass connectors and fittings ...

Page 7: ...l Support for specific instructions and recommendations for adapter fittings Make sure there are no sharp bends or kinks in the tubing Allow extra tubing to prevent stress on the fittings Avoid tubing contact with other objects and sharp edges All tubing used in the elbow fitting and shutoff valve must be clean cut square with a sharp knife or razor and free of nicks and burrs If you need addition...

Page 8: ...n Typically but not always necessary a small hole is cut in the back of the cabinet and the wall and the tubing is run through the wall or a drop ceiling to the cooler location If this is not possible take care that the tubing is not exposed or draped or creates a tripping hazard in any way Step 3 Install the optional shut off ball valve Included in your kit is an optional shut off ball valve This...

Page 9: ...ter source inlet on the back of the Series 500 Step 4 Make sure the compressors are off On the back of the Series 500 are two switches that turn the heating and cooling compressors on Be sure both switches are in the off or O position Step 5 Turn on the water source back on The water will begin to flow through the lines to the cooler ...

Page 10: ...me you may hear water flowing inside the Series 500 This is normal Step 7 Test water flow Once the tanks are filled ensure proper function by placing a cup under the dispenser and pressing the cold water button If functioning normally then press the hot water safety lock and then the hot water button Be sure that water flows freely from each operation Step 8 Flush the tanks and filters For optimum...

Page 11: ...e on or I position The chilling and heating indicators on the touch panel will light as chilling and heating is in process When the indicators go off water has reached the proper temperature The tanks will rechill or reheat as needed to ensure proper temperature Step 10 Enjoy Enjoy endless amounts of clean delicious and pure water ...

Page 12: ...ren do not accidentally get scalded To dispense hot water place a cup under the dispensing unit then press the Hot Water Safety Lock button Then press the hot water button To stop dispensing release the button The Hot Water Safety Lock will automatically reset after 5 seconds Button Reset Your Series 500 is designed with safety in mind To guard against accidental overflow the unit will stop dispen...

Page 13: ...filling a mug or smaller cup use the fold down cup holder and be closer to the dispenser Cup Dispenser Your Series 500 is equipped with a handy disposable cup dispenser specifically designed with child safety and hygiene in mind The dispenser fits a standard 6oz size found at most retailers To load the dispenser simply insert a stack of disposable cups pushing in gently until no more cups will fit...

Page 14: ...ector Your Series 500 is equipped with a drip collection tray and fullness sensor at the base of the unit When full a LED light will flash on the touch panel and a soft alarm will sound To empty the drip collector simply slide the tray out empty and then slide the tray back in NOTE If the LED light continues to blink after emptying the unit senses a possible water leak Unplug the unit wipe dry The...

Page 15: ...turning the hot and cold power off as well as the water supply The switches are located on the top back of the unit and the optional shut off ball valve NOTE If left unattended for more than a couple of days it is advised to flush the system by dispensing and then disposing of 2 3 glasses of water ...

Page 16: ...l of your Series 500 simply unfasten the screws holding the panel in place and slide the cover off No Hot Water If upon testing you find there is no hot water it is possible the water heater was turned on before the tank was completely full To avoid burnout of the mechanism the water heater is equipped with a safety off switch To reset the heater simply press the reset button on the back of the un...

Page 17: ... unit face and gently pull away Next with a philips head screw driver unscrew the single screw holding the filter frame in place At that point the filter frame will slide out easily so you can access all of the filters When changing filters take care to have a towel on the floor to catch any accidental leakage To reassemble simple reverse the steps ...

Page 18: ...embrane 2 3 years RO 2 3 Years All filters are In line including the RO Filter Twist Carbon Block filter is a simple twist filter Size of filters 11 x 2 5 inches Internal External Parts Stainless steel tanks are more sanitary and durable than plastic tanks with no possible chance of leaching in the water with stainless steel tanks like there is with plastic tanks 2 year parts warranty and outstand...

Page 19: ...covered by this Limited Warranty at Drinkpod s option In any case the value of the Warranty shall not exceed the original purchase price paid for the water dispenser OWNER S OBLIGATIONS The owner has the obligation and responsibility to diagnose and or make minor repairs to the cooler to keep it in working order DRINKPOD S OBLIGATIONS Drinkpod s obligation under this Limited Warranty is limited to...

Page 20: ...844 DRINKPOD 844 374 6576 drinkpodusa com ...

Reviews: