www.petfountain.com
REASSEMBLY OF THE STAINLESS STEEL DRINKWELL
®
360
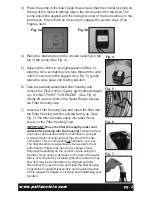
1) Replace the pump into its original location (See Assembly Step 3).
Be sure that the circular opening on the top of the pump is directly
above the circle outlined on the bowl. The pump should be aligned with
the top right corner of the box outlines on the bowl. Gently push down
to engage the suction cups.
2) Replace the Intake Tube into the circular opening on the top of the
pump.
3) Keeping the motor in its original position, align the cone so that the
cord runs through the cord notch. Once the cord is aligned (See Pg. 2,
Fig. 5), gently place the cone piece into resting position.
4) After cleaning your fountain, it is a good idea to replace your filter with
a new one. After replacing the filter, screw on the filter housing cap.
5) Look into the cone opening and make sure the intake tube is sticking
straight up from the motor. Carefully, insert the Filter Housing into the
cone opening and push straight down. By pushing the Filter Housing
all the way down to the rubber gasket, the housing should easily attach
to the intake tube.
6) Choose your preferred Spout Ring (1 spout up to 5 spouts) and place
on top of the Filter Housing Cap, press it gently into place. Be sure it is
pushed down evenly all the way around.
8) Replace the Flow Control Cap by aligning the cap with the notches on
the Filter Housing Cap. Gently push down to secure in place.
9) Attach the three cord clips around the base of the fountain to hide the
electrical cord and secure the cone piece into place.
10) Place fountain in desired location and fill with water to the MAX fill line.
11 ) With dry hands, reconnect the inline plug and then plug the fountain in.
Adjust the flow to your preference and let your pet enjoy the fresh free-
falling water of the Stainless Steel Drinkwell
®
360™ Pet Fountain.
pg. 7


