background image


CMS Electric Scooter  

Page 4 of 16 

Owner’s Handbook (Code: CMS_IFU 05/18) 

4.2


How To Operate Your Scooter 


Key Ignition. The key ignition acts as the power 
switch for the scooter. To switch the power on, 
turn the key clockwise and the battery gauge 
should illuminate. To switch the power off, turn 
the key anticlockwise, after which the battery 
gauge should switch off and the key can be 
removed. 


Do not turn the ignition off whilst 
driving as this will lead to an emergency 
stop and possible risk of damage or 
injury. 


Speed Dial. Turn the speed dial to determine the 
maximum speed of the scooter. Turn the dial 
clockwise to increase the speed setting and turn 
the dial anticlockwise to decrease the speed 
setting. 


Do not adjust the speed dial whilst 
driving. Do not set to the highest speed 
whilst driving indoors. 


Moving and Braking. To move forward, squeeze 
the right hand side of the wigwag paddle 
towards you. Squeeze the left hand side of the 
wigwag paddle towards you and the scooter will 
move backwards, emitting an audible reversing 
alarm. To brake, release the wigwag paddle 
which will return to neutral and activate the 
electromagnetic brake automatically and bring 
the scooter to a prompt stop. The wigwag paddle 
allows you to control the speed of the scooter up 
to a max speed determined by speed Dial. The 
further the wigwag paddle is deflected, the faster 
the scooter will go (up to 4mph). 

NOTE: wait at least 2 seconds before operating 
the wigwag paddle after starting the scooter with 
the key. Operating the wigwag paddle at the 
same time as the key switch will cause the 
scooter to diagnose an error. 


Warning 
Do not push both left and right hand 
sides of the wigwag simultaneously. 
You will not be able to control the 
scooter. 


Horn Button. Press the horn button to sound the 
horn. Release the button to stop the horn. The 
horn is the yellow button located on the control 
panel. 


Braking – Electromagnetic Brake. Release the 
wigwag paddle completely, and the 
electromagnetic brake will be activated 
automatically and the scooter will stop. 


When on a gradient, never set the 
vehicle to freewheel mode. The brakes 
will not be applied. 


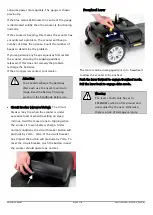
Seat. The seat can be rotated and locked in 
position at 45º intervals. Push the seat lever 
forward and swivel the seat. Release the lever 
and then continue swivelling the seat until it 
locks in position. 


Attention. 
Return the seat to the forward 
position before driving. 


Adjusting the Seat Height.  

Firstly remove the seat by rotating the seat 
(as described above) whilst pulling up on the 
seat. Remove the nut and bolt securing the 


Summary of Contents for CMS001

Page 1: ...4mph Scooter Owner s Manual Dealer Stamp Drive DeVilbiss Healthcare Ltd Heathfield Lane Birkenshaw West Yorkshire BD11 2HW Issued 01 18 ...

Page 2: ...ng assembly and maintenance instructions for the scooter A repair and maintenance record chart and warranty information is included with this handbook Please keep it in a safe place or with the scooter If someone else uses the scooter make sure that you provide him or her with this handbook for their consideration As designs change some of the illustrations and pictures in the manual may not corre...

Page 3: ...wn for your initial practice 2 2 Whilst Driving Do not use your scooter on surfaces that are muddy gravelly bumpy narrow snowed over icy or on towpaths near to canals which are not guarded Do not use your scooter outside when it is raining snowing misty or windy Do not make erratic turns on your scooter Bear in mind driving motions such as accelerating stopping turning reversing and the effect of ...

Page 4: ...a risk this interference may cause involuntary movement of the scooter The scooter has been tested and passed to withstand interference to a level of 20V per metre Be aware that the above sources may cause involuntary movement due to EMI Exercise caution whilst using the aforementioned devices and avoid close proximity to TV and Radio broadcast stations The addition of components or accessories ma...

Page 5: ...ter to a prompt stop The wigwag paddle allows you to control the speed of the scooter up to a max speed determined by speed Dial The further the wigwag paddle is deflected the faster the scooter will go up to 4mph NOTE wait at least 2 seconds before operating the wigwag paddle after starting the scooter with the key Operating the wigwag paddle at the same time as the key switch will cause the scoo...

Page 6: ...rm Tiller Lock When the tiller is centred pull the tiller lock out and twist to secure the tiller for transportation Push the tiller lock up to release Always ensure the tiller lock is disengaged when driving the scooter Always check the tiller moves and turns freely before driving Battery Gauge The LEDs will illuminate to show the amount of power remaining in the batteries The more LEDs are lit t...

Page 7: ...ter each use to ensure maximum range Read the Battery Charging section in the handbook before use Circuit Breaker Arrowed Below The circuit breaker may trip when the scooter is under excessive load or when travelling on steep inclines It will be more prone to tripping when the scooter is low on battery charge Under normal conditions the circuit breaker button will protrude by 2mm 3mm If the circui...

Page 8: ... arms on them 4 Switch the key ignition on 5 Check the battery gauge to check there is enough power for your journey If you have any doubt about the remaining power recharge the battery pack before use 6 Set the speed dial to a position you feel safe and comfortable with 7 Check the wigwag paddle and automatic brake work correctly 8 Before driving check the environment around you is safe for you t...

Page 9: ...oter and the battery pack can be charged away from the scooter To Remove the Battery Pack 1 Switch the scooter off at the ignition 2 Lift the scooter battery pack up by the handle see below To Install the Battery Pack 1 Remove the charger from the battery pack 2 Drop the battery pack in to the void on the scooter 3 Press down lightly on the battery pack to ensure it is securely installed Charger L...

Page 10: ... The batteries require charging every week to ensure battery longevity The batteries supplied as standard with the battery pack are classified as safe for air transport under IATA special provision A67 Warning If battery pack loses contact with the scooter during operation switch the key ignition off re insert the battery pack and switch the ignition back on Battery Care 1 You should recharge the ...

Page 11: ... Care Tyre condition will be affected by how you drive the scooter and what terrain it is driven on The scooter comes with solid tyres which are puncture proof so there is no need to check tyre pressure 7 4 Cleaning The scooter should be cleaned periodically especially if you tend to drive on sand gravel or in other adverse environments Use a soft wrung dry cloth to keep your scooter clean and dus...

Page 12: ...g 22lb CMS001 or 14 2kg 31lb CMS002 1 Lift the basket up to remove it from the front tiller 2 Remove the seat First push the seat swivel lever forward Then pull up on the seat whilst rotating the seat 3 Remove the Battery Pack Pull up on the battery pack handle to remove 4 Separate the front and rear sections Press down on the handle of the rear section 1 whilst pulling up using the lever 2 on the...

Page 13: ... 2 Connect the front and rear sections together Hold the back of the rear section and lift the front section in to place using the lever Then release the rear section and lower the front section with the lever Release the lever and ensure the sections are securely linked 3 Drop the battery pack in to the void in the scooter Press lightly on the top of the battery pack to ensure the battery pack is...

Page 14: ...t knob Release Tiller Lock Problem Horn sounds involuntarily automatically Symptoms The scooter has diagnosed a fault Remedy Ensure the wigwag paddle is released and switch the scooter off and on Recharge batteries if error persists 7 SPECIFICATION Model Reference CMS001 CMS002 Dimension L x W x H 102cm x 56cm x 91cm 40 x 22 x 36 Total Weight see below for weights of component parts 47 6kg 105lb 5...

Page 15: ...ny repaired or replaced parts will be covered by this warranty for the balance of the warranty period on the scooter 5 Consumable items supplied will not generally be covered during the normal warranty period unless such items require repair or replacement clearly as a direct result of a manufacturing or material defect Such items include among others upholstery tyres and batteries 6 The above war...

Page 16: ...off switch Seat Control Lever Back Braking Armrests Recharge point Electrics Batteries Connections condition Levels Lights Connections Test run Discharge test Forwards Wheels and Tyres Reverse Wear Emergency stop Pressure Left turn Bearings Right turn Wheel nuts Slope test Motors Over obstacles Wiring List Items repaired Noise Connections Brake Brushes Chassis Condition Steering ...

Reviews: