background image

assembly instructions

Weight capacity 300 lbs (136  Kg)

A-  Short Thumb Screw (5)
B-  Large Thumb Screw (4)
C-  Leg Receivers (2)
D-  Seat (1)

E-  Backrest Frame (2)
F-  Backrest (1)
G-  Legs (4)

F

G

D

A

C1

B

C2

E

E

G

5.  Attach backrest frame (E) to the seat by aligning 

holes on backrest frame supports with the holes on 

the leg receivers (C).  Secure in place using the large 

thumb screws (B), making sure to pay attention to 

the “rear” of the seat (Figure4).

1.    Remove contents from carton and verify that all  


parts in the parts diagram/list are present.

2.  Place seat upside down on a flat surface so holes  


are showing.

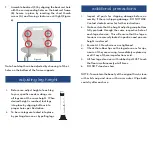
3.  Align the leg section that has the concave area on  


the underside with the holes in seat (Figure 1).   


Align the leg section that has the concave area on  


the top side with the leg section below (Figure 2).  

Figure 1

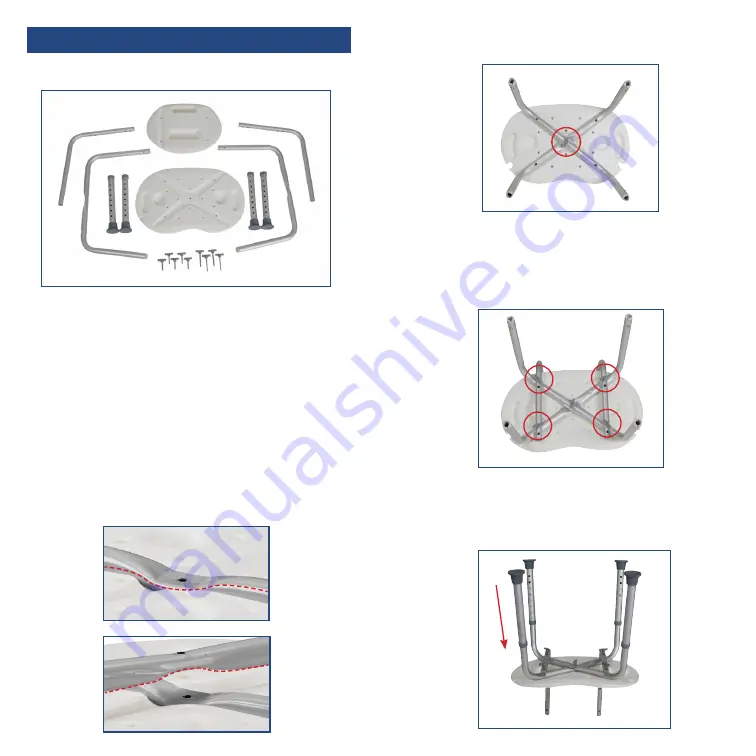
6.  Insert legs (G) into leg frames by depressing push 

pins, sliding legs over the receptacle and setting to 

desired height.  Make sure all the legs are set to the 

same height (Figure 5).

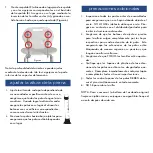
4.  Secure in place through the center hole using a  


SMALL thumb screw (A) (Figure 3).

Figure 2

Figure 3

Figure 4

Figure 5

Summary of Contents for RTL12605

Page 1: ...ion of our confidence in the materials and workmanship of our products and our assurance to the consumer of years of dependable service This warranty does not cover device failure due to owner misuse...

Page 2: ...m carton and verify that all parts in the parts diagram list are present 2 Place seat upside down on a flat surface so holes are showing 3 Align the leg section that has the concave area on the unders...

Page 3: ...rubber tips on the leg extensions for rips wear or if they are missing Immediately replace any or all if any of these imperfections exist 5 All four leg extensions with rubber tips MUST touch the floo...

Page 4: ...rando 3 Alinear la secci n de la pierna que tiene el rea c ncava en la parte inferior con los orificios de asiento Figura 1 Alinear la secci n de la pierna que tiene la zona c ncava en la parte superi...

Page 5: ...ione todas las partes antes de ensamblarlas para asegurarse que no se hayan da ado durante el env o NO LO USE si detecta da os por env o P n gase en contacto con el distribuidor portador para recibir...

Page 6: ...le sch ma des pi ces liste sont pr sents 2 Placez le si ge l envers sur une surface plane afin trous sont visibles 3 Aligner la section de jambe qui comporte la surface concave sur la face inf rieure...

Page 7: ...n avant le montage NE PAS UTILISER le produit en cas de dommages lors de l exp dition Entrez en contact avec le d taillant et le transporteur pour d autres instructions 2 Assurez vous que les boutons...

Page 8: ...Drive 2014 Medical Depot Inc Tous droits r serv s Drive est une marque de commerce de Medical Depot Inc Port Washington NY 11050 USA Fabriqu en Chine garant a limitada de por vida Su producto marca Dr...

Reviews: