background image

1.  Remove contents from carton.
2.  Lay both transfer bench seat sections upside down on  

  a flat surface.
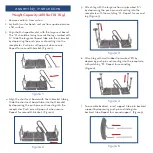
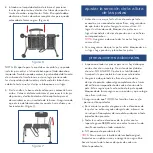
3.   Align the U-shaped bracket with the large seat board. 

The “U” should be facing towards the legs marked with 

“A”. Slide the large seat board tube into the U-bracket 

by depressing the push pins and inserting into the 

receptacles. Push pins will pop out when secure. 

Repeat for second U-bracket. (Figure 1)

assembly instructions

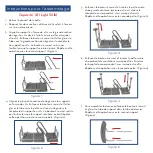
4.   Align the short seat board with the U-bracket tubing. 

Slide the short seat board tube into the U-bracket 

by depressing the push pins and inserting into the 

receptacles. Push pins will pop out when secure. 

Repeat for second U-bracket.  (Figure 2)

figure 1

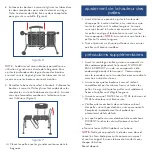
figure 3

figure 4

figure 5

Weight Capacity: 400 lbs (181 Kg)

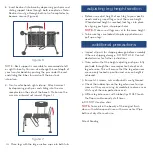
5.   Attach leg with the large suction cup (marked “A”) 

by depressing the push pin and inserting into the 

receptacle with the matching “A”.  Repeat for second 

leg. (Figure 3)

6.   Attach leg with small rubber tip (marked “B”) by 

depressing push pin and inserting into the receptacle 

with matching “B”.  Repeat for second leg.  

(Figure 4)

7.   To assemble backrest, insert support tube into backrest 

support by depressing push pin and sliding into 

backrest tube. Repeat for second support.  (Figure 5)

figure 2

Summary of Contents for RTL12032KDR

Page 1: ...warranty does not cover device failure due to own er misuse or negligence or normal wear and tear The warranty does not extend to non durable components such as rubber accessories casters and grips wh...

Page 2: ...tube into the U bracket by depressing the push pins and inserting into the receptacles Push pins will pop out when secure Repeat for second U bracket Figure 2 figure 1 figure 3 figure 4 figure 5 Weig...

Page 3: ...height adjusting push pins fully protrude through the same respective hole of each leg extension This will ensure that the leg extensions are securely locked in position and an even height is achieve...

Page 4: ...corta para sentarse dentro del soporte en U presionando las clavijas de presi n e introduci ndolo dentro de los recept culos Las clavijas de presi n saldr n al quedar aseguradas Repetir lo mismo para...

Page 5: ...ra de ajuste de las clavijas de presi n sobresalga completamente a trav s del orificio correspondiente de cada extensi n de la pata Esto asegura que la extensi n de la pata quede bloqueada de forma se...

Page 6: ...s supports en forme de U Enfoncez le bouton ressort et faites glisser le tube sous la petite section du si ge dans le r ceptacle du support en U Le bouton ressort sortira par l orifice lorsque le supp...

Page 7: ...us que les boutons ressort sortent compl tement par les m mes trous sur toutes les pattes Ceci garantit que les pattes sont solidement fix es et qu elles sont d gale longueur 3 Assurez vous que TOUTES...

Page 8: ...todas las piezas y herrajes est n seguros que los componentes est n en buen estado de funcionamiento y no est n desgastados rotos deshilachados o sueltos y que no haya obstrucciones o impedimentos par...

Reviews: