background image

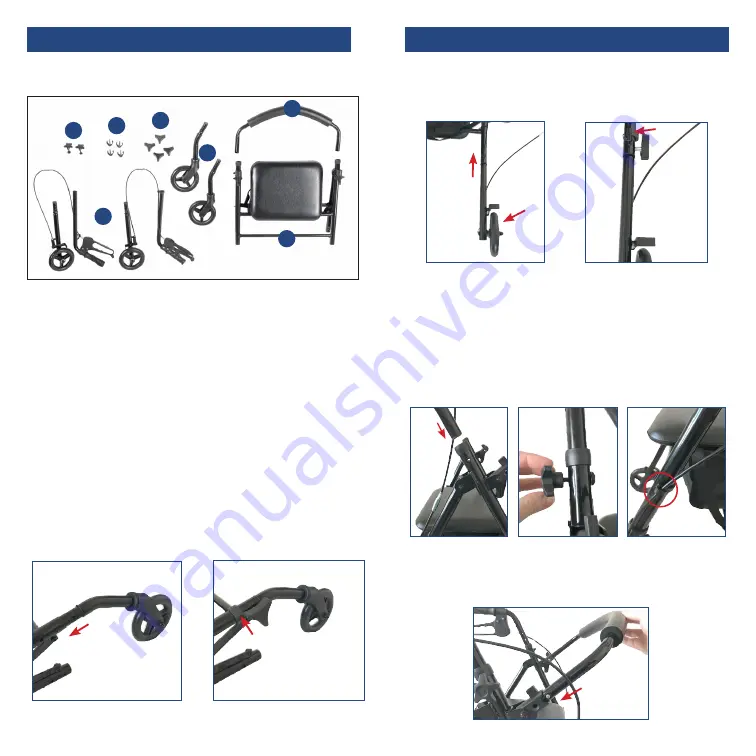
1.  Remove all contents from packaging.

2.  Open frame (A) and place up-side-down on the floor. 

Insert the front wheel assembly (without brakes) (B) 

into the front left frame receptacle. Note: Correspond 

the front wheel assembly labeled “L” with the front 

frame receptacle labeled “L”. Secure in place using the 

wheel tightening knob (D), threading the knob in from 

the outside. Insert c-clip (E) above the knob to secure 

wheel in place. Repeat for second leg, corresponding the 

front wheel assembly labeled “R” with the front frame 

receptacle labeled “R”.

3.  Attach back wheel assembly (with handbrakes) (C) using 

the same process as described in Step 2 making sure the 

wheels are positioned on the outside of the rollator.

4.  Position rollator upright and insert the left handle tube 

into frame and set to desired height. Secure in place using 

the handle tightening knob (F), threading the knob in from 

the outside. Note: Ensure the washer is threaded on the 

inside of the frame closest to the screw head. Repeat for 

the right handle, making sure both handles are set to the 

same height. Affix brake cable to the frame using the “S” 

shaped clamp provided. 

5.  Attach padded backrest (G) by depressing the black thumb 

buttons and sliding into the black bracket. Note  

that back rest can be folded up when not in use.

assembly instructions

assembly instructions

D

E

F

A

B

G

C

A. Frame
B.  Front Wheel Assembly 

(Without Brakes)

C.  Back Wheel Assembly  

(With Handbrakes)

D. Wheel Tightening Knob
E. C-Clip
F. Handle Tightening Knob
G. Backrest

Summary of Contents for RTL800KD-BK

Page 1: ...sters and grips which are subject to normal wear and need periodic replacement If you have a question about your Drive device or this warranty please contact an authorized Drive dealer WARNING This product can expose you to chemicals including bisphenol A BPA which is known to the State of California to cause birth defects or other reproduction harm For more information go to www P65Warnings ca go...

Page 2: ...wheels are positioned on the outside of the rollator 4 Position rollator upright and insert the left handle tube into frame and set to desired height Secure in place using the handle tightening knob F threading the knob in from the outside Note Ensure the washer is threaded on the inside of the frame closest to the screw head Repeat for the right handle making sure both handles are set to the same...

Page 3: ...eat Folding Hinge for Portability Loop Locks Backrest Hanging Bag for Functionality Storage Wheel Tightening Knob WEIGHT CAPACITY 350 LBS 158 KG 1 To Slow Down or Come to a Temporary Stop Pull up slowly on the loop locks with four fingers until unit slows down or comes to a temporary stop 2 To Temporarily Lock Wheels in Position Gently press down on both loop locks with palms until you hear a clic...

Page 4: ...be en el Paso 2 asegurándose de que las ruedas estén colocadas en la parte exterior del andador 4 Coloque el andador en posición vertical e inserte el tubo del mango izquierdo en el marco y ajústelo a la altura deseada Asegure en su lugar usando la perilla de apriete de la manija F enroscando la perilla desde el exterior Nota Asegúrese de que la arandela esté enroscada en el interior del marco más...

Page 5: ...egable Para Transportabilidad Sistema de Seguridad Con Frenos Curvos Disponible Respaldo Cesta Colgante Para Funcionalidad y Guardado Perilla de Apriete de la Rueda instrucciones para ajustar el sistema de freno de mano Aviso importante de seguridad El sistema de freno de mano equipada en este rallator cumple con los estándares de calidad del fabricante El sistema de freno de mano se ha preestable...

Page 6: ...ton de serrage de la poignée G Dossier 3 Fixez l ensemble de roue arrière avec freins à main C en utilisant le même processus que celui décrit à l étape 2 en vous assurant que les roues sont positionnées à l extérieur du déambulateur 4 Positionnez le déambulateur à la verticale et insérez le tube de la poignée gauche dans le cadre et réglez le à la hauteur désirée Fixez en place à l aide du bouton...

Page 7: ...onfortable Charnière Assurant la Portabilité Verrouillage à Boucle Dossier Panier de Rangement Fonctionnel Bouton de Serrage des Roues instructions d adapter le système de frein à main Important avis de sécurité Le système de frein à main monté sur cette rallator conforme aux normes de qualité du fabricant Le système de frein à main a été réglé ajusté pour les meilleurs paramètres de performance A...

Page 8: ...its réservés Drive est une marque de commerce de Medical Depot Inc Port Washington NY 11050 USA Fabriqué en Chine garantie à vie limitée garantía limitada de por vida Su producto marca Drive está garantizado de por vida del producto por el comprador consumidor original de no tener defectos en los materiales y la fabricación Este aparato fue construido de acuerdo a estándares rigurosos y cuidadosam...

Reviews: