background image

5

Indication / Contraindication

Walking device – for indoor and outdoor use – for com-
pensation  and  improvement  respectively  of restricted 
ability of walking.

The purpose of walking devices is to compensate for or 
at least improve restricted walking ability in users (ex-
pansion of range and/or mobility).

Persons with restricted hand/arm functions require spe-
cial adjustments/versions of handgrips or hand rests/
armrests.

For persons with balance disorders walking frames are 
not recommended, this is to be checked by an assess-
ment in an individual case. If it is necessary a compa-
nion must be present.

Contraindication

Use of the Rollator is not recommended for persons 
suffering from: perceptual disorders, severe imbalance 
disorders, an inability to sit

Scope of delivery contents

1. Rollator 
2. Bag
3. Backrest
4. Cane holder
5. Operating instructions

Unfold

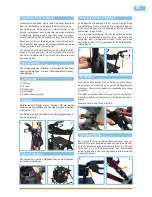
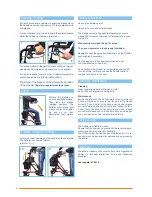
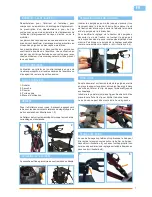
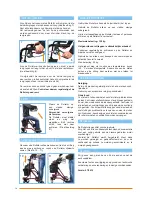
Position the Rollator on its wheels. Open the red safety 
bow and lift up. Now press both pipes from the seat 
downwards until they interlock. (see pictures 1 - 2).

EN

Height adjustment handgrips

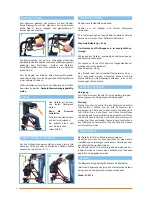
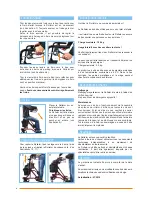
Insert the tube of the adjustable handgrip into the frame 
at least to the “first hole”. Insert the locking screw 
through the pipe from the inside and fix with washer and 
star clutch screw. (see picture 3).

Turn the star clutch counterclockwise to release the lo-
cking screw and change the height setting of the adjus-
table handgrips. Then follow the above instructions to 
secure the handgrip at the desired height.
(see picture 4).

Fitting the bag

Hang the bag with the Velcro loops at the frame tube ends. 
(see pictures 4 - 6).

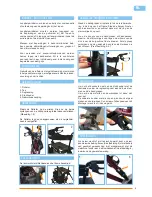
Adjustment of brake

For desired braking strength adjust the brake either 
manually at the screw on the housing of the brake (see 
picture 5)  or with the suitable tool (not included) on the 
brake wire (see picture 6).

3

1

5

6

4

2

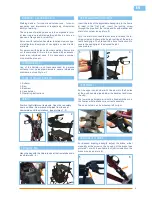
Cane Holder

Put the upper cane holder with the pins into the 2 holes 
at the push handle pipes below the backrest and close 
the clip. 

The lower cane holder part must be fixed with the pin in 
the fixation whole. Make sure correct assembly.

The cane holder can be mounted left or right.

Summary of Contents for Torro

Page 1: ...Rollator Torro ROLLATOR WALKING DEVICE ROLLATOR ROLLATOR Gebrauchsanweisung Operating instructions Manuel d utilisation Gebruiksaanwijzing ...

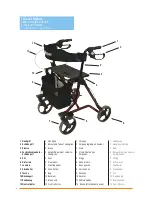
Page 2: ...4 Borgschroef van hoogte verstellingen 5 Zitting 6 Achterwiel 7 Zwenkwiel 8 Stokhouder 9 Tas 10 Rugleuning 11 Bowdenkabel 12 Voorreflector 1 Handgrip 2 Adjustable Tube of Handgrips 3 Brake 4 Height Adjustment screw for handgrips 5 Seat 6 Rear wheel 7 Steering wheel 8 Cane holder 9 Bag 10 Backrest 11 Brake wire 12 Front reflector 1 Poignée 2 Poignée réglable en hauteur 3 Frein 4 Vis de Fixation des...

Page 3: ... ist richtig entfaltet wenn der Verriegelungsha ken eingerastet ist DE Höheneinstellung Schiebegriffe Schiebegriffe mindestens bis zur ersten Querbohrung in das Rahmen Rohr einstecken Die Fixierschraube von innen durchstecken und mit Scheibe und Sterngriff fest schrauben siehe Bild 3 Um die Höheneinstellung der Schiebegriffe zu verän dern die Fixierschraube durch Drehen des Sterngriffs entgegen de...

Page 4: ... führen könnte Reinigung Wartung Reinigung Von Hand mit einem feuchten Tuch regelmäßig reinigen Keine aggressiven Reinigungsmittel verwenden Wartung Stellen Sie sicher dass alle Teile des Rollators einwandfrei funktionieren Prüfen Sie ob alle Schrauben fest angezogen sind Falls nicht ziehen Sie die Schrauben bitte fest Prüfen Sie ob alle Steck und Schnellverschlüsse richtig eingestellt und vollstä...

Page 5: ... press both pipes from the seat downwards until they interlock see pictures 1 2 EN Height adjustment handgrips Insert the tube of the adjustable handgrip into the frame at least to the first hole Insert the locking screw through the pipe from the inside and fix with washer and star clutch screw see picture 3 Turn the star clutch counterclockwise to release the lo cking screw and change the height ...

Page 6: ...ith a damp cloth Do not use any aggressive detergents Maintenance Ensure that all parts of the Rollator are functioning correctly Check all screws and ensure that they are all tightened correctly Check that all of the push on and quick release connectors are positioned correctly and locked in place Check that all buttons on the push in and quick release connectors release and re lock easily Broken...

Page 7: ...orrectement déplié lorsque le crochet de verrouillage est enclenché FR Réglage en hauteur des poignées Insérer les poignées au moins jusqu au premier trou traversant dans le tube du châssis Faire passer la vis de fixation de l intérieur puis serrer à l aide de la rondelle et de la poignée à trois branches Pour modifier le réglage de la hauteur des poignées desserrer la vis de fixation en tournant ...

Page 8: ...r de détergents agressifs Maintenance Assurez vous du bon fonctionnement de l ensemble des pièces du rollator Vérifiez que toutes les vis sont bien serrées Si tel n est pas le cas veuillez les serrer correctement Vérifiez que tous les dispositifs de fermeture rapide sont correctement réglés et parfaitement verrouillés Vérifiez que tous les boutons des dispositifs de fermeture rapide se bloquent et...

Page 9: ...goed opengevouwen als de vergrendel haak is vastgeklikt NL Hoogte van handgrepen verstellen Steek de handgrepen minstens tot de eerste dwarsbo ring in de buis van het frame Steek de borgschroef er van binnenuit door en schroef deze met de ring en de stervormige knop vast Als u de hoogte van de handgrepen wilt aanpassen draait u de stervormige knop tegen de wijzers van de klok in om de borgschroef ...

Page 10: ...uik geen agressieve reinigingsmiddelen Onderhoud Controleer of alle onderdelen van de rollator probleemloos werken Controleer of alle schroeven stevig zijn aangedraaid Zo niet dan moeten deze worden aangedraaid Controleer of alle insteek en snelsluitingen goed zijn ingesteld en volledig zijn gesloten Controleer of alle knoppen van de insteek en snelsluitingen probleemloos te openen en weer te slui...

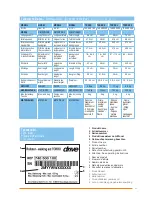
Page 11: ...Sitzhöhe Seat height Hauteur du sièget Hoogte zitting 59 cm 51 5 cm 59 cm 60 cm Raddurchmesser breite Wheel diameter width Diamètredes roues largeur Wielmaat 20 3 5 cm 20 3 5 cm 20 3 5 cm 20 3 5 cm GEWICHT WEIGHT POIDS GEWICHT 6 9 kg 6 8 kg 7 1 kg 8 6 kg MAX BELASTUNG MAX LOADS CHARGEMAX MAX BELASTING 150 kg 150 kg 150 kg 150 kg Max Belastung Tasche Max load bag Charge maxi sacoche Max belasting t...

Page 12: ...händler Your specialist Dealer Votre revendeur spécialisé Uw speciaalzaak Drive Medical GmbH Co KG Leutkircher Straße 44 D 88316 Isny Allgäu Germany info drivemedical de Tel 49 0 7562 9724 0 Fax 49 0 7562 9724 25 Stand as per 07 2015 ...

Reviews: