background image

31 


RELOADING 

Once you have obtained a good bed of embers, you should reload the unit. In order to do 
so, open the air controls to maximum a few seconds prior to opening the stove's door. 
Then proceed by opening the door very slowly; open it one or two inches for 5 to 10 
seconds, before opening it completely to increase the draught and thus eliminate the 
smoke which is stagnant in a state of slow combustion in the stove. Then bring the red 
embers to the front of the stove and reload the unit. 

For optimal operation of your wood stove, we recommend you operate it with a wood load 
approximately equivalent to the height of fire bricks. 

It is important to note that wood combustion consumes ambient oxygen in the room .In the 
case of negative pressure, it is a good idea to allow fresh air in the room, either by opening 
a window slightly or by installing a fresh air intake system on an outside wall. Refer to 
page 16 of the present manual. 

In order to achieve an optimum efficiency from your unit, we suggest that you operate it 
with the air control slightly open (approximately 10%). Make sure that you have a good fire 
going and an adequate ember bed before you completely close the air control. Use a 
chimney thermometer if necessary. Closing the air control too soon will lower combustion 
efficiency and may cause the fire to die out. The addition of a blower (if not already 
included) is highly recommended to maximize your unit’s efficiency. 


CREOSOTE FORMATION AND NEED FOR REMOVAL 

When wood is burned slowly, it produces tar and other organic vapours, which combine 
with expelled moisture to form creosote. The creosote vapours condense in the relatively 
cool chimney flue of a slow-burning fire. As a result, creosote residue accumulates on the 
flue lining. When ignited this creosote makes an extremely hot fire. When burning wood, 
the chimney connector and chimney should be inspected at least once every two months 
during the heating season to determine if a creosote build-up has occurred. 

We strongly recommend that you install a magnetic thermometer on your smoke exhaust 
pipe, approximately 18" above the stove. This thermometer will indicate the temperature of 
your gas exhaust fumes within the smoke exhaust system. The ideal temperature for these 
gases is somewhere between 275 

o

F and 500 

o

F. Below these temperatures, the build-up 

of creosote is promoted. Above 500 degrees, heat is wasted since a too large quantity is 
lost into the atmosphere. 


TO PREVENT CREOSOTE BUILD UP 

  Always burn dry wood. This allows clean burns and higher chimney temperatures, 

therefore less creosote deposit. 

  Leave the air control full open for about 10 min. every time you reload the stove to 

bring it back to proper operating temperatures. The secondary combustion can only 
take place if the firebox is hot enough. 

  Always check for creosote deposit once every two months and have your chimney 

cleaned at least once a year. 

Summary of Contents for Adirondack

Page 1: ...IONAL INC 250 rue de Copenhague Saint Augustin de Desmaures Quebec G3A 2H3 Tel 418 878 3040 Fax 418 878 3001 www drolet ca This manual is available for free download on the manufacturer s web site It is a copyrighted document Re sale is strictly prohibited The manufacturer may update this manual from time to time and cannot be responsible for problems injuries or damages arising out of the use of ...

Page 2: ...nstall and use your new stove If this stove is not properly installed a house fire may result To reduce the risk of fire follow the installation instructions Failure to follow instructions may result in property damage bodily injury or even death Consult your municipal building department or fire officials about restrictions and installations requirements in your area and the need to obtain a perm...

Page 3: ...BUSTION AIR 27 WOOD STOVE UTILISATION 28 AVERAGE ENERGY YIELD OF ONE AIR DRIED CORD OF CUT WOOD 28 TESTING YOUR WOOD 29 THE FIRST FIRES 29 IGNITION 29 HEATING 30 RELOADING 31 CREOSOTE FORMATION AND NEED FOR REMOVAL 31 ASH DISPOSAL 32 MAINTENANCE 33 GLASS 33 GASKETING 33 PAINT 33 DROLET LIMITED LIFETIME WARRANTY 34 REGISTER YOU WARRANTY ONLINE To receive full warranty coverage you will need to show...

Page 4: ...21 x 26 635 x 533 x 660 mm 25 x 21 x 28 3 8 648 x 533 x 721 mm 25 x 25 x 29 1 2 635 x 641 x 749 mm 31 x 19 x 29 5 16 787 x 489 x 745mm Combustion Chamber Width x Depth Volume W x D 20 x 11 514 x 286 mm 1 47 pi3 0 04 m3 Door Opening All Models W x H 7 5 8 x 18 1 4 200 x 464 mm Pyroceram Glass Door Adirondack Celtic Savannah Eldorado Jurassien W x H 8 x 16 222 x 419 mm 10 x 18 254 x 464 mm Weight El...

Page 5: ... is why you will normally see a 63 efficiency rating on that EPA tag The real efficiency of EPA certified units however is normally between 70 and 80 It is possible for manufacturers to test their appliances for efficiency Manufacturers that report an efficiency rating higher than 63 have probably had their appliances tested through an independent laboratory Although there exists more than one rec...

Page 6: ... Use a chimney thermometer installed at a distance of approximately 18 inches on the flue pipe above the stove Flue gases should reach at least 350 F before you close the stove s primary air intake completely Operate your unit within the comfort zone indicated on the thermometer To reduce the risk of smoke spillage into the room upon reloading your stove leave the primary air intake completely ope...

Page 7: ...de the ash pan in position Side Panels and Ash Lip Installation 1 Start by fixing the front part of the decorative side in the two clips welded on the sides of the fire box 2 Then fix the back of the decorative side with two screws and washers supplied Line up the decorative side parallel to the side of the appliance 3 Clip the ash lip into position centred just below the door ...

Page 8: ...8 LEGS AND ASH PAN Ash Lip Installation 1 Just clip the ash lip into position centred just below the door 2 Slide the ash pan in position ...

Page 9: ...djusted periodically to provide an air tight fit To adjust Remove the lock pin spring pin by pulling and turning it using pliers wise grip Turn the handle counter clock wise one turn to increase pressure Re install the lock pin spring pin with a small hammer Figure 1 Door Adjustment ...

Page 10: ...10 ASH LIP INSTALLATION FOR JURASSIEN MODEL Your Jurassien can be equipped with an ash lip Place it as shown on detail below and secure it in place using the two bolts supplied with the owner s manual ...

Page 11: ...orcing hot air toward the front the blower enables you to extend the radiation power of your stove You can purchase this option through your DROLET dealer Make sure to specify this part number AC02050 You can also install a thermodisc to enable the blower to start or stop automatically when the stove is hot or too cold The thermodisc part number is AC05530 Installation instructions are supplied wi...

Page 12: ...STEM A SOURCE OF FRESH AIR INTO THE ROOM OR SPACE HEATED SHALL BE PROVIDED WHEN REQUIRED POSITIONING THE STOVE It is very important to position the wood stove as close as possible to the chimney and in an area that will favour the most efficient heat distribution possible throughout the house The stove must therefore be installed in the room where the most time is spent and in the most spacious ro...

Page 13: ...mm 18 460 mm 12 305 mm 19 485 mm 28 715 mm 21 535 mm 48 1220 mm 84 213 cm Celtic 15 385 mm 12 305 mm 10 255 mm 19 485 mm 22 560 mm 19 485 mm 48 1220 mm 84 213 cm Jurassien 14 360 mm 8 205 mm 10 255 mm 18 460 mm 21 535 mm 20 510 mm 48 1220 mm 84 213 cm CLEARANCES DOUBLE WALL PIPE CANADA USA MODEL A B C D E F K L Eldorado 6 155 mm 18 460 mm 12 305 mm 10 255 mm 28 715 mm 21 535 mm 48 1220 mm 84 213 c...

Page 14: ...14 Figure 2 Clearances to combustibles and floor protector ...

Page 15: ...USA only 8 205 mm M 8 205 mm N A Canada only N N A USA only Note 2 Steel with a minimum thickness of 0 015 0 38 mm or ceramic tiles sealed together with grout No protection is required if the unit is installed on a non combustible floor ex concrete Note 1 The floor protection at the back of the stove is limited to the stove s required clearance if such clearance is smaller than 8 inches 205 mm Not...

Page 16: ...radiation shield the clearances mentioned on the stove certification plate may be reduced as stated in the following table TYPE OF PROTECTION Reducing Clearances With Shielding Sides and Rear Back Top Sheet metal a minimum of 0 024 0 61 mm spaced out at least 1 25 mm by non combustible spacers see graphic 2 67 50 Ceramic tiles or an equivalent non combustible material on fire proof supports spaced...

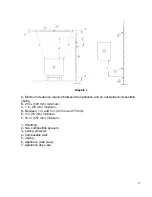
Page 17: ...ed combustible ceiling B 20 in 500 mm minimum C 1 in 25 mm minimum D Between 1 in and 3 in 25 mm and 75 mm E 3 in 75 mm minimum F 18 in 457 mm minimum 1 Shielding 2 Non combustible spacers 3 Ceiling protector 4 Combustible wall 5 Ceiling 6 Appliance side view 7 Appliance top view ...

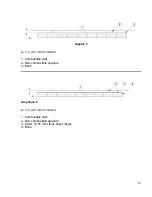
Page 18: ... 3 A 1 in 25 mm minimum 1 Combustible wall 2 Non combustible spacers 3 Non combustible support 4 Ceramic tile or non combustible material Graphic 4 A 1 in 25 mm minimum 1 Combustible wall 2 Non combustible spacer 3 0 024 0 61 mm thick sheet metal 4 Non combustible support 5 Ceramic tile or non combustible material ...

Page 19: ... Graphic 5 A 1 in 25 mm minimum 1 Combustible wall 2 Non combustible spacers 3 Brick Graphique 6 A 1 in 25 mm minimum 1 Combustible wall 2 Non combustible spacers 3 0 024 0 61 mm thick sheet metal 4 Brick ...

Page 20: ... draught effect your stove s performance is directly dependent on an adequate draught from your chimney The following recommendations may be useful for the installation of your chimney 1 Do not connect this unit to a chimney flue serving another appliance 2 It must rise above the roof at least 3 0 9 mm from the uppermost point of contact 3 The chimney must exceed any part of the building or other ...

Page 21: ...per foot with the upper end of the section toward the chimney See Figure 2 3 Detail B To insure a good draft the total horizontal length of the connector should never exceed 8 to 10 2 4 to 3 04 m In the case of vertical installation the total length of the connector can be much longer and connected without problem to the chimney at the ceiling level There should never be more than two 90 degrees e...

Page 22: ...etween the stove and chimney See figure 2 4 A The use of two 45 degree elbows See figure 2 4 C is often preferable to a single 90 degree elbow See figure 2 4 B because less turbulence is created in the exhaust flow and they result in less horizontal run A B C FIGURE 2 4 The use of elbows ...

Page 23: ...gh fire A draft measure of less than 03 w c will cause operational difficulties while too much draft greater than 10 w c will result in over firing of the stove This can result in excessive operating temperatures In this case the installation of elbows totaling no more than 180 ex 2 x 30 elbows 2 x 45 elbows or 2 x 90 elbows can be installed to help reduce excessive draft If the addition of elbows...

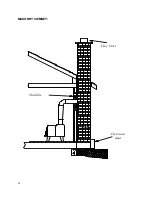
Page 24: ...24 MASONRY CHIMNEY Clay liner Thimble Clean out door ...

Page 25: ...25 FACTORY BUILT THIMBLE ...

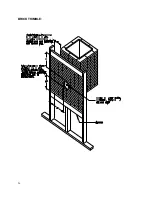
Page 26: ...26 BRICK THIMBLE ...

Page 27: ...r heating appliances smell do not operate properly suffer smoke roll out when opened or back drafts occur whether or not there is combustion present 3 Opening a window slightly on a calm windless day alleviates any of the above symptoms 4 The house is equipped with a well sealed vapour barrier and tight fitting windows and or has any powered devices that exhaust house air 5 There is excessive cond...

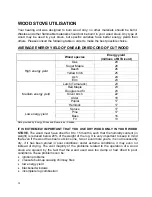
Page 28: ... 17 Hemlock 17 Low energy yield Spruce 17 Pine 17 Bass 16 Fir 13 Data provided by Energy Mines and Resources Canada IT IS EXTREMELY IMPORTANT THAT YOU USE DRY WOOD ONLY IN YOUR WOOD STOVE The wood must have dried for 9 to 15 months such that the humidity content in weight is reduced below 20 of the weight of the log It is very important to keep in mind that even if the wood has been cut since one ...

Page 29: ...o achieve a medium burn rate Make sure that there s enough air circulation while curing the stove The odours could be smelled during the 3 or 4 first fires Never start your stove outside You will not be able to see if you are over heating IGNITION After making sure that the stove air intake controls are fully open completely pull out towards you place several rumpled sheets of paper in the centre ...

Page 30: ... it until it stops the combustion air is reduced to a minimum Your DROLET stove burnt between 953 kg h et 3 639 kg h of wood during EPA testing Real operating conditions may give very different results than those obtained in the lab according to the species of wood used it s moisture content the size and density of the pieces the length of the chimney altitude and outside temperature WARNINGS NEVE...

Page 31: ... blower if not already included is highly recommended to maximize your unit s efficiency CREOSOTE FORMATION AND NEED FOR REMOVAL When wood is burned slowly it produces tar and other organic vapours which combine with expelled moisture to form creosote The creosote vapours condense in the relatively cool chimney flue of a slow burning fire As a result creosote residue accumulates on the flue lining...

Page 32: ...OULD CONTAIN HOT EMBERS EVEN AFTER TWO DAYS WITHOUT OPERATING THE STOVE THE ASH PAN CAN BECOME VERY HOT WEAR GLOVES TO PREVENT INJURY NEVER BURN THE STOVE WITH THE ASH TRAP OPEN THIS WOULD RESULT IN OVER FIRING THE STOVE DAMAGE TO THE STOVE AND EVEN HOUSE FIRE MAY RESULT BLOWER OPERATION If your stove has a fan Eldorado model or if you have install an optional blower allow the stove time to reach ...

Page 33: ...cialized product available in the stores where wood stoves are sold The glass should be washed only when cold GASKETING It is recommended that you change the door gasket which makes your stove door air tight once a year in order to insure good control over the combustion maximum efficiency and security To change the door gasket simply remove the damaged one Carefully clean the available gasket gro...

Page 34: ...and labour costs covered by this warranty are limited according to the table below The manufacturer at its discretion may decide to repair or replace any part or unit after inspection and investigation of the defect The manufacturer may at its discretion fully discharge all obligations with respect to this warranty by refunding the wholesale price of any warranted but defective parts The manufactu...

Reviews: