background image

Installation and Operation Manual for Escape 1800 


34 

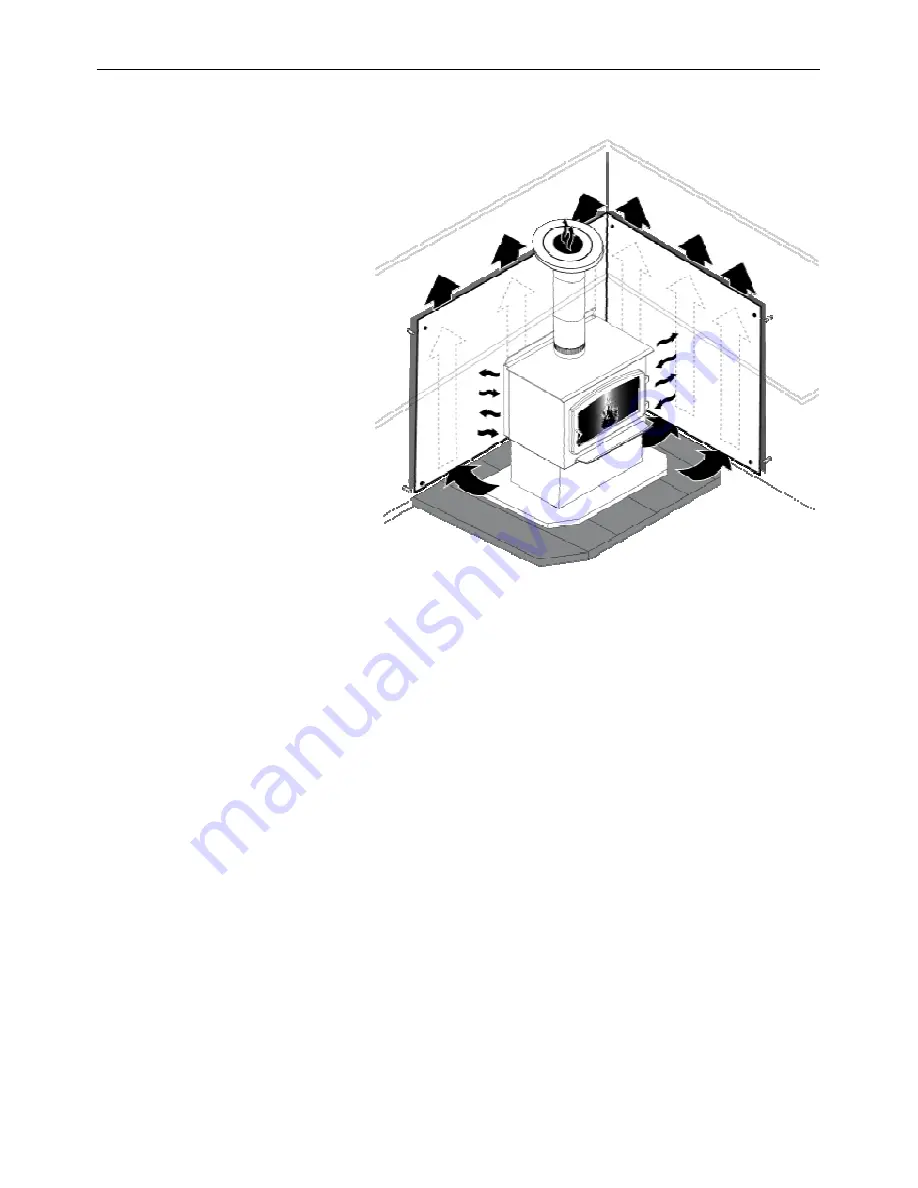
7.4  Reducing Wall and Ceiling Clearances Safely 

It  is  often  desirable  to  reduce 
the 

minimum 

installation 

clearances by placing the stove 
closer 

to 

walls 

so 

the 

installation  takes  up  less  floor 
space.  You  can  safely  reduce 
the  minimum  clearances  by 
permanently  installing  a  shield 
between 

the 

stove 

and 

combustible  material.  The  rules 
for 

safe 

shields 

can 

be 

complicated,  so  read  them 
carefully 

and 

follow 

them 

exactly.  Note  that  there  may  be 
minor  regional  differences  in 
clearance  reduction  rules  so  be 
sure to check with your building 
or 

fire 

inspector 

before 

proceeding.  


7.4.1  Shield Construction Rules 

1.  Minimum space behind shield: 25 mm (1 in.). In Canada 21 mm (7/8 in). 
2.  Minimum clearance along the bottom of shield: 25 mm (1 in.). 
3.  Maximum clearance along the bottom of shield: 75 mm (3 in.). 
4.  Minimum clearance along the top of shield at ceiling: 75 mm (3 in.). 
5.  Shield extension beyond each side of appliance: 450 mm (18 in.). 
6.  Shield extension above appliance: 500 mm (20 in.). 
7.  Edge clearance for ceiling shields: 75 mm (3 in.). 
8.  Adhesives  used  in  shield  construction must not  ignite  or  lose adhesive  qualities  at 

temperatures likely to be encountered. 

9.  Mounting hardware must allow full vertical ventilation. 
10. Mounting hardware must not be located closer than 200 mm (8 in.) from the vertical 

centre line of the appliance. 

11. Mounting hardware which extends from the shield surface into combustibles may be 

used only at the edges of the shield. 
 

Summary of Contents for DB03102

Page 1: ...Testing Services www drolet ca Stove Builder International Inc 250 rue de Copenhague St Augustin de Desmaures Quebec Canada G3A 2H3 Tel 418 878 3040 Fax 418 878 3001 This manual is available for free download on the manufacturer s web site It is a copyrighted document Re sale is strictly prohibited The manufacturer may update this manual from time to time and cannot be responsible for problems inj...

Page 2: ...installed a house fire may result To reduce the risk of fire follow the installation instructions Contact local building or fire officials about restrictions and installation inspection requirements in your area Please read this entire manual before you install and use your new stove Failure to follow instructions may result in property damage bodily injury or even death It is important that you f...

Page 3: ...ength 12 3 2 4 Piece Size 12 3 2 5 How to Dry Firewood 13 3 2 6 Judging Firewood Moisture Content 14 3 3 Manufactured Logs 14 4 Operating Your Stove 15 4 1 The use of a fire screen 15 4 2 Your First Fires 15 4 3 Lighting Fires 15 4 3 1 Conventional Fire Starting 16 4 3 2 The Top Down Fire 16 4 3 3 Two Parallel Logs 17 4 3 4 Using Fire Starters 17 4 4 Maintaining Wood Fires 17 4 4 1 General Advice ...

Page 4: ...36 8 2 1 Factory built Metal Chimneys 37 8 2 2 Factory built Metal Chimneys in mobile homes 37 8 2 3 Masonry Chimneys 38 8 3 Minimum Chimney Height 38 8 4 The Relationship Between the Chimney and the House 39 8 4 1 Why inside chimneys are preferred 39 8 4 2 Why the chimney should penetrate the highest heated space 40 8 5 Supply of Combustion Air 40 8 5 1 Combustion Air Supply in Mobile Homes 41 8 ...

Page 5: ... ONLY DURING LIGHTING PROCEDURES OR RELOADING ALWAYS CLOSE THE DOOR OR PUT BACK THE FIRE SCREEN AFTER IGNITION DO NOT LEAVE THE STOVE UNATTENDED WHEN THE DOOR IS OPENED WITH OR WITHOUT FIRE SCREEN NEVER USE GASOLINE GASOLINE TYPE LANTERN FUEL NAPHTHA FUEL OIL MOTOR OIL KEROSENE CHARCOAL LIGHTER FLUID OR SIMILAR LIQUIDS OR AEROSOLS TO START OR FRESHEN UP A FIRE IN THIS STOVE KEEP ALL SUCH LIQUIDS O...

Page 6: ... 9 4 kW h Maximum heat output natural hardwood fuel 75 000 BTU h 23 4 kW h Optimum efficiency 77 2 Test Standard efficiency CSA B415 1 10 Approximate Burn Time 6 to 8 hours Approximate Shipping Weight 380 lb 172 kg Firebox Volume 2 4 cu ft 0 060 m3 Maximum Log Length 20 east west Flue Outlet Diameter 6 150 mm diameter vertical Baffle Material Vermiculite Burn time and heating capacity may vary sub...

Page 7: ...Installation and Operation Manual for Escape 1800 7 Models on pedestal ...

Page 8: ...Installation and Operation Manual for Escape 1800 8 Models on legs ...

Page 9: ... areas of your house to an adequate temperature we strongly recommend that you also have a conventional oil gas or electric heating system to provide back up heating Your success with zone heating will depend on several factors including the correct sizing and location of the stove the size layout and age of your home and your climate zone Three season vacation homes can usually be heated with sma...

Page 10: ...also be recycled Vermiculite is used for the baffle Vermiculite is a mineral Large commercial mines exist in China Russia South Africa and Brazil Potassium silicate is used as binder to form a rigid board Vermiculite can withstand temperatures above 2 000 F It is not considered hazardous waste Disposal at a landfill is recommended Lightweight firebrick is made of pumice and cement Pumice is in fac...

Page 11: ... Hardwoods are denser than softwoods People who live in the coldest regions of North America usually have only spruce birch and poplar other low density species to burn and yet they can heat their homes successfully Homeowners with access to both hardwood and softwood fuel sometimes use both types for different purposes For example softer woods make good fuel for relatively mild weather in spring ...

Page 12: ... they fit in easily Pieces that are even slightly too long make loading the stove very difficult The most common standard length of firewood is 16 400 mm The pieces should be a consistent length with a maximum of 1 25 mm variation from piece to piece 3 2 4 Piece Size Firewood dries more quickly when it is split Large unsplit rounds can take years to dry enough to burn Even when dried unsplit logs ...

Page 13: ...rely dry enough to burn so it is advisable to buy the wood in spring and dry it yourself drying happens faster in dry weather than in damp maritime climates drying happens faster in warm summer weather than in winter weather small pieces dry more quickly than large pieces split pieces dry more quickly than unsplit rounds softwoods take less time to dry than hardwoods softwoods like pine spruce and...

Page 14: ...ood is much lighter in weight than wet wood split a piece and if the fresh face feels warm and dry it is dry enough to burn if it feels burn a piece wet wood hisses and sizzles in the fire and dry wood does not You could buy a wood moisture meter to test your firewood Do not burn manufactured logs made of wax impregnated sawdust or logs with any chemical additives Manufactured logs made of 100 com...

Page 15: ...ls vaporize The vapors are not poisonous but they do smell bad Fresh paint fumes can also cause false alarms in smoke detectors So when you first light your stove be prepared by opening doors and or windows to ventilate the house As you burn hotter and hotter fires more of the painted surfaces reach the curing temperature of the paint The smell of curing paint does not disappear until you have bur...

Page 16: ...ire has mostly burned you can add standard firewood pieces until you have a fire of the right size for the conditions 4 3 2 The Top Down Fire The top down fire starting method solves two problems with the conventional method first it does not collapse and smother itself as it burns and second it is not necessary to build up the fire gradually because the firebox is loaded before the fire is lit A ...

Page 17: ...s normal for its surface temperature to rise after a new load of wood is ignited and for its temperature to gradually decline as the fire progresses This rising and falling of temperature can be matched to your household routines For example the area temperature can be cooler when you are active such as when doing housework or cooking and it can be warmer when you are inactive such as when reading...

Page 18: ...es normally contain some live charcoal that can stay hot for several days If the ashes are disposed of by burial in soil or otherwise locally dispersed they should be retained in the closed container until all cinders have thoroughly cooled Other waste shall not be placed in this container NEVER STORE ASHES INDOORS OR IN A NON METALIC CONTAINER OR ON A WOODEN DECK 4 4 3 Raking Charcoal Rekindle th...

Page 19: ... This heat surge is welcome when the room temperature is a little lower than desirable but not welcome if the space is already warm Therefore allow each load of wood to burn down so that the space begins to cool off a little before loading Letting the space cool before loading is one of the secrets to clean burning and effective zone heating 4 4 5 Turning Down the Air Supply Once the firewood fire...

Page 20: ...4 in diameter After raking the coals you can lay two pieces parallel to each other corner to corner in the firebox and lay two more across them in the other direction Open the air control fully and only reduce the air after the wood is fully flaming This kind of fire is good for mild weather when you are around to tend the stove and should provide enough heat for four hours or more Small fires lik...

Page 21: ... the second half is the coal bed phase during which there is little or no flame The length of burn you can expect from your stove including both the flaming and coal bed phases will be affected by a number of things such as firebox size the amount of wood loaded the species of wood you burn the wood moisture content the size of the space to be heated the climate zone you live in and the time of ye...

Page 22: ... logs east west East west loads that are built compactly break down slowly when heated but the amount of wood you can load is limited because if you put in too many pieces one may fall against the glass East west loads are excellent for long low output fires for relatively mild weather North south loads break down more quickly but much more wood can be loaded at a time This makes north south loadi...

Page 23: ...with a damp cloth or paper towel and then drying Never try to clean the glass when the stove is hot In spring and fall when the stove is run at lower temperatures you may see some light brown stains forming especially at the lower corners of the glass This indicates that the fire has been smoky and some of the smoke has condensed on the glass When the weather is mild you may find that letting the ...

Page 24: ...ar or more of use the door gasket will compress and become hard which may allow air to leak past it You can test the condition of the door gasket by closing and latching the door on a strip of paper Test all around the door If the paper slips out easily anywhere it is time to replace the gasket Use the correct replacement gasket that you can purchase from your retailer The diameter and density of ...

Page 25: ...lds the glass to the door frame E Lift out the glass D and pull off the old gasket This is a good time to clean the glass thoroughly The gasket must be centred on the edge of the glass To do this easily peel back a section of the paper covering the adhesive and place the gasket on a table with the adhesive side up Stick the end of the gasket to the middle of one edge then press the edge of the gla...

Page 26: ...imney Connector Maintenance 5 2 1 Why Chimney Cleaning is Necessary Wood smoke can condense inside the chimney connector and chimney forming a combustible deposit called creosote If creosote is allowed to build up in the venting system it can ignite when a hot fire is burned in the stove and a very hot fire can progress to the top of the chimney Severe chimney fires can damage even the best chimne...

Page 27: ...o take on The most common equipment used are fibreglass rods with threaded fittings and stiff plastic brushes The brush is forced up and down inside the chimney flue to scrub off the creosote The chimney connector assembly should always be cleaned at the same time the chimney is cleaned CAUTION Operation of your stove without the baffle may cause unsafe and hazardous temperature conditions and wil...

Page 28: ...TESTING AUTHORITY VIOLATES CSA B365 CANADA AND ANSI NFPA 211 USA CONNECT THIS STOVE ONLY TO A LISTED FACTORY BUILT CHIMNEY FOR USE WITH SOLID FUEL OR TO A LINED MASONRY CHIMNEY CONFORMING TO NATIONAL AND LOCAL BUILDING CODES IF REQUIRED A SUPPLY OF COMBUSTION AIR SHALL BE PROVIDED TO THE ROOM OR SPACE DO NOT CONNECT TO OR USE IN CONJUNCTION WITH ANY AIR DISTRIBUTION DUCTWORK UNLESS SPECIFICALLY AP...

Page 29: ...ning Appliances and Equipment and the CSA C22 1 Canadian National Electrical Code are to be followed in the absence of local code requirements In the USA the ANSI NFPA 211 Standard for Chimneys Fireplaces Vents and Solid Fuel Burning Appliances and the ANSI NFPA 70 National Electrical Code are to be followed in the absence of local code requirements This stove must be connected to a chimney comply...

Page 30: ...information given on the certification label affixed to the appliance always overrides the information published in any other media owner s manual catalogues flyers magazines and or web sites it is important to refer to it in order to have a safe and compliant installation In addition you will find information about your stove model serial number etc You can find the certification label on the bac...

Page 31: ... lowered to 76 193 cm CLEARANCES SINGLE WALL PIPE CANADA USA A 15 381 mm 15 381 mm B 17 432 mm 17 432 mm C 14 356 mm 14 356 mm D 18 476 mm 18 476 mm E 27 686 mm 27 686 mm F 25 641 mm 25 641 mm K 48 1220 mm 48 1220 mm L 76 193 cm 76 193 cm CLEARANCES DOUBLE WALL PIPE CANADA USA A 8 203 mm 8 203 mm B 17 432 mm 17 432 mm C 9 229 mm 9 229 mm D 11 298 mm 11 298 mm E 27 686 mm 27 686 mm F 20 514 mm 20 5...

Page 32: ...Installation and Operation Manual for Escape 1800 32 Clearances to combustible materials and floor protection ...

Page 33: ...ith a minimum thickness of 0 015 0 38 mm or ceramic tiles sealed together with grout No protection is required if the unit is installed on a non combustible floor ex concrete Note 1 The floor protection at the back of the stove is limited to the stove s required clearance if such clearance is smaller than 8 inches 203 mm Note 2 Only required under the horizontal section of the connector Must excee...

Page 34: ...Construction Rules 1 Minimum space behind shield 25 mm 1 in In Canada 21 mm 7 8 in 2 Minimum clearance along the bottom of shield 25 mm 1 in 3 Maximum clearance along the bottom of shield 75 mm 3 in 4 Minimum clearance along the top of shield at ceiling 75 mm 3 in 5 Shield extension beyond each side of appliance 450 mm 18 in 6 Shield extension above appliance 500 mm 20 in 7 Edge clearance for ceil...

Page 35: ...ombustible material on non combustible board spaced out at least 25 mm 1 in by non combustible spacers 50 33 Ceramic tiles or equivalent non combustible material on non combustible board with a minimum of 24 gauge 0 61 mm sheet metal backing spaced out at least 25 mm 1 in by non combustible spacers 67 50 Brick spaced out at least 25 mm 1 in by non combustible spacers 50 N A Brick with a minimum of...

Page 36: ...draft that draws in combustion air keeps smoke inside the stove and safely vents exhaust to outside You can think of heat in the flue gas as the fuel the chimney uses to make draft 8 2 Suitable Chimneys Your wood stove will provide optimum efficiency and performance when connected to a 6 inch diameter chimney flue system The connection to a chimney having a diameter of at least 5 inches Canada onl...

Page 37: ...t least feet including elbows from the top of the stove To maintain an effective vapour barrier insulation and waterproof at the chimney and outside flue pipe install a mobile home roof flashing and seal it with silicone Installation and Operation Manual for Escape 1800 built Metal Chimneys These are sometimes referred to as high temp chimneys because they have the special characteristics to withs...

Page 38: ...ft above the highest point of contact with the roof and at least 60 cm 2 ft higher than any roof line or obstacle within a horizontal distance of 3 m 10 ft Installation and Operation Manual for Escape 1800 nected to a masonry chimney provided the chimney complies with the construction rules found in the building code enforced locally The chimney must have either a clay liner or a suitably listed s...

Page 39: ...talled up through the heated space of the house not out and up an outside wall Second the chimney should penetrate the top of the building at or near the highest heated Why inside chimneys are preferred Venting systems that rise straight up from the stove flue collar provide the best performance Chimneys that rise inside the warm space of the house tend to provide a even when there is no fire burn...

Page 40: ...ire burning in the stove First the chimney runs up the outside of the house so the air in it is colder and denser than the warm air in the house And second the chimney is shorter than the heated space of the house meaning the negative pressure low in the house will pull outside air down the chimney through the stove and into the room Even the finest stove will not work well when connected to this ...

Page 41: ...ch the wood stove may not have adequate access to combustion air is if the operation of a powerful exhaust device such as a kitchen range exhaust causes the pressure in the house to become negative relative to outdoors Some jurisdictions in the United States require that wood stoves have a supply of combustion air from outdoors If you do install an air supply through the wall of the house be aware...

Page 42: ...r assembly has been called the weak link in the safety of wood heating systems because failure to install the connector properly which has been common in the past can result in house fires The best flue pipe assembly is one that rises straight up from the stove to the base of the chimney with no elbows Straight assemblies are less likely to cause problems like smoke out when the door is opened for...

Page 43: ...s should include an inspection wrap with one end unfastened or a telescopic section Minimum upward slope towards the chimney 20 mm m 1 4 in ft One end of the assembly must be securely fastened to the flue collar with 3 sheet metal screws and the other end securely fastened to the chimney There must be provision for cleaning of the pipes either through a clean out or by removal of the pipe assembly...

Page 44: ...ssembled to the firebox before positioning the stove See installation instructions below 1 Remove the firebricks the ash dump plug and the loading door from the stove to avoid breaking any parts and facilitate handling in the followings steps 2 Gently flip the stove on its back 3 Secure the shims A and legs B with the bolts C ...

Page 45: ...he ash drawer lid then slide it on the left and right bend of the support brackets 6 Position the stove for its installation and reinstall the door the bricks and the ash dump plug see Appendix 6 Exploded Diagram and Parts List for layout Note Make sure that baffle components have not moved during the leg installation process since a flue blockage may occur ...

Page 46: ...6 Appendix 2 Installing the Fresh Air Intake Kit AC01336 This mobile home approved stove requires installation of a fresh air intake kit A and an insulated fresh air intake pipe B sold separately Installation on the bottom for models on pedestal AC01336 ...

Page 47: ...Installation and Operation Manual for Escape 1800 47 Installation on the back for models on pedestal AC01336 Installation on the back for models on legs AC01316 ...

Page 48: ...opening Lean the upper part of the fire screen against the top door opening making sure to insert the top fire screen brackets behind the primary air deflector as in Detail A Lift the fire screen upwards and push the bottom part towards the stove then let the fire screen rest on the bottom of the door opening Warning Never leave the stove unattended while in use with the fire screen ...

Page 49: ...a fan should not be used as a way to gain more output from a stove that is undersized for the space it is intended to heat When using the fan allow the stove to reach operating temperature approximately one hour before turning it on The increased airflow from the fan cools the firebox and could affect the start up combustion efficiency if the fan is turned on too early You can also install an opti...

Page 50: ...ion and Operation Manual for Escape 1800 50 Characteristics of the thermodisc Starts the blower when the stove s temperature reaches 43 C 110 F Cuts the electrical contact when the temperature falls to 32 C 90 F ...

Page 51: ...and Operation Manual for Escape 1800 51 CAUTION ENSURE THAT THE FAN S POWER CORD IS NOT IN CONTACT WITH ANY SURFACE OF THE STOVE TO PREVENT ELECTRICAL SHOCK OR FIRE DAMAGE DO NOT RUN THE POWER CORD BENEATH THE STOVE ...

Page 52: ... hole Then lift and insert the left end of the tube into the rear left channel 2 Align the notch in the left end of the tube with the key of the left air channel hole Using a Wise grip hold the tube and lock it in place by turning the tube as shown in detail A Make sure the notch reaches the end of the key way 3 Repeat step 1 and 2 for the other secondary air tubes 4 To remove the tubes use the ab...

Page 53: ...tubes B can be replaced without removing the baffle board A Important Notes The air tubes are identified for placement as follows Model Type of tube Escape 1800 All models Front 30 holes of 0 147 Middle front 30 holes of 0 136 Middle rear 20 holes of 0 128 Rear 15 holes of 0 128 ...

Page 54: ...Installation and Operation Manual for Escape 1800 54 Appendix 6 Exploded Diagram and Parts List DB03101 DB03102 DB03111 ...

Page 55: ... QUADREX ZINC 2 11 AC06500 SILICONE AND 5 8 X 8 BLACK GASKET KIT 1 12 30055 HINGE PIN RETAINING RING 5 16 ID X 0 512 OD 2 13 30169 DOOR HINGE PIN 5 16 DIA X 1 3 4 LONG 2 14 SE55103 REMPLACEMENT GLASS WITH GASKET 10 3 16 X 17 1 8 1 15 AC06400 BLACK SELF ADHESIVE GLASS GASKET KIT 6 1 16 PL55041 GLASS RETAINER FRAME 2 17 PL53585 GLASS RETAINER 3 4 X 7 8 6 18 30124 SCREW 8 32 X 5 16 TRUSS QUADREX ZINC...

Page 56: ...B 1 44 44080 RHEOSTAT WITH NUT 1 45 44087 RHEOSTAT NUT 1 46 44085 RHEOSTAT KNOB 1 47 AC05530 THERMODISC KIT 1 48 44046 THERMODISC F110 20F 1 49 SE16059 ASH DUMP PLUG 1 50 PL36018 2 1 4 X 8 3 4 X 1 1 4 REFRACTORY BRICK 2 51 PL36028 4 1 2 X 8 1 8 X 1 1 4 REFRACTORY BRICK 1 52 29015 4 x 9 x 1 1 4 REFRACTORY BRICK 4 53 29020 4 1 2 X 9 X 1 1 4 REFRACTORY BRICK HD 12 54 21387 TOP AIR DEFLECTOR INSULATIO...

Page 57: ...Installation and Operation Manual for Escape 1800 57 DB03112 DB03113 ...

Page 58: ...SS GASKET KIT 6 1 16 PL55041 GLASS RETAINER FRAME 2 17 SE53585 GLASS RETAINER WITH SCREW KIT 10 PER KIT 1 18 30124 SCREW 8 32 X 5 16 TRUSS QUADREX ZINC 6 19 PL65566 ASH LIP 1 20 30060 THREAD CUTTING SCREW 1 4 20 x 1 2 F HEX STEEL SLOT WASHER C102 ZINC 8 21 AC07866 1 4 BLACK COIL HANDLE 1 22 SE65561 AIR CONTROL ROD ASSEMBLY 1 23 PL65537 AIR CONTROL DAMPER 1 24 30206 ZINC WASHER ID 5 16 x OD 3 4 1 2...

Page 59: ...46 AC05530 THERMODISC KIT 1 47 44046 THERMODISC F110 20F 1 48 SE16059 ASH DUMP PLUG 1 49 PL36018 2 1 4 X 8 3 4 X 1 1 4 REFRACTORY BRICK 2 50 PL36028 4 1 2 X 8 1 8 X 1 1 4 REFRACTORY BRICK 1 51 29015 4 x 9 x 1 1 4 REFRACTORY BRICK 4 52 29020 4 1 2 X 9 X 1 1 4 REFRACTORY BRICK HD 12 53 21387 TOP AIR DEFLECTOR INSULATION 1 54 PL65505 TOP AIR DEFLECTOR PROTECTOR 1 55 PL65514 FRONT SECONDARY AIR TUBE 1...

Page 60: ...placement part All parts and labour costs covered by this warranty are limited according to the table below The manufacturer at its discretion may decide to repair or replace any part or unit after inspection and investigation of the defect The manufacturer may at its discretion fully discharge all obligations with respect to this warranty by refunding the wholesale price of any warranted but defe...

Reviews: