background image

HeatPack Furnace Installation and Operation Manual


61 

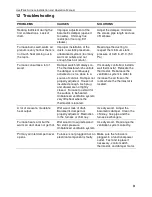
12  Troubleshooting 

PROBLEMS 

CAUSES 

SOLUTIONS 

Heating inefficient during the 
first combustions.  Lack of 
draft. 

Improper adjustment of the 
barometric damper (opened 
too wide).  Chimney flue 
restriction (too long. 90

o


elbows) 

Adjust the damper, minimize 
the smoke pipe length and use 
45

o

 elbows. 

Furnace burns well, warm air 
plenum is very hot but there is 
not much heat coming out in 
the room. 

Improper installation of the 
ducts, low static press0ure, 
unbalanced system (too many 
warm air outlets and not 
enough fresh air return). 

Rearrange the ducting to 
respect the minimum static 
pressure of 0.20 in. W.C. (50 
Pa) 

Furnace consumes a lot of 
wood. 

Damper switch left always on.  
The thermostat which controls 
the damper is continuously 
activated or is too close to a 
source of cold air.  Damper not 
properly adjusted.  House not 
insulated enough.  Ash plug 
and drawer are not tightly 
closed.  Furnace too small for 
the surface to be heated. 
Unbalanced ventilation system, 
very little heat where the 
thermostat is located. 

If manually controlled, install a 
wall thermostat.  Relocate the 
thermostat.  Rebalance the 
ventilation system in order to 
increase the air flow in the 
room where the thermostat is 
located. 

A lot of creosote, moderate 
heat output. 

Wet wood, lack of draft.  
Barometric damper not 
properly adjusted.  Restriction 
in the furnace or chimney. 

Use dry wood.  Adjust the 
barometric damper.  Clean the 
chimney, flue pipe and the 
furnace exchangers. 

Furnace heats a lot but the 
warm air duct does not get hot. 

Wet wood or low grade wood.  
No static pressure.  
Unbalanced ventilation system. 

Use dry wood.  Rearrange the 
ventilation system correctly. 

Primary air inlet damper never 
opens. 

Furnace is not plugged-in.or an 
electrical component is faulty. 

Make sure the furnace is 
plugged-in a functional power 
outlet.  Test and replace if 
necessary, control switch, 
thermostat, and damper motor.  


Summary of Contents for HeatPack DF00500

Page 1: ...8002 E mail tech sbi international com This manual is available for free download on the manufacturer s web site It is a copyrighted document Re sale is strictly prohibited The manufacturer may update...

Page 2: ...icials about restrictions and installation inspection requirements in your area Please read this entire manual before you install and use your new furnace Failure to follow instructions may result in...

Page 3: ...tioning the unit and clearances to combustible materials 10 5 1 Unit positioning 10 5 2 Certification label 10 5 3 Clearances to combustible material 11 5 3 1 Clearances to combustibles materials 11 5...

Page 4: ...0 9 2 2 With the plenum extension A and the plenum B 32 9 3 Blower technical Data 34 9 4 Draw Calibration 34 9 4 1 The use of a thermometer 35 Appendix 1 Optional thermostat installation 36 Appendix 2...

Page 5: ...nector maintenance 59 11 2 1 Why chimney cleaning is necessary 59 11 2 2 How often should you clean the chimney 59 11 2 3 Cleaning the chimney 59 11 3 Smoke pipe inspection 60 11 4 Blower motor mainte...

Page 6: ...Canada by WETT Wood Energy Technical Training or in Quebec by APC Association des Professionnels du Chauffage ATTENTION FOR INSTALLATION OF A CENTRAL HEATING VENTILATION SYSTEM IT IS HIGHLY RECOMMENDE...

Page 7: ...ATION PUBLISHED IN ANY OTHER MEDIA OWNER S MANUAL CATALOGUES FLYERS MAGAZINES AND OR WEB SITES AIR DUCTS SERVING A GARAGE SHOULD NOT BE CONNECTED TO OTHER PARTS OF A HOUSE AND THE DUCTING SERVING A HO...

Page 8: ...at exchanger scraper Poker 3 3 Crate The following parts can be found in the wooded crate Furnace Boxes 1 2 6 adapter for hot air distribution plenum 5 adapters in each box Box 3 Hot air distribution...

Page 9: ...gas oil or electric existing furnace Power input B should be equal to or greater than A Each furnace must have its own air return duct system The highest clearances of A and B hot air distribution duc...

Page 10: ...pported evenly to ensure stability 5 1 Unit positioning The furnace must be installed where outside air supply will be sufficient for proper combustion If required a fresh air return adaptor kit sold...

Page 11: ...umber serial number certification agency standards clearances to combustible material as well as the main safety cautions 5 3 Clearances to combustible material 5 3 1 Clearances to combustibles materi...

Page 12: ...ld air return ductwork Clearances The air return duct can be connected to a new or to an existing air return ductwork In both cases the minimum clearance to combustible material is 0 0 mm 1 Clearances...

Page 13: ...e table below FLOOR PROTECTION CANADA USA A 18 457 mm From door opening 16 406 mm From door opening B N A USA only 8 203 mm From door opening C 8 203 mm N A Canada only D 8 203 mm Note 1 N A Canada on...

Page 14: ...it allows the proper venting of combustion gases and that such application is verified and authorized by a qualified installer Otherwise the diameter of the flue must be reduced to 6 152 mm by the us...

Page 15: ...er If the masonry chimney has a square or rectangular liner that is larger in cross sectional area than a round 6 152 mm flue it should be relined with a listed 6 152 mm stainless steel liner When pas...

Page 16: ...stallation Code for Solid Fuel Burning Appliances and Equipment and NFPA 90B Standard for the installation of warm air heating and air conditioning systems A flue pipe must never pass through a combus...

Page 17: ...himney connector must be in good condition Flue pipe joints should overlap 1 1 4 30 mm It should not be necessary to move the furnace to maintain the exhaust system The male ends of the pipe sections...

Page 18: ...THE BLOWER TO DISTRIBUTE HEAT EFFICIENTLY THROUGHOUT THE HOUSE THE NUMBER SIZE AND LENGTH OF THE HOT AIR DISTRIBUTION DUCTS AND AIR RETURN DUCT WILL VARY DEPENDING ON THE CONFIGURATION AND CHARACTERIS...

Page 19: ...e to cut the plenum extension A of at most 10 254 mm The plenum extension A must therefore have a minimum height of 14 356 mm Warning The plenum extension A should not obstruct the openings for the ho...

Page 20: ...d the hot air distribution plenum B 7 2 1 Assembling the plenum extension A Step 1 Assemble the plenum extension panels A with 12 black screws C 10 x 5 8 robertson type A provided in the user manual S...

Page 21: ...plenum B Step 1 Insert the male end of each panel B in the female part of the adjacent panel Step 2 Secure the assembly by bending the two metal tabs in the center of each corner Step 3 Install the co...

Page 22: ...2 3 Assembling the plenum extension A with the plenum B Slide plenum B over the plenum extension A to the extent determined in section 7 Hot air distribution and air return system Using 13 self drilli...

Page 23: ...stall the start off adapters WARNING USE GLOVES TO COMPLETE THE FOLLOWING STEPS BECAUSE THE START OFF ADAPTERS CAN BE SHARP Step 1 Cut a notch in the flange of adapter and slightly fold down one side...

Page 24: ...nstallation of the RTD thermal probe Also 5 holes are aligned with the fold of the top of the furnace on the right side and three holes on the other sides This allows you to secure the plenum properly...

Page 25: ...um and the screws D provided in the user manual FAVOR THE USE OF RIGID DUCTS BECAUSE THERE ARE LESS RESTRICTIVE TO AIR FLOW The maximum run of a main duct is 35 10 7 m It must be reduced from 6 152 mm...

Page 26: ...in Surface of plenum outlet in2 Number of outlets on the plenum Total surface of plenum outlets used in2 6 28 6 170 The acceptable total area of secondary outlets would therefore be Diameter of secon...

Page 27: ...in the hot air duct and will prevent obstruction of the blower and the ducts see Appendix 2 Optional air filters AC01390 AC01391 Take note that the static pressure calibration should be re done after...

Page 28: ...mponents and calibration of the draw The furnace is fully assembled at the factory and no electrical connection is required other than plugging the power cord into an outlet 9 1 Raccordement lectrique...

Page 29: ...HeatPack Furnace Installation and Operation Manual 29...

Page 30: ...THE FURNACE INSTALL IT IN THE OPENING PROVIDED FOR THIS PURPOSE ON THE START OFF PLENUM 9 2 1 With plenum B only Step 1 Pre drill the four plate holes L on the plenum with a 1 8 drill bit Using 4 sel...

Page 31: ...the two top RTD probe support holes with a 1 8 drill bit in the furnace plenum Secure it in place with two screws C Step 4 Install the RTD probe N in its support and secure it in place with 2 screws C...

Page 32: ...m B Step 1 Pre drill the four plate holes L on the plenum with a 1 8 drill bit Using 4 self drilling screws D install the plate L supplied with the furnace on the plenum B Make sure to have the notch...

Page 33: ...RTD probe L in its support and secure it in place with 2 screws C Plug the RTD probe in the connector located at the back of the furnace NOTE IT IS POSSIBLE TO SEE THE TEMPERATURE READ BY THE RTD BY P...

Page 34: ...ts Results may vary depending on the configuration and installation 9 4 Draw Calibration The draw The measurement is taken in the exhaust pipe 18 457 mm above the furnace s flue collar with a tube and...

Page 35: ...ccurate measurement of the draft using a pressure gauge manometer the thermometer will indicate if the temperature is ideal too low or too high The use of a thermometer is therefore an acceptable alte...

Page 36: ...hot air outlet or cold outside walls Must be installed at a minimum of 55 140 cm above the floor Must be installed at a minimum of 15 4 57 m from the furnace and must not receive radiation from the g...

Page 37: ...s furnace may be installed in parallel as an add on to an existing furnace in the USA only Such an installation requires that the furnace s controls be interlocked to prevent both furnaces from heatin...

Page 38: ...urn until the call for heat from that thermostat is satisfied After the existing furnace s thermostat is satisfied the wood furnace will return under the control of its own thermostat Use in thermosta...

Page 39: ...es the filter the filter holder two caps and the screws necessary for the installation Complete installation instructions can be found in the instruction booklet provided with this option Clean and re...

Page 40: ...ce to be heated This option can be installed on either sides or at the back of the blower box Complete installation instructions can be found in the instruction booklet provided with his option 1 fres...

Page 41: ...for relatively mild weather in spring and fall because they light quickly and produce less heat Softwoods are not as dense as hardwoods so a given volume of wood contains less energy Using softwoods...

Page 42: ...about 3 to 6 76 mm to 152 mm in cross section Having a range of sizes makes starting and rekindling fires much easier Often the firewood purchased from commercial suppliers is not split finely enough...

Page 43: ...specially if the pieces are big Firewood dries more quickly when stacked in the open where it is exposed to sun and wind it takes much longer to dry when stacked in a wood shed Firewood that is ready...

Page 44: ...re burning quickly A fire that starts fast produces less smoke and deposits less creosote in the chimney Here are three popular and effective ways to start wood fires 10 2 1 Conventional fire starting...

Page 45: ...hose log cabin style Light the newspaper 10 2 4 Using fire starters Many people like to use commercial fire starters instead of newspaper Some of these starters are made of sawdust and wax and others...

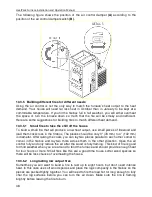
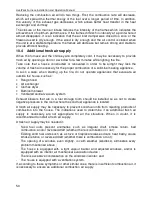
Page 46: ...ABOUT 10 SECONDS BEFORE OPENING IT WIDE TO ALLOW STABILISATION OF THE PRESSURE INSIDE THE FURNACE 10 3 2 Raking charcoal Rekindle the fire when you notice that the room temperature has fallen Do not o...

Page 47: ...chimney the result will be a surge of heat from the furnace This heat surge is welcome when the room temperature is a little lower than desirable but not welcome if the space is already warm Therefore...

Page 48: ...m crisscross in the firebox The pieces should be only 3 76 mm to 4 102 mm in diameter After raking the coals you can lay two pieces parallel to each other corner to corner in the firebox and lay two m...

Page 49: ...nd half is the coal bed phase during which there is little or no flame The length of burn you can expect from your furnace including both the flaming and coal bed phases will be affected by a number o...

Page 50: ...ate appliances that evacuate air outside the house such as Range hood Air exchanger Clothes dryer Bathroom blower Ventilated central vacuum system Exhaust blowers that are in a fuel storage room shoul...

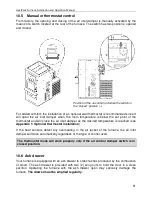
Page 51: ...nt of the thermostat and will close the air inlet damper as the desired temperature is reached see Appendix 1 Optional thermostat installation If the heat sensors detect any overheating in the air jac...

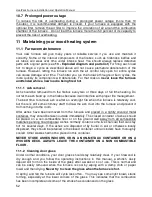
Page 52: ...er fire management The best time to remove ash is after an overnight fire when the furnace is relatively cool but there is still some chimney draft to draw the ash dust into the furnace and prevent it...

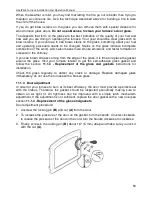
Page 53: ...the glass it is time to replace the gasket around the glass Visit your furnace retailer to get the self adhesive glass gasket and follow the section 11 1 4 Replacement of the glass and gaskets instru...

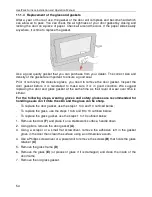
Page 54: ...and glass gasket at the same time as their level of wear over time is similar For the following steps wearing gloves and safety glasses are recommended for handling seals can irritate the skin and the...

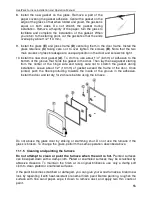
Page 55: ...gasket starting from the center of the hinge side and taking care not to stretch the gasket during installation Leave about 1 2 13 mm of gasket exceed the frame of the door Once jointed push the fibe...

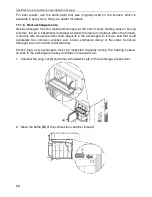
Page 56: ...r and with minimal air circulation within the furnace it can mix with creosote and or sooth deposits in the exchangers to form an acid that could accelerate the corrosion process and induce premature...

Page 57: ...HeatPack Furnace Installation and Operation Manual 57 3 Use the tool provided clean the three exchanger pipes 4 Dirt in the exchangers 1 and 3 fall into the combustion chamber at the rear...

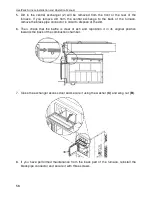
Page 58: ...e remove the black pipe connector in order to dispose of the dirt 6 Then check that the baffle is clear of ash and reposition it in its original position towards the back of the combustion chamber 7 C...

Page 59: ...termine the rate of creosote formation Even if creosote forms slowly in your system the chimney should be cleaned and inspected at least once each year Contact your local municipal or provincial fire...

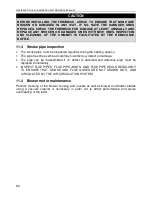
Page 60: ...must be inspected regularly during the heating season The pipe must be examined carefully to detect any defect or damage The pipe can be reassembled if no defect is detected and defective pipe must be...

Page 61: ...House not insulated enough Ash plug and drawer are not tightly closed Furnace too small for the surface to be heated Unbalanced ventilation system very little heat where the thermostat is located If m...

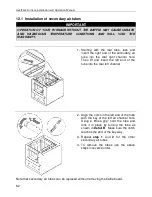
Page 62: ...h the rear tube lean and insert the right end of the secondary air tube into the rear right channel hole Then lift and insert the left end of the tube into the rear left channel 2 Align the notch in t...

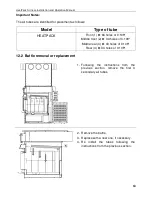
Page 63: ...les of 0 109 Middle front 2 33 holes of 0 109 Middle rear 3 33 holes of 0 109 Rear 4 33 holes of 0 109 12 2 Baffle removal or replacement 1 Following the instructions from the previous section remove...

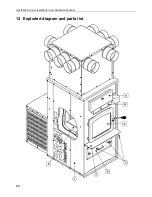
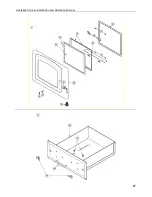
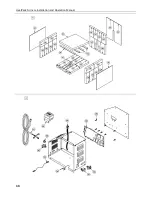
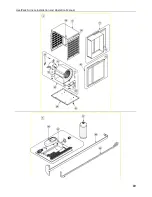
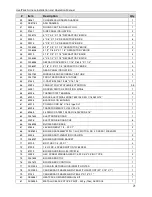
Page 64: ...HeatPack Furnace Installation and Operation Manual 64 13 Exploded diagram and parts list...

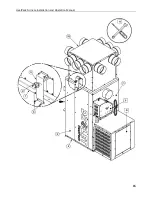
Page 65: ...HeatPack Furnace Installation and Operation Manual 65...

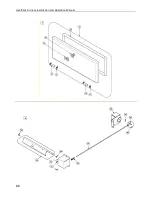
Page 66: ...HeatPack Furnace Installation and Operation Manual 66...

Page 67: ...HeatPack Furnace Installation and Operation Manual 67...

Page 68: ...HeatPack Furnace Installation and Operation Manual 68...

Page 69: ...HeatPack Furnace Installation and Operation Manual 69...

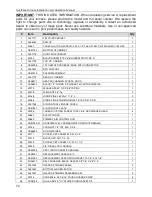
Page 70: ...SS DOOR 1 13 AC06900 BLACK 1 2 ROUND X 9 GASKET KIT WITH ADHESIVE 1 14 30210 WASHER 29 32 OD X 3 8 ID ZINC 1 15 30416 WING NUT 3 8 16 3 16 30168 HINGE PIN 5 16 DIA X 1 1 4 L 2 17 30055 HINGE PIN RETAI...

Page 71: ...ER SWITCH 2 POSITION MSR 8 1 58 60036 THERMOSTAT TERMINAL 2 59 60300 BLACK ELECTRICAL WIRE TEW 105 DEG C 18 AWG 14 1 60 60008 BLACK NYLON BUSHING 1 61 60013 POWER CORD 96 X 18 3 type SJT 1 62 60208 TR...

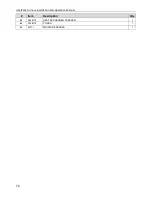
Page 72: ...HeatPack Furnace Installation and Operation Manual 72 Item Description Qty 82 PL48170 HEAT EXCHANGER SCRAPER 1 83 PL48173 POKER 1 84 44171 MOISTURE READER 1...

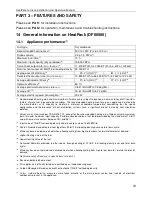
Page 73: ...m acceptable temperature considering that the space configuration and the presence of heat distribution systems have a significant impact in making heat circulation optimum 1 Values are as measured pe...

Page 74: ...A CSA B415 1 10 USA standard safety UL 391 Canadian standard safety CAN CSA B366 1 East west through the door you see the longitudinal sides of the logs north south through the door you see the tips o...

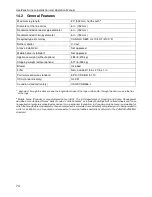
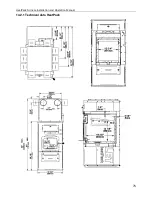
Page 75: ...HeatPack Furnace Installation and Operation Manual 75 14 2 1 Technical data HeatPack...

Page 76: ...HeatPack Furnace Installation and Operation Manual 76...

Page 77: ...14 4 1 What is your new furnace made of The body of your furnace which is most of its weight is carbon steel Should it ever become necessary many years in the future almost the entire furnace can be r...

Page 78: ...OPEN ONLY DURING LIGHTING PROCEDURES OR RELOADING DO NOT LEAVE THE FURNACE UNATTENDED WHEN THE DOOR IS SLIGHTLY OPENED DURING IGNITION ALWAYS CLOSE THE DOOR AFTER IGNITION AIR DUCTS SERVING A GARAGE...

Page 79: ...ISHED IN ANY OTHER MEDIA OWNER S MANUAL CATALOGUES FLYERS MAGAZINES AND OR WEB SITES MIXING OF CHIMNEY COMPONENTS FROM DIFFERENT SOURCES OR MODIFYING FURNACE COMPONENTS MAY RESULT IN HAZARDOUS CONDTIO...

Page 80: ...its in a neglected venting system It will often happen when burning cardboard branches or small dry pieces of wood The first signs of a chimney fire are 1 A rumble 2 Smoke pipe becomes extremely hot 3...

Page 81: ...n of the defect The manufacturer may at its discretion fully discharge all obligations with respect to this warranty by refunding the wholesale price of any warranted but defective parts The manufactu...

Reviews: