background image

7

7

TROUBLESHOOTING

PROBLEM:

  Transmitter LED does not illuminate when 

tuned on.

Solution:  Transmitter batteries are installed incorrectly.

Remove batteries and check polarity markings.

Solution:  Transmitter batteries are low. Replace the 

batteries.

PROBLEM:

  The model does not respond to the transmitter.

Solution:  The flight battery needs to be charged. Charge 

the flight battery.

Solution:  The battery is not plugged in to the plane. Plug 

it in.

Solution:  The plane is not linked to the transmitter. Power 

down the transmitter and plane and try again.

Solution:  The transmitter batteries are low. Replace the 

batteries.

PROBLEM:

  Flight time is short.

Solution:  The flight battery was not fully charged. Let the 

battery cool and charge again.

Solution:  The flying conditions are too cold (below 60°F 

or 15°C).

Solution:  The battery is old or damaged. Replace the 

battery.

PROBLEM:

  The plane has excess vibration.

Solution: A propeller is damaged. Replace the propeller.
Solution: A motor shaft is bent. Replace the motor.
Solution: Motor base is loose. Reglue with CA or epoxy.
Solution: Motor base is broken. Replace motor base.

PROBLEM:

  Propeller will not stay attached.

Solution: Propeller hub is worn. Replace the propeller.

PROBLEM:

  The model does not fly straight.

Solution:  The transmitter trim dial is not set properly.  Adjust 

the dial until the plane flies straight.

Solution:  The motor base is loose. Reglue the motor base 

with CA or epoxy.

PROBLEM:

  The motors begin to slow down in flight.

Solution:  When the flight battery voltage drops too low 

the motors will slow down gradually until they 
stop. Land immediately and recharge the battery. 
Failure to land immediately may result in total 
loss of control.

PROBLEM:

  The battery won’t charge from the transmitter.

Solution:  Replace the batteries in the transmitter.
Solution:  Charge using a USB power adapter. (DIDP1125)

PROBLEM:

  The props are spinning but the plane will 

not fly.

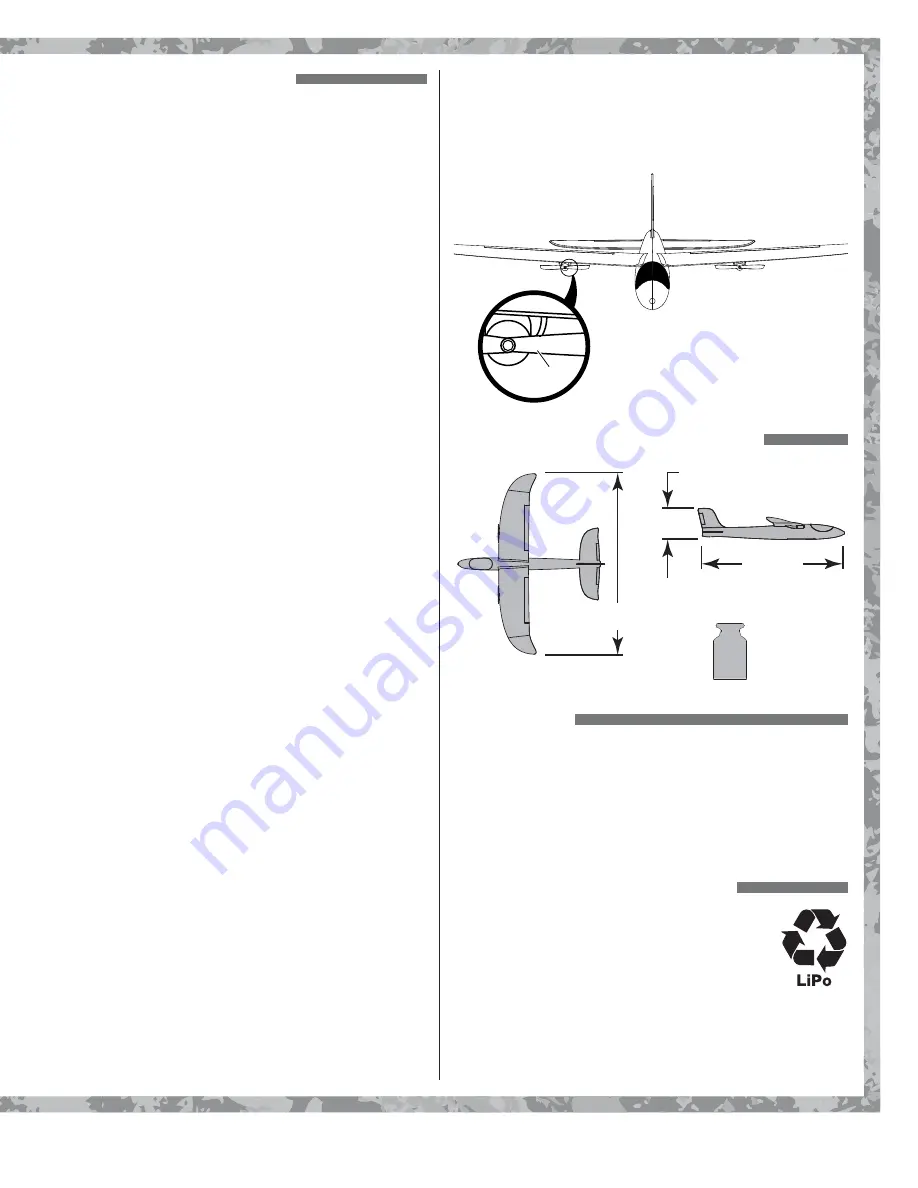
Solution:  The props are reversed. Pull the props off the 

motors and swap their positions. The prop with 
the “A” on the blade should be on the RIGHT 
motor.

“A”

A

A

PLANE SPECIFICATIONS

13.8 in.

[380 mm]

Weight

Wingspan

Height

Length

18.9 in. [ 480 mm]

1.5 oz

[42 g]

3.1 in. [ 80 mm]

SERVICE

If your Dromida product requires repairs or replacement, 
contact:

Hobby Services 

9am-5pm Central Mon.-Fri.

3002 N. Apollo Drive, Suite 1 

(217) 398-0007

Champaign, Il, 61822, U.S.A. 

hobbyservices@hobbico.com

BATTERY RECYCLING

Be good to the environment!

 The Twin 

Explorer is powered by a rechargeable LiPo 

battery. At the end of the battery’s useful life, 
under various state and local laws, it may be 
illegal to dispose of the battery into the municipal 
waste system. Check with your local solid waste officials for 
details in your area for recycling options or proper disposal. 

We encourage contacting your local recycling center for 

more information.

Summary of Contents for Twin Explorer

Page 1: ...to clean your model Solvents will damage the foam and plastic Use a dry cloth to clean any dirt from outside of the aircraft This product includes small and sharp edged parts Always assemble and keep this product out of children s reach Do not fly your airplane on days with strong winds or side winds When not using the model always take the battery out of the plane and switch off the transmitter A...

Page 2: ...ALL TRANSMITTER BATTERIES AA NOTE Use only AA dry cell alkaline batteries Do not use NiCd or NiMH CHARGE THE FLIGHT BATTERY Turn ON 1 Plug the charger into the transmitter or into a USB power adapter and swith on the transmitter 100 240V AC Phone Charger or DIDP1125 not included NOTE Charging from the transmitter will deplete the batteries very quickly We recommend charging from anAC powered USB a...

Page 3: ...he transmitter Always do this first 2 Turn on the plane 3 When ready the LED turns solid 4 Arm the motors by moving the left stick all the way up then all the way down Blinking LED Switch Solid LED 1 2 TRANSMITTER FUNCTION Half power 50 Full power 100 Power off 0 ...

Page 4: ...rim Dial The trim dial is used to make small steering trim changes Adjust the dial as necessary so the plane flies straight when the right control stick is centered Center the dial before your first flight ...

Page 5: ...0 75 use gentle right stick movements to turn left or right Use small movements of the sticks to adjust the climb and direction If the battery is not charged properly the plane will not climb 3 Use the throttle to maintain altitude Move the throttle stick down to 0 when crashing to avoid damage TURNING Once you reach 50 to 75 feet 15 20m in altitude you will be able to make a safe turn Practice ma...

Page 6: ...and come to a stop grass landing area 50 75 feet AFTER LANDING 1 Always unplug and remove the plane s battery first 2 Turn off the transmitter second 3 Allow the motors time to cool before flying again 4 Allow the flight battery to cool before recharging MAKING REPAIRS For light weight and durability the Twin Explorer is made of foam If it does break repairs can be made using CA cyanoacrylate glue...

Page 7: ...e dial until the plane flies straight Solution The motor base is loose Reglue the motor base with CA or epoxy PROBLEM The motors begin to slow down in flight Solution When the flight battery voltage drops too low the motors will slow down gradually until they stop Land immediately and recharge the battery Failure to land immediately may result in total loss of control PROBLEM The battery won t cha...

Page 8: ...nsible for compliance could void the user s authority to operate the equipment This equipment complies with FCC radiation exposure limits set forth for an uncontrolled environment This equipment should be installed and operated with a minimum distance of 8 inches 20cm between the radiator transmitter and your body This transmitter must not be co located or operating in conjunction with any other a...

Reviews: