background image

Ignis Operations Manual (DJI M600 Variant)

Drone Amplified

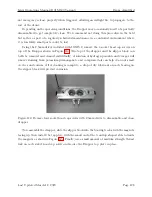
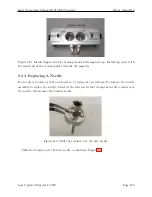
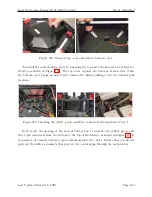
Figure 117: The needle can only fit through the rectangular hole in one orientation.

Slide the needle through the rectangular hole in the retainer, as shown in Figure 117.

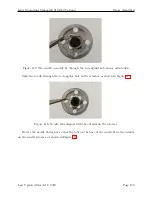
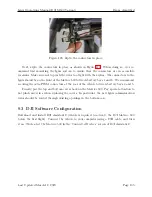
Figure 118: Needle tabs aligned with the cutouts on the retainer.

Rotate the needle 45 degrees so that the tabs on the base of the needle fit in the cutouts

on the needle retainer, as shown in Figure 118.

Last Updated March 12, 2020

Page 130

Summary of Contents for DJI M600

Page 1: ...Ignis II Operational Manual DJI M600 Variant Hardware Version v2 0 Firmware Version 68 Android App Version 2 9 0 Drone Amplified INC 1...

Page 2: ...uipment 20 2 1 Camera 20 2 2 Laptop with DJI Assistant 2 20 2 3 Generator 20 2 4 Tarp 21 2 5 Antenna Improvements 21 3 Normal Procedures 22 3 1 Preflight Inspection Checklist 23 3 2 Matrice 600 Pro Pr...

Page 3: ...Level 36 4 1 17 Injection Amount 36 4 1 18 Reservoir and Pumps 36 4 1 19 Dropper Needle 39 4 1 20 Drone Preflight Inspection 40 4 1 21 OPTIONAL Start Test Ignitions 40 4 1 22 Stop Dropping 41 4 1 23...

Page 4: ...Checklist 51 4 6 1 Remove Needles from Dropper and Store 51 4 6 2 Separate Dropper from Hopper 52 4 6 3 Clean System 52 4 6 4 Empty Reservoir and Pumps 53 4 6 5 Flush With Water 54 4 6 6 Disconnect Ba...

Page 5: ...0 6 3 3 Battery Disconnect 60 6 3 4 Manually Remove Stuck Ignition Sphere 60 7 Ignis Android App 61 7 1 System Requirements 61 7 2 Privacy and Versions 62 7 3 Main Menu 63 7 3 1 First Time Registratio...

Page 6: ...nition with Transects 118 7 14 2 Mapping with Transects 118 7 15 Saving and Loading Missions 121 7 16 Privacy Mechanisms 124 8 Service and Maintenance 125 8 1 Every Flight Maintenance 125 8 2 Daily Ma...

Page 7: ...ts for normal operation Section 3 and emergency procedures Section 5 The checklist items utilize a standard challenge response type format with any special notes or warnings included after the checkli...

Page 8: ...ice 600 M600 It connects to the mounting rails of the M600 and receives commands over communication link from the M600 controller The Ignis system includes a number of safety systems This includes onb...

Page 9: ...one may fly in case the drone loses communication and per forms an automatic return to home if configured to do so Be aware of your surroundings and to maintain visual line of sight of both the drone...

Page 10: ...onent undergoes rigorous individual tests and quality control and every system is tested in the factory after completion Ignis contains more than a dozen sensors and independent processors to ensure t...

Page 11: ...ise ignition patterns by touching the map to place waypoints and then specifying which portions of the path Ignis should drop along The app will direct the drone to autonomously fly along the path and...

Page 12: ...as an Arm Disarm switch While the Arm Disarm switch is in the Disarm position Ignis will not drop ignition spheres for any reason 1 7 LEDs Feedback on the current status of the system is provided thr...

Page 13: ...restarted until the error is resolved The following is a list of the status messages that can be displayed in the app HIGH TEMP Ignis s temperature sensor is detecting a high temperature above the inj...

Page 14: ...ng Otherwise land and replace the battery If Ignis is idle and the battery is close to or lower than the safe level then dropping is not recommended as the battery voltage will likely dip below the sa...

Page 15: ...flight controller LOST CONNECTION TO DROPPER Ignis lost connection with one or all of its sub boards on the dropper Check that the USB cable between the hopper and the dropper is connected INJECTION A...

Page 16: ...ions of Ignis INJECTION A MOTION ERROR Dropping was stopped and disabled because the A side injection motor had trouble moving Dropping cannot restart until Ignis is power cycled Land and inspect the...

Page 17: ...hen the ambient temperature is significantly lower Similarly moisture and temperatures can vary significantly based on drone altitude 1 10 Ignition Spheres and Fluid The Ignis system is designed to us...

Page 18: ...into the jug first Figure 6 Figure 6 Put pickup clunk and tube into jug first and tighten cap The custom cap has been tested with most of the common 1 gal jugs of antifreeze available but is not guara...

Page 19: ...system should be prepared as outlined in Section 4 6 Figure 9 shows the storage container and parts as typically shipped The system should always be stored and transported in its original transport ca...

Page 20: ...the Zenmuse cameras the X3 is an affordable visible camera and the XT2 is a combined visible and thermal camera We make a custom mounting bracket for these cameras that allows you to attach Ignis und...

Page 21: ...so that the batteries will have a chance to cool down before being put on the charger 2 4 Tarp If you are taking off or landing from a dusty area it may be useful to stake down a large tarp over your...

Page 22: ...ons Manual DJI M600 Variant Drone Amplified 3 Normal Procedures This section contains the normal procedure checklists See the Amplified Normal Procedures in Section 4 for details Last Updated March 12...

Page 23: ...r of all moving parts 13 Verify Puncture Motion Moving 14 Start Ignis App Open 15 Ignis App Ignis Setup Connected 16 Ignis Battery Level Greater Than 7 4V 17 Injection Amount Set 18 Reservoir and Pump...

Page 24: ...Batteries Charge Level Similarity Similar Note No battery should be more than one blinking light different than any other 13 Check Vehicle Camera for Visible Damage No Damage 14 Check Vehicle Camera...

Page 25: ...ed to clear the Open by default settings for that app 39 Verify Connection to Controller in App Connected 40 Turn on Vehicle Camera On 41 Turn on Vehicle and Move Back On 42 Verify Connection to Vehic...

Page 26: ...ged of Air 6 Drone Preflight Inspection Completed 7 OPTIONAL Start Test Ignitions Injecting and Dropping WARNING If ignition spheres are loaded in the hopper this will cause them to be injected and po...

Page 27: ...ropper and Store Complete 2 Separate Dropper from Hopper Complete 3 Clean System Clean 4 Empty Reservoir and Pumps Empty 5 Flush With Water Flushed and Emptied 6 Disconnect Battery Disconnected 7 Remo...

Page 28: ...needed etc 4 1 2 Environmental Conditions and Forecast Environmental Conditions and Forecast Within Limits Ensure that the weather and the forecasted conditions are within limits for both the Ignis sy...

Page 29: ...Hatches Hatches A and B Closed Figure 11 Left Hatches closed blocking spheres from feeding into dropper Right Hatches open Ensure that the hatches are in the closed position as shown in Figure 11 If t...

Page 30: ...opper to the Hopper Start by aligning the drive bearings with the opening in the slipper block Figure 12 left Then align the shoulder screw on the emergency release lock with the teardrop shaped cutou...

Page 31: ...motion while pressing helps engage the fastener 4 1 7 Hopper Attached to Drone Hopper Attached to Drone Secured Figure 15 Attaching hopper to Drone Left Remove thumb screws Right Attach to drone Figur...

Page 32: ...back of the drone 4 1 8 Hopper Cable Connected to Drone Hopper Cable Connected to Drone Connected Figure 16 Attaching cable from the Hopper to the Drone Attach the cable between the Hopper and the dr...

Page 33: ...larly testing that the emergency release works properly while on the ground see Section 6 2 4 1 11 DJI Mode Set to P or F DJI Mode Set to P or F Flight Mode Set The DJI flight mode selection switch mu...

Page 34: ...e puncture actuator shown in Figure 19 should travel back and forth as the calibration procedure is performed Verify that it moves smoothly along the full length 4 1 14 Start Ignis App Start Ignis App...

Page 35: ...aired to You can touch one of these to connect to that Ignis via Bluetooth Alternatively if the controller and drone are on and there is a connection from the app to Ignis through the drone you will s...

Page 36: ...cted Ignis s status will be displayed once the app begins to receive messages from Ignis 4 1 16 Ignis Battery Level Ignis Battery Level Greater Than 7 4V Verify that the battery voltage is above 7 4V...

Page 37: ...marked in red There will be a significant increase in resistance to turning when the antifreeze enters the pump Once this resistance is felt stop turning the handle Figure 23 Prime pump by cranking r...

Page 38: ...pler and store on the antifreeze jug as shown in Figure 26 Note that the pump does not form a complete seal when at rest so if the antifreeze jug is overturned in storage or during transit it will lea...

Page 39: ...reached both needles 4 1 19 Dropper Needle Dropper Needle A and B Clear and Installed Before each flight the needle should be removed and it should be verified that it is clear of any foreign materia...

Page 40: ...ter clockwise It should not be able to rotate 4 1 20 Drone Preflight Inspection Drone Preflight Inspection Completed Ensure that the drone s preflight inspection is complete See section 3 2 for the Ma...

Page 41: ...h ignition spheres Fluid is injected in both A and B The app status indicates dropping This process will perform injections on both A and B sides until stopped 4 1 22 Stop Dropping Stop Dropping Disar...

Page 42: ...wise order You can also undo redo or clear the geofence Once you ve finished creating the geofence touch the ignition sphere icon in the top right corner to close the Ignis controls 4 1 25 Fill Hopper...

Page 43: ...ignition spheres can be quickly added 4 1 26 Ready for Takeoff Ready for Takeoff Ready Ignis is now ready for flight operations Ensure that the area is clear and abide by all flight and takeoff recom...

Page 44: ...on sphere icon in the top right corner is touched This process will start drops alternating between the A and B sides The total number of continuous drops is capped at approximately 500 spheres which...

Page 45: ...lthough additional ignition spheres may be dispensed as they are cleared from the chutes The Stop dropping button is located in the Ignis controls submenu shown in Figure 33 This submenu will appear w...

Page 46: ...m Disarm switch S3 is pushed down and away from the user to disable dropping with Ignis 4 4 2 Emergency Release Dials Emergency Release Dials Rotated Counterclockwise Safe Ensure that the emergency re...

Page 47: ...that Ignis via Bluetooth Alternatively if the controller and drone are on and there is a connection from the app to Ignis through the drone you will see an option to connect to Ignis through the drone...

Page 48: ...attery Level Greater Than 7 4V Verify that the battery voltage is above 7 4V in the app Figure 22 See Section 1 3 for more information about the battery and power information 4 4 5 Reservoir and Pumps...

Page 49: ...heres cannot be injected Start continuous drops by first moving S3 on the control bar into the upward position to arm Ignis Then press the Start button in the Drone Amplified Android app During this p...

Page 50: ...set above 0 4 mL or the reservoir will run dry before dropping all 450 spheres It is important to make sure that the chutes at the bottom of the Hopper are filled with ignition spheres so that the fir...

Page 51: ...Ignis Battery Disconnected Disconnect the Ignis battery It can take up to 30 seconds to completely power down after disconnecting battery 4 5 4 Inspect for Visible Damage Inspect for Visible Damage No...

Page 52: ...ls fully clockwise within 2 seconds of each other to trigger the emergency release as shown in Figure 34 Or use the Emg Release button in the App to trigger an emergency release If Ignis is not powere...

Page 53: ...in the field before placing it back in the case put the Dropper in the included plastic bag to help keep the rest of the case contents clean 4 6 4 Empty Reservoir and Pumps Empty Reservoir and Pumps...

Page 54: ...le the pumps are running turn the hand pump counterclock wise rapidly The pumps will create some back pressure in the reservoir which helps push antifreeze to the hand pump to get it primed Figure 42...

Page 55: ...d store them properly Finally flush out the check valves on the reservoir by taking the syringe filled with approximately 10 mL of water and connecting it to the check valves as shown in Figure 44 Fig...

Page 56: ...y from the battery compartment as shown in Figure 14 4 6 8 Inspect for Visible Damage Inspect for Visible Damage No Damage See Section 4 1 3 4 6 9 Store in Case Store in Case Stored Store all componen...

Page 57: ...ore proceeding to next step 4 Return Drone to Landing Zone and Land Landed 5 Perform Post Flight Inspection Complete 5 2 In Flight Fire Checklist 1 Check for In Flight Fire Fire Suspected 2 Disarm Ign...

Page 58: ...system purges any additional ignition spheres and performs a calibration process 6 1 2 Alert Operators and Bystanders Alert Operators and Bystanders Alerted Alert all personnel in the area of the loss...

Page 59: ...d position down and away from the user This will automatically cause Ignis to stop dropping 6 2 3 Fly Over Safe Ignition Area Fly Over Safe Ignition Area Over Safe Ignition Area Fly over an area where...

Page 60: ...his will ensure that no antifreeze can be injected into the ignition sphere 6 3 2 Trigger Dropper Emergency Ejection Trigger Dropper Emergency Ejection Both Rotated Clockwise Ejected Rotate both dials...

Page 61: ...tem Requirements Operating System Android Lollipop 5 0 CPU Quad Core 1 2 GHz RAM 1GB Recommended System Requirements Operating System Android Nougat 7 0 CPU Quad Core 1 5 GHz RAM 2GB The app is compat...

Page 62: ...es to control a DJI drone can potentially upload flight logs to DJI s servers The privacy enhanced version of this app implements a firewall to ensure that no data will leaked by the DJI SDK over the...

Page 63: ...on of the app these menu options are split across two apps Press the FLY button on the first screen to see the other options Status and error messages will display at the bottom of the screen such as...

Page 64: ...default app to open Go to your Android device s Settings Apps and click on that app Next to the Open by default setting for that app and clear defaults Now reconnect the controller and you should see...

Page 65: ...its that are in the parenthesis Other units are displayed in Metric m C hectares or Imperial units ft F acres Latitude Longitude Format Changes the format that latitudes and longitudes will be display...

Page 66: ...e default app to open when the USB to the remote controller is connected to the tablet This button opens up the Android settings app to the all applications screen which shows a list of all of your ap...

Page 67: ...re 47 This screen will display all of the maps you ve downloaded but it is currently empty in this Figure 7 5 1 New Offline Region Figure 48 Selecting a region to download Pressing the NEW OFFLINE REG...

Page 68: ...d the Satellite images Figure 49 Downloading a region After pressing the download button the app will return to the previous screen shown in Figure 49 where the download progress will be displayed Whi...

Page 69: ...REGION button These entries give some basic information about the location size and zoom levels of the map If an entry in the list in the list is touched it will expand to display the progress of any...

Page 70: ...to the internet Additionally Mapbox will cache tiles that have been recently viewed so it s possible that tiles that haven t been explicitly downloaded can be viewed offline Disconnect from the intern...

Page 71: ...levation shuttle radar topography mission srtm 1 arc Additional data sets may be incorporated in the future 7 6 Map Overlays PDF files with georeferenced maps such as those created by Esri ArcMap KMZ...

Page 72: ...le browser to see its contents Press the back button on your device s navigation bar to go back up a directory If you downloaded the file it is likely inside the Download folder If you want to import...

Page 73: ...ist below the ADD OVERLAY FILE button as shown in Figure 56 This list is persistent and you do not need to re process all of these overlays every time you start the app When you fly you will be able t...

Page 74: ...o view it on a map or remove it from the list Viewing the overlay will allow you to see it on the map as shown in Figure 58 Touch the screen to hide or show the overlay Figure 58 Viewing a kmz overlay...

Page 75: ...DJI Camera is connected to the drone Clicking on this will take you to settings for the camera Remote Controller Clicking on this will take you to settings for the remote controller Compass Displays...

Page 76: ...her considerations Lost Link Procedure Sets the procedure the drone will follow if it loses connection with the remote controller You can choose between Hover Land or Go Home See the RTH Safety Notice...

Page 77: ...ave it there for a few seconds before raising it again This usually fixes the issue and is the procedure the app takes when selecting the Zenmuse quick configuration HDMI AV Video Bandwidth Allocation...

Page 78: ...oot Mode Switches between photo and video mode Photo Mode Changes what kind of pictures you take while in photo mode Refer to your camera s manual to find out what options it supports Video Resolution...

Page 79: ...alette Isotherm Middle Temperature Pixels between the lower temperature and the middle temperature will use a second color gradient Isotherm Upper Temperature Pixels between the middle temperature and...

Page 80: ...video feed For easy configuration the video feed will be displayed in the corner of this screen Touch ing the video will maximize or minimize it as shown in Figure 61 While it is maximized you can dra...

Page 81: ...e app is connected Note that these functions are implemented by the app and won t work if no app is connected to the remote controller C2 Button Function Pressing the C2 button on the controller will...

Page 82: ...of the ways to connect to Ignis Each bluetooth device the tablet is paired to is listed as well as an option to connect to Ignis through the drone 7 9 2 Bluetooth Settings Pressing the BLUETOOTH SETT...

Page 83: ...rst find Ignis s Bluetooth address located in the battery cover or on the back of the Hopper then touch the corresponding name in the connection option screen shown in Figure 63 This will open a scree...

Page 84: ...iquid from the A side Use this to quickly prime the needle with antifreeze from the reservoir FORWARD B Ignis 2 only Injects a large amount of liquid from the B side Use this to quickly prime the need...

Page 85: ...is the option to setup Ignis through the drone Make sure Ignis is connected to the drone the drone is on the controller is on the tablet is connected to the controller and the app says it is connecte...

Page 86: ...and status bars In order to back out of this screen swipe down from the top to reveal the status and navigation bars then press the back button The following is a description of the enumerated interfa...

Page 87: ...ansect lines 4 Waypoints Menu Button Touching this icon will open up the Waypoints Menu for creating waypoint missions 5 Map Menu Button GPS Signal Strength Touching this icon will open the Map Recent...

Page 88: ...s the video being streamed from a camera connected to the drone Touching this will maximize it Touching this while it is maximized will return it to normal size 15 Drone Horizontal Speed Displays the...

Page 89: ...the map information about that point will be displayed as shown in Figure 69 This will show the latitude longitude altitude of the ground above the takeoff location elevation above mean sea level and...

Page 90: ...r User to recenter and rezoom the map on that Touch the map or the menu button again to close this menu Figure 71 Overlays List The Overlays button will open a list of all of the overlays that are dis...

Page 91: ...icon at 1344 7 m and the black drone icon representing the drone s shadow at 1219 9 m respectively The app will automatically reload a larger region of elevation maps if you fly too close to the edge...

Page 92: ...This will make the drone hover 1 meter above the ground Touch Auto Landing when it is white to initiate an automatic landing This will make the drone slowly descend in place until it reaches the groun...

Page 93: ...e battery icon at the top of the screen will open the Battery Menu shown in Figure 74 This displays the energy percent remaining in each battery on the drone Touch the map or the menu button again to...

Page 94: ...fingers closer together will zoom out The app currently does not support optical zoom Touch the video feed once to minimize it again and reveal the map Figure 76 Camera menu Touching the video camera...

Page 95: ...ed the Exposure the Focus and the Photo Mode The exposure focus and photo mode can only be adjusted on DJI cameras If no DJI camera is connected the Camera Menu will instead show the Video Feed Menu T...

Page 96: ...l see an additional Thermal option which will allow you to change between Visible IR Picture in Picture or Multi Spectral Dynamic Imaging which enhances the IR view with edges detected by the visible...

Page 97: ...ure compensation settings which control the brightness of the image Mode The exposure mode determines whether ISO Aperture and or Shutter will be au tomatically adjusted to meet the desired Exposure C...

Page 98: ...u lets you change between the four exposure modes Automatic Exposure Allows you to manually adjust ISO and exposure compensation Aperture and shutter are automatically adjusted to achieve the desired...

Page 99: ...selector to scroll through the possible values The ISO will be set to the center setting which is contained within the two indicator triangles In Automatic Exposure Shutter Priority and Aperture Prio...

Page 100: ...ave caught fire inside the dropper Trigger an emergency release to separate the dropper from the rest of the aircraft The ellipsis would display other information about Ignis s status IDLE Ignis is cu...

Page 101: ...l trigger this error again NO CONNECTION TO IGNIS The app is not receiving messages from Ignis and has disabled dropping Reconnect the app to the controller You will also see this message if you have...

Page 102: ...t connection with the B side injection sub boards on the dropper Check that the USB cable between the hopper and the dropper is connected PUNCTURE COMMS TIMEOUT Ignis lost connection with the puncture...

Page 103: ...e motor had trouble moving Dropping cannot restart until Ignis is power cycled This error could lead to an in flight fire if Ignis was not able to remove an injected sphere Use the camera and temperat...

Page 104: ...utton again to close the Ignis menu 7 12 1 Geofencing Figure 84 Geofencing Menu Touching the boxed drone icon in the Ignis menu opens the Geofencing Menu shown in Figure 84 While this menu is open tou...

Page 105: ...screen to open the Waypoint Menu While the Waypoint Menu is open touching the map will place a waypoint at the touched location Figure 85 shows a sequence of 2 waypoints that have been placed You can...

Page 106: ...o and redo adding deleting and clearing waypoints If the drone is flying along a waypoint mission then the Stop button will stop the mission and give you manual control of the drone again You can also...

Page 107: ...e airspace specified by the Airspace indicator altitude setting The green zig zag region is supposed to look like trees and represents the airspace specified by the Low altitude warning setting The th...

Page 108: ...er to the ground When it was moved near the orange dotted snap altitude line its altitude was snapped to the snap altitude represented by the larger orange dot appearing under the waypoint Figure 90 T...

Page 109: ...ndicating that the side view is unfolding a turn in the path here and the waypoint can only be moved up and down Like in the top view you can touch a waypoint to select it and make a delete bubble app...

Page 110: ...end to the waypoint s altitude and then fly horizontally to the waypoint If the drone is already above the first waypoint it will instead fly horizontally until it is directly above the waypoint and t...

Page 111: ...nt will be automatically removed as the drone reaches it allowing you to easily resume the waypoint mission if you stop it The drone will hover in place once it reaches the last waypoint If you press...

Page 112: ...side view The waypoints can also be used to control Ignis s dropping Touch a dashed line along a waypoint mission to toggle it between yellow and blue as shown in Figure 93 and Figure 94 Ignis will au...

Page 113: ...rt dropping with Ignis and whenever it travels from a yellow section to a blue section or reaches the end of the waypoint mission it will stop dropping As a warning for users of Ignis 1 Ignis 1 can ta...

Page 114: ...r clockwise order You can drag corners around to move them and use the Undo button to undo adding a corner Touch the Clear button to delete all of the corners Inside of the transect region are a serie...

Page 115: ...cause the generated waypoints to be activated for dropping with Ignis along the transects Mapping will show additional controls and interface elements for designing missions where the drone will be ta...

Page 116: ...ts along your desired ingress path before generating the waypoints as shown in Figure 99 If you do this the app will generate the first waypoint of the transect lines so that it is closer to the last...

Page 117: ...but now you want to change the spacing or angle of the transects without hitting undo a whole bunch of times that s not a problem Simply change the angle and spacing of the transects to what you want...

Page 118: ...cts already activated for dropping with Ignis as shown in Figure 103 While flying this mission you may need to stop and start the waypoint mission in between transect lines or regulate the drone s spe...

Page 119: ...otos We currently don t support taking photos with a DJI camera but when we do you ll be able to use this slider to set the distance between photos that you want If you are using a time triggered came...

Page 120: ...w much area the photos will cover and affects the amount of overlap along the same transect line If the Custom Parameters option is selected there will be a slider that you can use to adjust this Figu...

Page 121: ...es so that the flight path can follow the terrain at a more consistent altitude This would result in a more consistent spacing between the photos 7 15 Saving and Loading Missions After you ve placed s...

Page 122: ...Changes to use the default name The default name will be Mission X where X is the number after the highest numbered mission or 1 if there is no other numbered mission Figure 108 The mission you have...

Page 123: ...h it is the date it was created and the kinds of mission data it contains Missions in the mission list are sorted from most recently created at the top to oldest at the bottom Underneath the mission s...

Page 124: ...e a waypoint mission the mission file will also save your waypoint mission settings such as the snap altitude the orange dotted line in the side view cruise speed curve range vertical flight path to t...

Page 125: ...kill its process This immediately kills the Ignis application and all of the services started by the DJI Mobile SDK preventing any leakage of data 8 Service and Maintenance The Ignis system was design...

Page 126: ...n the screw kit provided with the system shown in Figure 111 we provide the correct drivers and replacement screws for most screws We do not recommend tightening screws if they are not visibly loose a...

Page 127: ...each operational day to maintain proper working order Apply a small amount of the dry lubricant to the brush and cotton swabs to clean the Dropper wherever dirty paying special attention to the bearin...

Page 128: ...er and the slipper block can both be removed and cleaned individually A solution of hydrogen peroxide and vinegar will remove staining from potassium permanganate and compressed air can help clean out...

Page 129: ...ets 8 3 3 Replacing A Needle If a needle is broken or bent and needs to be replaced you will need to remove the needle assembly to replace the needle Unscrew the four screws that clamp the needle reta...

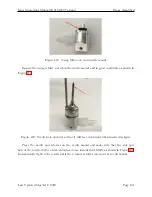
Page 130: ...entation Slide the needle through the rectangular hole in the retainer as shown in Figure 117 Figure 118 Needle tabs aligned with the cutouts on the retainer Rotate the needle 45 degrees so that the t...

Page 131: ...igure 119 Figure 120 Needle hole oriented so that it will face downward when inserted in Ignis Place the needle and retainer on the needle mount and make sure that the side port hole of the needle wil...

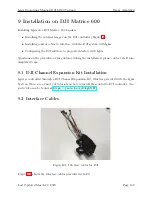
Page 132: ...uestions on the procedure or for guidance during the installation please contact the Drone Amplified team 9 1 DJI Channel Expansion Kit Installation Ignis is controlled through a DJI Channel Expansion...

Page 133: ...moved by firmly pulling at the two labeled pull locations Figure 123 Inserting the yellow green and blue connectors through battery bay 1 Next locate the opening at the back of battery bay 1 and route...

Page 134: ...ue cable should attach to the connector labeled API with the white wire on the pin all the way right note the 4th pin on the right if the header is unused Incorrect connections could cause damage to t...

Page 135: ...ng the extra PWM connectors at the rear of the vehicle between battery bays 4 and 5 Finally put the top and bottom covers back on the Matrice 600 Pay special attention to not pinch any wires when repl...

Page 136: ...he dropdown boxes configure F3 to connect to S1 F4 to connect to S2 F5 to connect to S3 F6 to connect to S6 F7 to connect to S7 F8 to connect to S8 The Spraying Frequency and Output Channel Frequency...

Page 137: ...essages from Ignis to the Android app This procedure needs to be performed once with each vehicle that will be used to carry Ignis Power Ignis on and connect it to the Matrice 600 and turn the Matrice...

Page 138: ...g a different error retry this processes then contact Drone Amplified for support After the activation was successful you won t need to do this again until you update the Matrice 600 s firmware You ca...

Page 139: ...o the vehicle properly You have now completed the setup Connect and test Ignis with the Matrice 600 You should test the configuration by going through the normal procedures without spheres to ensure t...

Reviews: