background image


SL27 / 679185 Instruction Manual 

19 of 19 


Important Information 

PLEASE DO NOT DESTROY THE SHIPPING CARTON! 


DryLam urges you to store the original carton in which your laminator was shipped. Should you 
ever need to return your laminator to our repair and service center it is best repacked in the 
original carton to reduce the chance of damage during transport. Our special foam filled carton 
ensures the 

laminator’s safe transit to our service facility. Failure to use the original box and 

packing material will likely result in shipping damage. If you have any shipping or service 
inquiries, please contact DryLam

’s Tech-Line and Service Department, at 888-633-1973 Ext 

8575. 
 
Warranty:  A One Year Warranty will be issued from date of product shipment. Please supply 
the model and serial numbers (located on the rear panel of the machine) on all correspondence 
concerning your laminator. 


Equipment Warranty 

 
We warrant to the original purchaser the equipment manufactured to be free from defects in 
material and workmanship under normal use and service. Our obligation under this warranty 
shall be limited to the repair or exchange of any part or parts which may prove defective under 
normal use and service within one year from the date of shipment and which our examination 
shall disclose to our satisfaction to be a manufacturing defect. Warranty does not include 
damage due to operator error or general maintenance. Warranty does not cover shipping, or 
shipping related damage. Note: You will be charged for the replacement of any parts which are 
damaged as a result of improper packaging. 

When a laminator is returned to DryLam’s Service 

Center for repair it is recommended that all loose items be retained on site. Loose items are 
classified as (but not limited to) supply shafts, film rolls, heat guard, thermometer, feed table, 
etc. Loose items add to shipping weight and may cause damage to the machine in shipping. 
When necessary, purchaser shall properly pack and return the unit to 

DryLam’s Service Center 

freight and insurance prepaid. 
 
THIS WARRANTY IS EXPRESSLY IN LIEU OF ALL OTHER WARRANTIES EXPRESSED OR 
IMPLIED INCLUDING THE WARRANTIES OF MERCHANTABILITY AND FITNESS FOR USE 
AND OF ALL OTHER OBLIGATIONS OR LIABILITIES ON OUR PART, AND WE NEITHER 
ASSUME NOR AUTHORIZE ANY OTHER PERSON TO ASSUME FOR US, ANY OTHER 
LIABILITY IN CONNECTION WITH THE SALE OF THIS LAMINATING MACHINE OR ANY 
PART THEREOF WHICH HAS BEEN SUBJECT TO ACCIDENT, NEGLIGENCE, 
ALTERATION, ABUSE OR MISUSE. WE MAKE NO WARRANTY WHATSOEVER IN 
RESPECT TO LAMINATION FILM, ACCESSORIES OR PARTS NOT SUPPLIED BY US. THE 
TERM 

“ORIGINAL PURCHASER,” AS USED IN THIS WARRANTY, SHALL BE DEEMED TO 

THE PERSON OR COMPANY WHO FIRST PUTS THE EQUIPMENT INTO SERVICE. THIS 
WARRANTY SHALL APPLY ONLY WITHIN THE BOUNDARIES OF THE CONTINENTAL 
UNITED STATES. 
(end)


Summary of Contents for SL27

Page 1: ...e Laminator Model SL27 27 120V Instruction Manual Also includes School Smart model 679185 manufactured January 2011 and later For School Smart models manuf prior to January 2011 use DryLam model 27STA Instructions Revised 1 20 14 3 12 14 4 10 15 Brian Jennett ...

Page 2: ...Operating 7 Control Panel 7 Heat 7 Motor 8 Key switch 8 Loading Film on 1 Supply Shafts 9 Threading the Laminator 10 Laminating 12 Supply Roll Tension Adjustment 13 Maintaining the Model SL27 679185 Laminator 15 Care and Cleaning 15 Specific Troubleshooting Guide 16 Removing a Wrap Around 16 Replacing the hand held Cutter Blades 18 Important Information 19 Equipment Warranty 19 ...

Page 3: ...rug or similar surface that may block the ventilation openings or placed in a built in installation such as bookcase or cabinet or against the wall that may impede the flow of air through its ventilation openings This unit should be situated away from heat and air ventilation systems such as radiators heat registers stoves etc This unit should only be connected to a power supply outlet of the volt...

Page 4: ...uring any machine repairs Clean unit only as recommended in this instruction manual Make sure to remove the Feed Table before reversing the machine Care should be taken so that objects do not fall and liquids are not spilled into the enclosure through any openings Caution The Cutter blade is extremely sharp Please handle carefully and dispose of properly ...

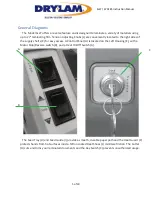
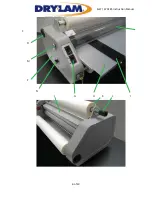
Page 5: ...t sides of the supply shafts K for easy access A Control Panel G is located on the Left Housing E with a Motor Stop Reverse switch B and a Heat On Off Switch A A C B The Feed Tray H and Feed Guide I provide a smooth durable paper path and the Heat Guard F protects hands from hot surfaces inside Teflon coated Heat Shoes J minimize friction The Cutter D cuts and trims your laminated documents and th...

Page 6: ...SL27 679185 Instruction Manual 6 of 19 F D M E N J G H K L I ...

Page 7: ... to the product being laminated Once heated small amounts of the glue side can stick to the heat shoes and rollers and must be periodically cleaned from the laminator Laminating film is available in a variety of different lengths and thicknesses Models SL27 and 679185 School Smart Laminators are designed to use 1 5 mil 150 and 3 mil 300 film thicknesses Operating Control Panel The control panel is...

Page 8: ...on To start the motor press the Stop Reverse switch in the Fwd up position To reverse the motor press the Stop Reverse switch in the Rev down position The motor will remain in reverse only as long as the button is depressed Key switch The key switch located just below the control panel locks out the motor allowing the machine to remain heated yet preventing unauthorized usage when in the locked po...

Page 9: ...t on the left side of the laminator The slot end fits into the tension adjuster on the right side Slide the film roll onto the supply shaft by rotating the supply shaft in the opposite direction of the gripper points leaving equal lengths of supply shaft sticking out of each end The film roll will slide over the gripper which will keep the roll from turning on the shaft Load the supply shaft on th...

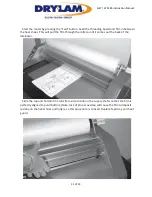
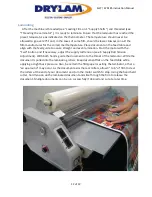
Page 10: ...he figure on the right Pull the film around the idler rollers as shown On some models do not mistake the reinforcing bar for the idler roller Make sure the glossy and dull sides of the film are as indicated in the diagram The dull side must not touch the heat shoes Position the threading board provided Turn power and key switch to on ...

Page 11: ...he film through the rollers until it comes out the back of the laminator Slide the top and bottom film rolls from side to side on the supply shafts so that the film is perfectly aligned top and bottom Note lack of proper overlap will cause the film to deposit residue on the heat shoes and rollers so this procedure is critical Replace feed tray and heat guard ...

Page 12: ...on Start the motor with the Fwd button and if necessary adjust the supply roll tension see E Supply Roll Tension Adjustment With both hands guide the document into the throat of the laminator While the document is pulled into the laminating rollers keep document flat on the feed table while applying a slight back pressure Also be certain the film paper is exiting the laminator other a wrap around ...

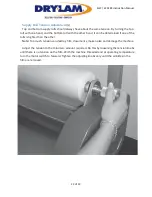
Page 13: ... determined if one of the rolls is tighter than the other Note Too much tension can destroy film documents make noise and damage the machine Adjust the tension to the minimum amount required Do this by loosening the tension knobs until there is no tension on the film With the machine threaded and at operating temperature turn the motor switch to forward Tighten the adjusting knobs only until the w...

Page 14: ...ockwise If the tension is not equal top and bottom the laminated product will curl or may bunch up in the roller area If the material curls up as it comes out of the machine the top roll is probably tighter than the bottom If it curls down the bottom roll is probably tighter Note Make sure the black tension disks are flat against the side panel They should be rotating both top and bottom while fil...

Page 15: ...er rollers Any scratches indentations or marks left on the rollers will appear on the laminated product To clean the shoes and rollers use a clean lint free cloth Some suggested solvents are Poly Off rubbing alcohol isopropyl fingernail polish remover with acetone and Goof Off After cleaning the shoes as described above it is HIGHLY recommended to use the DryLam Maintenance Kit DryLam part number ...

Page 16: ...rollers curls around one of them causing the laminate to wind around the roller If the wrap around is not severe simply use the reverse feature and back the film out Make sure to remove the Feed Table before reversing the machine It is advisable to have one person operate the motor switch while the other person pulls the film back out the front ...

Page 17: ...machine off DryLam Model SL27 and School Smart model 679185 have set screws at both ends of each laminating and pull roller With the use of a 3 32 hex key allen wrench loosen all four set screws on the pull rollers Cut the film between the laminating and pull rollers grab the loose end and pull The rollers may rotate freely on the roll shafts and the wrap around may easily unwrap Tighten all the s...

Page 18: ...r blade can be replaced by removing the small screw on the back of the cutter then removing the cutter back Caution The cutter blade is extremely sharp Please handle carefully and dispose of properly Remove and discard the old blade Re install cutter back and screw Caution Do not over tighten screw ...

Page 19: ...ction to be a manufacturing defect Warranty does not include damage due to operator error or general maintenance Warranty does not cover shipping or shipping related damage Note You will be charged for the replacement of any parts which are damaged as a result of improper packaging When a laminator is returned to DryLam s Service Center for repair it is recommended that all loose items be retained...

Reviews: