

DS Guitar Engineering
Chronograph
User Manual v1.0.3
Revised October 31, 2016
DSGE
Chronograph
User Manual
Page
3
of
3
Setup Menu
To enter the setup menu, hold down the footswitch while the power is off and apply power to the pedal. The
display should show “StuP” instead of the usual scrolling message. Release the footswitch after “StuP” appears.
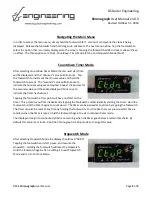
The first setup option that appears is the
Blink Warning Time
for the Countdown Timer Mode. The display
should read “bL:xx”, where “xx” is the warning time in minutes. The display will begin to continuously blink
when the countdown timer is running and the remaining time passes this value. Tap the footswitch to increment
the warning time. The warning time will roll over to zero after you pass 10 minutes. Hold the footswitch to
accept.
The next menu item is the
Clock Hour Format
parameter. The display should read “hr:12” or “hr:24” at this
point. Simply tap the footswitch to toggle between 12-hour clock format and 24-hour format. Hold the
footswitch to accept your changes.
The final menu item is the
Clock Adjustment
. Tapping the footswitch will increment the hour. Hold the
footswitch to accept the hour value. Repeat the process for adjusting the minutes. After accepting the minutes
the first menu item will reload. Simply unplug the power and reapply it to boot back into normal mode. The
pedal will always boot in normal mode unless you hold the footswitch during power up.
Note:
You must accept both the hour and minutes values to update the clock, even if you only change the hour.
Replacing the Battery
The Chronograph draws an extremely low amount of current from the battery when it’s not powered externally.
Of course it will have to be replaced occasionally, but we expect each battery to last up to 10 years. The battery
part number is CR2032, which is a relatively common 3V coin cell type. You only need two tools to replace the
battery: a small Philips head screwdriver and a wrench.
The first step is to remove the back cover of the pedal. The footswitch will have to be temporarily removed to
give the battery enough room to slide out. Use your wrench to carefully remove the nut from the footswitch on
the outside of the enclosure. You should now be able to easily pull the footswitch out of the back side. Take
caution not to put too much force on the wires that connect the footswitch to the circuit board. Doing so could
damage the solder joints and cause your pedal to malfunction.
Finally, carefully remove the battery by sliding it out towards the space where the footswitch was. Make sure the
positive side of your new battery is facing up. Repeat each process in reverse to reassemble your pedal. Follow
the instructions under “Setup Menu” to set the clock and your user settings. Now you’re good to go for several
more years to come!


