


Apply AC Power
CAUTION: The socket-outlet in which the
direct plug-in adaptor is inserted must be
close to the keypad, easily accessible, and
have unobstructed access. The plug of the
adaptor serves as a means of disconnection
from the supply mains.
1. Slide the keypad up and out from the
mounting plate/desk stand.
2. Locate the power adaptor jack at the
back of the keypad housing.
3. Place the adaptor plug in the housing
indentation, perpendicular to the keypad.
Insert the adaptor plug firmly into the jack.
4. Pivot the adaptor plug downwards so that
it fits flush with the housing. Guide the AC
wire along the channel provided in the keypad housing; the wire will extend through the bottom of the
housing.
5. Replace the keypad on the mounting plate/desk stand (in the latter case, a further channel is
provided in the bottom of the desk stand. Guide the AC wire along this channel; the wire will extend
through an opening in the back of the stand).
6. Plug the adaptor into a wall outlet.
Only use the power adaptor (9.0VDC, @1.25A, 2.25W, limited power supply for models: HK-XX11-
U09N (UL) and HK-XX11-U09NC (ULC).
Program the Keypad
There are several programming options available for the keypad (see the following table). Programming
the keypad is similar to programming the rest of the system. The installer menu is a text driven flow.
For information on programming the rest of your security system, refer to your system’s installation
manual.
1. Press [*][8][Installer Code].
2. Use the [<][>] keys to navigate through the menus or jump directly to a specific section by entering
the section number.
Language Programming
To enter language programming, enter [000]>[000], then enter the two-digit number that corresponds to
the language desired:
01 = English (def)
02 = Spanish
03 = Portuguese
04 = French
05 = Italian
06 = Dutch
07 = Polish
08 = Czech
09 = Finnish
10 = German
11 = Swedish
12 = Norwegian
13 = Danish
14 = Hebrew
15 = Greek
16 = Turkish
17 = Future Use
18 = Croatian
19 = Hungarian
20 = Romanian
21 = Russian
22 = Bulgarian
23 = Latvian
24 = Lithuanian
25 = Ukrainian
26 = Slovakian
27 = Serbian
28 = Estonian
29 = Slovenian
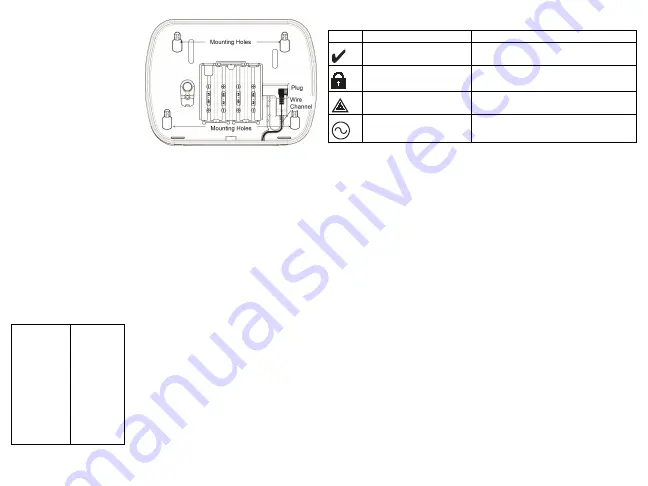
Keypad Symbols
Symbol
Description
Ready Light (Green)
If Ready light is ON, the system is ready to arm.
Armed Light (Red)
If Armed light is ON/Flashing, the system has been
armed successfully.
System Trouble (Yellow)
ON - Indicates that a system trouble is active..
Flashing - Keypad low battery.
AC (Green)
ON - Indicates that AC is present at the keypad
Enroll HSM2HOST
The HSM2HOST wireless transceiver or HS2LCDRF/HS2ICNRF keypad must be enrolled onto the
alarm panel before any wireless devices can be enrolled. When the alarm system is powered up for the
first time, the first keypad or the HSM2HOST (if using a wireless keypad as the first keypad) can be
enrolled. To do this:
1. Once the HSM2HOST is wired to the alarm panel and power has been applied, power up a wire-
less keypad.
2. Press any button on the keypad to enroll it on the HSM2HOST. The HSM2HOST is then auto-
matically enrolled on the alarm panel.
Enroll Keypad
1. Press [*][8][Installer Code] and then [804][000].
2. When prompted, either activate the device to enroll immediately or enter a device serial number. Do
the latter to pre-enroll devices then enroll them later at the customer site.
3. Use the [<][>] keys or enter the corresponding number to select an option.
4. Scroll through the available selections and enter a number or enter text as appropriate.
5. Press [*] to accept and move to the next option.
6. Once all options are configured, the system prompts you to enroll the next device.
7. Repeat this process until all wireless devices are enrolled.
For UL/ULC Residential Fire applications, HS2LCDWF9, HS2LCDWFP9, HS2LCDWFPV9
keypads must be set up for 200 seconds wireless supervision, by enabling toggle option 4 (200s Fire
Supv), in section [804][810].
Delete Keypad
1. Press [*][8][Installer Code] and then [804][905].
2. Use the [<][>] keys to select the keypad or press [#] to exit.
3. Press [*] to delete. The screen will read “Keypad deleted”.


