background image

Program Labels

Use this section to assign a meaningful name (e.g., Front Door, Hallway, etc.) to each zone.
1. Press [*][8] [Installer code].
2. Press [*] and use the [<][>] keys to scroll to Zone Labels and press [*] again. The first zone is dis-
played. Alternatively, enter [000][001].
3. Scroll to the zone label to be programmed and press [*] or enter the zone number (e.g., 001 for zone
label 1).
4. Scroll to the desired character’s location using the [<][>] keys.
5. Enter the number of the corresponding character group until the desired character is displayed (see
the following table).Example: Press the “2” key 3 times to enter the letter “F”. Press the “2” key 4
times to enter the number “2”.

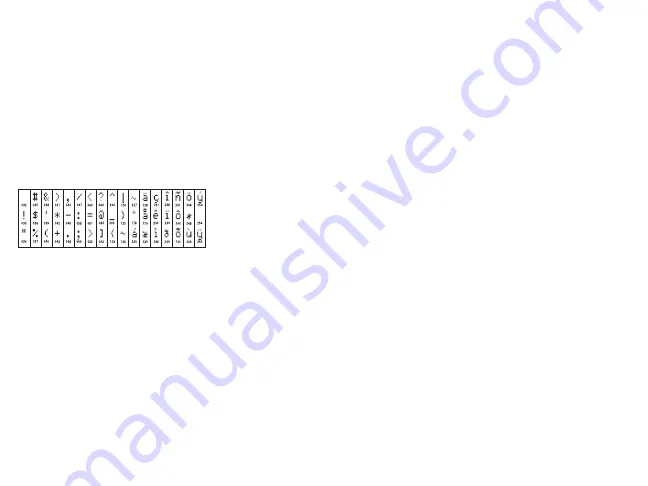
[1] - A, B, C, 1 [4] - J, K, L, 4 [7] - S, T, U, 7 [0] - Space
[2] - D, E, F, 2 [5] - M, N, O, 5 [8] - V, W, X, 8 [*] - Select
[3] - G, H, I, 3 [6] - P, Q, R, 6 [9] - Y, Z, 9,0

[#] - Escape

6. To save the label, press [#], and the label is automatically saved. To delete a character, use the [<]
[>] keys to move the cursor under the character, then press [0]. If any key other than [<] or [>] is
pressed before [0], the cursor moves one space to the right and deletes that character.

ASCII Character

Label Library

The Label Library is a database of words commonly used when programming labels. Individual words
can be combined as needed (e.g., Front + Door). Each line of the display supports a maximum of 14
characters. If a word will not fit on a line, scroll right until the cursor appears at the first character of
the second line then add the word.
To program a custom label using the Label Library:
1. Press [*][8][Installer Code][000][001] (to program the label for zone 01).
2. Press [*] to open the menu.
3. Press [*] again to select the “Word Entry” option.
4. Enter the 3-digit number corresponding to a word (see Words Library) or use the scroll keys [<][>]
to view words in the library.
5. Press [*] to select the word.
6. To add another word, repeat the previous procedure from step 2.
7. To add a space, press the right scroll key [>].
8. To clear characters, select “Clear to End” or “Clear Display” from the “Select Options” menu.
9. To save the label, press [#], and the label is automatically saved.

Broadcast LCD Labels

If more than one LCD keypad is present on the system, labels programmed at one keypad will be broad-
cast to all other LCD keypads right after the change is confirmed.

Voice Prompt/Voice Chime
Voice Prompt Control (for wireless keypads only)

Menu: [*][6][access code] > Voice Prompt
This function is used to change the volume level of keypad voice prompts, for example, “User arming
in progress.” The voice prompt speaks the zone labels programmed for zone openings/closings. Use

the scroll keys [<][>] to increase or decrease the volume from levels 0-10. Selecting 00 turns off
keypad voice prompts.

Voice Chime Control

Menu: [*][6][access code] > Chime Control
This function is used to change the keypad voice chime volume level. Use the scroll keys [<][>] to
increase or decrease the volume from levels 0-10. Selecting 00 turns off voice chime.

Change Brightness/Contrast/Buzzer

LCD Keypads
1. Press [*][6][Master Code].
2. Use the [<][>] keys to scroll to either Bright Control, Contrast Control, Buzzer Control.
3. Press [*] to select the setting you want to adjust.
4. (a) Brightness/LED Bar Control: There are 15 back lighting levels. Use the [<][>] keys to scroll to
the desired level. Changing this level adjusts the LED bar accordingly.
b) Contrast Control: There are 15 different display contrast levels. Use the [<][>] keys to scroll to the
desired contrast level.
c) Buzzer Control: There are 15 different buzzer control levels. Use the [<][>] keys to scroll to the
desired buzzer level.

Proximity Tags (HS2LCDWFP, HS2LCDWFPV only)

The proximity tag can be used to perform any keypad function that would normally require a user
access code. The tag is to be presented to the center left face of the keypad. While the keypad is run-
ning off AC, the transceiver is always on to detect any prox tag approaching. While the keypad is run-
ning on battery and in sleep mode, the user can press any key to wake the keypad, then present the
prox tag.

Enroll Proximity Tags

Enrolling a tag on one keypad will enroll it automatically to all HS2LCDWFP or HS2LCDWFPV
keypads enrolled on the system. Master code (code 1) cannot have a prox tag assigned to it.
1. Press [*][5][Master Code].
2. Use the [<][>] keys to scroll to the applicable user and press [*].
3. Use the [<][>] keys to scroll to Prox Tag and press [*]. The screen displays: “Present Tag”.
4. Pass the enrolled tag near the tag reader on the keypad. A prox tag can only be assigned to one user
at a time.
5. If enrollment is successful, acknowledgment beeps will sound and the keypad LCD will read ‘Tag
Enrolled Successfully’. If enrollment is unsuccessful, an error tone will sound and the keypad will
read ‘Invalid Tag Not Enrolled’. If the tag has been enrolled previously, an error tone will sound and
the keypad will read ‘Duplicate Tag Not Enrolled’.

Delete Proximity Tags

Delete the prox tags from the system when they are lost or no longer needed.
1. Press [*][5][Master Code].
2. The keypad displays the user number and includes the letter ‘T’ if a prox tag is programmed.
3. Use the [<][>] keys to locate the desired user and press [*]. Scroll to Prox Tag and press [*].
4. The keypad reads ‘Press [*] To Delete Tag’. After pressing [*], the message ‘Tag Deleted Suc-
cessfully’ appears.

Keypad Function Key Programming

To program a function key:
1. Press [*][8][Installer Code].
2. Enter [861] for keypad programming. Section [860] is read-only and shows the slot number of the
keypad being accessed.
3. Enter [001]-[005] for function keys 1-5.
4. Enter a 2-digit number to assign a function key operation - [00]-[68]. See the following tables.
5. Continue from step 3 until all function keys are programmed.
6. Press [#] twice to exit Installer Programming.

Summary of Contents for PowerSeries Neo HS2LCDWF

Page 1: ...Informationen zu den Haftungsbeschr nkungen des Herstellers HINWEIS Diese Installationsanleitung muss zusammen mit der Installationsanleitung der Alarmzentrale benutzt werden an welcher das Ger t ange...

Page 2: ...Tag w verbal annunciation 1 HS2LCDWF wall bracket 1 installation manual 1 inner door sticker 4 AA batteries 1 hardware pack 1 prox tag Mount the Keypad Mount the keypad where it is accessible from des...

Page 3: ...Danish 14 Hebrew 15 Greek 16 Turkish 17 Future Use 18 Croatian 19 Hungarian 20 Romanian 21 Russian 22 Bulgarian 23 Latvian 24 Lithuanian 25 Ukrainian 26 Slovakian 27 Serbian 28 Estonian 29 Slovenian...

Page 4: ...d to change the keypad voice chime volume level Use the scroll keys to increase or decrease the volume from levels 0 10 Selecting 00 turns off voice chime Change Brightness Contrast Buzzer LCD Keypads...

Page 5: ..._ 3 Panic Key Enabled Panic Key Disabled ON ______ 4 Display Access Code When Programming Display X s When Programming Access Codes OFF ______ 5 For Future Use For Future Use OFF ______ 6 For Future U...

Page 6: ...ond duration 05 Zone Name 991 Reset Keypad Programming to Factory Defaults 1 Press 8 Installer Code 2 Enter 991 3 Use the keys to scroll to the applicable keypad 4 Press to select the keypad 5 Re ente...

Page 7: ...Saver 195 1 231 016 Baby 052 Disarmed 088 Gym 124 Mother s 160 Schedule 196 2 232 017 Back 053 Door 089 Hallway 125 Motion 161 Screen 197 3 233 _ Underscore 018 Bar 054 Down 090 Heat 126 No 162 Second...

Page 8: ...ouwill not exportor re export theSOFTWARE PRODUCT toany country person orentity subjecttoCanadianexportrestrictions 5 CHOICE OF LAW This SoftwareLicenseAgreement is governedby thelaws of theProvinceof...

Page 9: ...s Bedienteils 4 AA Batterien 4 AA Batterien 1 Packung Befestigungsmaterialien 1 Packung Befestigungsmaterialien 1 Transponder HS2LCDWFPV Transponder mit Ansage 1 HS2LCDWF Wandhalterung 1 Installations...

Page 10: ...5 Griechisch 16 T rkisch 17 FFU 18 Kroatisch 19 Ungarisch 20 Rum nisch 21 Russisch 22 Bulgarisch 23 Lettisch 24 Litauisch 25 Ukrainisch 26 Slowakisch 27 Serbisch 28 Estnisch 29 Slowenisch Bedienfeldsy...

Page 11: ...Funk Bedienteile Men 6 Zugangscode Aufforderungsansage Diese Funktion dient zur Lautst rkeregelung der Aufforderungsansagen des Bedienfelds zum Beispiel Benutzerscharfschaltung im Gang Die Aufforderu...

Page 12: ...scharfschalten 34 Benutzer Programmierung 68 Bereich Auswahl 8 14 Global unscharf schalten 35 Benutzer Funktionen 16 Schnell verlassen 37 Uhrzeit und Datum einstellen Bedienteilprogrammierung Dr cken...

Page 13: ...hl der L schungen der heruntergeladenen Mitteilung bevor sie permanent entfernt ist Dr cken Sie eine beliebige Taste um diese Nachricht zu l schen 041 Innentemperatur Zonenzuordnung Standard 000 _____...

Page 14: ...9 Bereich 061 Geringer 103 Nein 145 Special 187 Zugang 229 020 Bericht 062 Geschlossen 104 Nicht 146 Speicher 188 Zur ck 230 021 Bewegung 063 Gewalt 105 Nord 147 Sportstudio 189 Zusatz 231 Leerzeichen...

Page 15: ...________ ______________________________________________________________________________________________________________________________________________________________________________________ ________...

Page 16: ...verwendetwerden wie in dieser EULAbeschrieben d Vermietung Sie d rfen diesesSOFTWAREPRODUKT nichtvermieten lea sen oder ausleihen Sie d rfen esanderen nichtzur Verf gung stellen oder es aufeinen Serve...

Page 17: ...samolepka s popisem na dv ka kl vesnice 4x baterie AA 1x materi l pro mont Mont kl vesnice Namontujte kl vesnici na m sto kter je p i p chodu a odchodu snadno p stupn Jakmile m te vybr no such a bezp...

Page 18: ...Popis P ipraveno zelen Pokud kontrolka sv t je syst m p ipraven na zapnut Zapnuto erven Kontrolka sv t blik pokud je syst m sp n zapnut Porucha lut Sv t signalizuje poruchu v syst mu Blik slab baterie...

Page 19: ...ch zm n te n zvy tak po ulo en zm n dojde k automatick mu odesl n zm n n ch n zv do ostatn ch kl vesnic Hlasov n pov da Hlasov zvonkohra Nastaven hlasov n pov dy pouze na bezdr tov kl vesnici Menu 6 p...

Page 20: ...Ovl dac v stup 1 Programov n kl vesnice Stiskn te 8 Instala n k d 860 Slot kl vesnice Sekce nen ur ena pro programov n dvou m stn slo slotu je zobrazeno pouze pro informa n ely 861 876 Sekce pro progr...

Page 21: ...ou 000 128 042 P i azen z ny pro venkovn teplotu V choz nastaven 000 ___ ___ ___ platn hodnoty jsou 000 128 101 228 Programov n dve n zvonkohry V choz nastaven 01 ___ ___ T n zvonkohry na kl vesnici l...

Page 22: ...ter 100 pokojik 142 syna 184 zprava 226 Mezera 017 chodba 059 matky 101 policie 143 system 185 zruseno 227 Apostrof 018 chyba 060 mazlicek 102 pomocny 144 tamper 186 zvonkohra 228 Poml ka 019 cislo 06...

Page 23: ...________ ______________________________________________________________________________________________________________________________________________________________________________________ ________...

Page 24: ...jeden Integrovan produkt V tomto p pad sm b t Softwarov produkt pou v n pouze s dodan m Hardware tak jak je ur eno d le v t to EULA d Pron jem U ivatel nesm pronaj mat ani p j ovat Softwarov produkt...

Page 25: ...Yak nl k Etiketi W s zl duyuru 1 HS2LCDWF duvar deste i 1 kurulum k lavuzu 1 i kap yap kan sticker 4 AA pil 1 donan m paketi 1 yak nl k etiketi Tu tak m n monte edin Tu tak m n belirlenen giri ve k no...

Page 26: ...etonya dili 24 Litvanya dili 25 Ukraynaca 26 Slovakyaca 27 S rp a 28 Estonyaca 29 Slovence Tu tak m Sembolleri Sembol Tan m Haz r I Ye il Haz r A IK ise sistem kuruluma haz rd r Kurulu I K rm z Kurulu...

Page 27: ...n 00 se mek tu tak m sesli uyar s n kapat r Sesli Zil Kontrol Men 6 eri im kodu Zil Kontrol Bu fonksiyon tu tak m sesli zil ses seviyesini de i tirmek i in kullan l r Sesi 0 10 aras nda art rmak veya...

Page 28: ...lan 01 dir NOT HS2LCDWF tu tak m global bir tu tak m olarak atanamaz 001 005 1 5 numaralar aras Fonksiyon Tu u Atamas 011 Tu tak m Giri k Programlamas Zone veya PGM Numaras 00 _____ _____ _____ 012 Y...

Page 29: ...erli giri ler 000 128 dir 101 228 1 128 aras ndaki Zone lar i in Kap Zil Sesi Tu tak m ayr zone lar i in d rt farkl zil sesi olu turmaya programlanabilir rn Zone 1 i in K s m 101 e girin Zone 2 i in K...

Page 30: ...ersiz 098 I klar 138 Paspas 178 Yukar 218 V 019 Banyo 059 Ekran 099 lemde 139 Pencere 179 Y kle 219 W 020 Bar 060 Enerji 100 zinsiz 140 Pil 180 Y kleme 220 X 021 Baraka 061 Ev 101 Kamera 141 PM 181 Y...

Page 31: ...________ ______________________________________________________________________________________________________________________________________________________________________________________ ________...

Page 32: ...n artlar na ve ko ullar na uyulmas n sa lamakhususundagerekli nlemlerialman z gerekmektedir b Bile enlerin Ayr lmas Yaz l m r n tek bir r n olarak lisansland r lmaktad r Bile enpar alar birden fazla...

Reviews: