MENUS AND FUNCTIONS
26
D-306232 WP8010/WP8030 V18 DSC EN USER
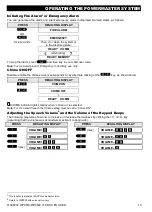
A. To Program a User Code
B. To Set Partitions Authorization
*
Additional Information (section B.4)
1
For detailed instructions on how to select the setting options – refer to sections A.1 and A.2.
2
The display shows the 1
st
User Code (Master User) in the list of 8 User Codes (in WP Panel system) / 48
User Codes (in WP Panel). If you have not yet changed the default code 1111, we recommend that you
change it now.
3
a. The display shows the user code currently programmed in this location (e.g. 5327).
b. The cursor blinks on the first digit of the code.
c. If the location is free the display will be blank ( - - - - ).
4
You can move the cursor to the next or previous digit by pressing
or
. Pressing
erases the digit of the all digits right of the cursor.
5
a. The new code is momentarily displayed without the cursor before reverting to step 3.
b. If Partition is enabled, continue to step 6.
6
You can now repeat steps 3 - 5 to program or edit another user code. To end this session and to select
other menu options or to quit programming – follow the instructions in section A.2.
7
This setting can be performed only after completing steps 1 - 5 of
section B.4A.
8
The
symbol now appears next to the newly selected Partitions.
9
You can now repeat steps 3 - 7 to program or edit another user code.
*
When PARTITIONING is enabled.
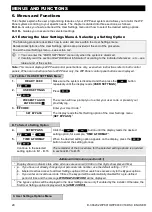
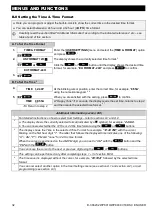
1.
USER CODES
Enter the [
USER SETTINGS
] menu, select the [
USER CODES
] option and
press
.
1
2.
User 01 Code
The first user code "
User 01 Code
" is displayed.
2
or
At the blinking cursor position, key in the User Code you wish to program , for
example, [06] for user code 6, or alternatively click the
or
button until the display reads, [
User 06 Code
].
3.
User 06 Code
When the user code you wish to program appears on the display, press
.
4.
User 06 :
234
To program or edit the code, at the blinking cursor position enter the 4 digit
code, for example, “
1234
”, using the numerical keypad.
3,
4
5.
When done, press
.
User 06 : 1234
☺
Return to step 3
A "Happy Tune"
☺
sounds. The display confirms the saved code.
5,
6
6.
SET PARTITIONS
The display will read [
SET PARTITIONS
].
7
7.
U06: P1
P2 P3
Use the keypad keys
,
,
to change the status of the
partitions P1, P2 & P3, respectively.
8
U06: P1
P2 P3
When you are satisfied with the setting, for example, User 6 is authorized
with Partition 1 and 3 only, press
to confirm.
☺
Return to step 3
A "Happy Tune"
☺
sounds. The display confirms the Partition setting.
9


