background image

MENUS AND FUNCTIONS 

D-306232 WP8010/WP8030 V18 DSC EN USER 

43 

1. 

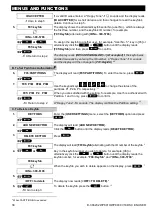
SCHEDULER 

Enter the [

USER SETTINGS

] menu, select the [

SCHEDULER

] option and 

press 

.

 1


2. 

PGM 

When the display reads [PGM], press 


B. To Set the Day 

2


Sunday 

The 1

st

 day of the scheduler is displayed. 

3. 


or


Click the 

 or 

 button until the display reads the day you wish 

to schedule or "Daily", for example, "

Tuesday

". 

2


Tuesday 


4. 


When the "day" to schedule appears on the display, press 

C. To Select the Activation No. 

3


5. 

operation No 1 

The 1

st

 operation (PGM output activation) of the scheduler is displayed.

 3


or


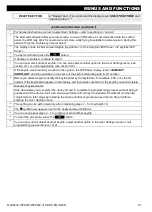
Click the 

 or 

 button until the display reads the operation you 

wish to schedule, for example, "

operation No 3

". 


operation No 3


6. 


When the "

operation 

No

." to schedule appears on the display, press 

D. To Set the ON (Start) Time 

4


7. 

Start-HH:MM 

The "start time" screen is shown on the display.

 4


To set the start time of the selected operation, press the 

 button. 

8. 

TIME       10:00A 

The display shows the current setting of the start time.

 5


TIME       12:30P


Use the numerical keypad to set or change the operation 

ON (start)

 time, for 

example, “

00:30P

”.

 6


9. 


When you are satisfied with the setting, press 

 to confirm. 


Go to step 10


A "Happy Tune" 

 sounds. The display confirms the saved start time and 

returns to the "start time" screen as in step 7.


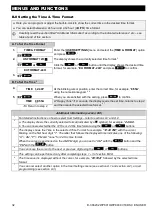
To set the stop time, continue to step 10.


E. To Set the OFF (Stop) Time 

10. 

Start-HH:MM 

Click the 

 or 

 button until the display reads "

Stop-HH:MM

".  


or


Stop HH:MM 

When the display reads the desired setting, press 

 to confirm. 

11. 


TIME        01:30P 

The "stop time" of the selected operation is displayed.


5


12. 

TIME        04:00P 

Use the numerical keypad to set or change the operation 

OFF (stop)

 time, 

for example, “

04:00P

”.

 6


When you are satisfied with the setting, press 

 to confirm. 


Return to step 5


A "Happy Tune" 

 sounds. The display confirms the saved stop time and 

returns to the "operation No" screen, as in step 5.

 7


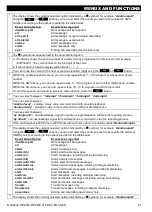
Additional Information (section B.14) 

Summary of Contents for WP8010

Page 1: ...ON OFF 14 Message Exchange 14 Message Playback 15 4 Electrical Appliance Control 16 Control Options and Pushbuttons 16 Automatic ON OFF Control 16 5 Reviewing Troubles and Alarm memory 17 Alarm Tamper...

Page 2: ...the Control Panel 57 Event Log 57 Exiting the Event Log 58 APPENDIX A FUNCTIONS OF CONTROLLING DEVICES 59 A1 WK160 868 3 037 59 A2 WK141 868 3 037 60 A3 PGx9939 61 APPENDIX B PARTITIONING 62 B1 Select...

Page 3: ...essage is expected to investigate the event and act accordingly IMPORTANT All you need to know to secure your premises can be found in Chapters 2 and 3 of this manual If you are not familiar with some...

Page 4: ...system as usual but also sends a silent alarm to the monitoring station see Chapter 2 Operating the WP Panel System System supervision All wireless peripherals within the protected site send periodic...

Page 5: ...ome INSTANT Canceling the entry delay upon arming AWAY or HOME DISARM OFF Disarming the system and stopping alarms PARTITION Partition selection Other Keys No Indication Function Chime ON OFF Reviewin...

Page 6: ...is at home HOME Arming when people remain at home INSTANT Canceling the entry delay upon arming AWAY or HOME DISARM OFF Disarming the system and stopping alarms PARTITION Partition selection Other Ke...

Page 7: ...ON pause ON ON ON ON pause Test both external and internal sirens ON for 2 seconds once Not included in all models General Audible Indicators The sounds you will hear while using the control panel ar...

Page 8: ...control panel the message OK for AWAY is displayed Now you can press the button to immediately arm the control panel or wait for 3 second for system automatic AWAY arming the message Please exit now w...

Page 9: ...to arm If you do not know how to do this consult your installer Note To quit at any stage and to revert to the READY display click Device Locator The WP Panel system has a powerful device locator that...

Page 10: ...e or more partitions are in the AWAY or HOME modes Before attempting to perform any operation on any given partition s it is necessary to perform the operations below which enable you to select the de...

Page 11: ...HOME Forced arming allows you to arm the system even if the system is NOT READY Any open zones will be bypassed for the duration of arming Note When forced arming is carried out the buzzer protests b...

Page 12: ...sers of keyfob transmitters 5 through 8 WP Panel 23 32 WP Panel The latchkey message is considered an alert and not an alarm and is therefore sent to the private telephones programmed by the user as t...

Page 13: ...le enable the chime zones see Appendix C by alternate clicking of the key as shown below PRESS RESULTING DISPLAY CHIME ON CHIME OFF READY HH MM CHIME indicator lights steadily when chime on is selecte...

Page 14: ...udspeaker Records a spoken message for other users of the alarm system Allows listening to a recorded message left by another user of the alarm system Enables disables the chime function in chime zone...

Page 15: ...ternating READY MSG To check your own message listen to it within one minute from the end of recording see the next section Message Playback This way the MSG indication will not be erased Message Play...

Page 16: ...ller Both The appliance is controlled by sensors as well as by a timer Examples of benefits gained by automatic remote control Timer Control When you are away the timed activation de activation of an...

Page 17: ...LAY WP Panel Z07 TAMPER OPEN alternating Z12 ALARMED Z06 MOTION SENS alternating alternating Z03 CONTACT BEDROOM alternating GARAGE DOOR READY HH MM In response to additional clicking of the button th...

Page 18: ...ILURE READY HH MM IMPORTANT If the trouble beeps bother you disarm the system again even though it is already disarmed This will cancel the trouble beeps for 4 hours C Reviewing Memory Troubles at the...

Page 19: ...eplaced see Chapter 10 Maintenance Replacing Backup Battery CPU TAMPER OPEN The control panel was physically tampered with or its cover was opened or it was removed from wall GAS TROUBLE Gas detector...

Page 20: ...d then press the button repeatedly until the display reads USER SETTINGS 1 2 USER SETTINGS Press PRESENT TAG OR ENTER CODE The screen will now prompt you to enter your user code or present your proxim...

Page 21: ...cedure see section B 8 DATE FORMAT Use to set the calendar date to show the correct date and date format For further details and programming procedure see section B 9 AUTO ARM ENABLE Use to enable or...

Page 22: ...evious menu options OK Use to select a menu option or to confirm a setting or action HOME Use to move one level up in the menu or to return to previous setting step AWAY Use to jump back to the OK TO...

Page 23: ...ish to bypass or clear bypass for example Z04 for Zone 04 After several seconds the LED on the respective device starts flashing indicating it s me Z04 NOT READY Z04 P1 P2 P3 4 3 Kitchen When the disp...

Page 24: ...formation section B 1 B 3 1 For detailed instructions on how to select User Settings refer to sections A 1 and A 2 2 This menu is displayed only if BYPASS was previously enabled by the installer 3 a T...

Page 25: ...possible User Codes 2 4 WP Panel User Codes 2 22 and 33 48 WP Panel are assigned to family members co workers etc They enable arming and disarming of the system or of selected partitions as defined by...

Page 26: ...s in section A 2 7 This setting can be performed only after completing steps 1 5 of section B 4A 8 The symbol now appears next to the newly selected Partitions 9 You can now repeat steps 3 7 to progra...

Page 27: ...es For example proximity tag 3 is assigned to user code 3 Here you can add enroll new proximity tags or delete tags as required Carefully read the section titled Additional Information according to th...

Page 28: ...TAG The display will read ADD NEW TAG Click the button until the display reads DELETE TAG 3 DELETE TAG Press T01 Tag Prox The display will read T01 Tag Prox 2 7 4 or Key in the tag number you wish to...

Page 29: ...rrespondingly Partition Option For information about Partition option see Appendix B If the Partition option is enabled in the control panel each of the 8 keyfobs WP Panel 32 keyfobs WP Panel can be a...

Page 30: ...will read F05 PARTITIONS To enter the menu press 10 7 F05 P1 P2 P3 Use the keypad keys to change the status of the partitions P1 P2 P3 respectively 11 F05 P1 P2 P3 When you are satisfied with the sett...

Page 31: ...nrolled in the system the WP Panel display reads ALREADY ENROLLED and then switches to the name of the keyfob alternating with its ID number 8 Before you delete a keyfob identify the keyfob either by...

Page 32: ...play reads the set time returns to step 2 and then reads the selected time format 6 7 Return to step 2 Additional Information section B 8 1 For detailed instructions on how to select User Settings ref...

Page 33: ...for example 20 04 2011 using the numerical keypad 3 4 5 5 When you are satisfied with the setting press to confirm DATE 20 04 2011 A Happy Tune sounds the display shows the set date and returns to ste...

Page 34: ...Auto Arming Time Here you can program the exact time of the Auto Arming Note This feature is not to be not to be enabled in UL Listed product 1 AUTO ARM TIME Enter the USER SETTINGS menu select the A...

Page 35: ...d 4th private telephone MMS SMS numbers and emails for reporting alarm and other event messages to private subscribers The number of redial attempts two way voice communication and whether to use a si...

Page 36: ...the currently selected option 12 or Click the or button until the display reads the desired number of redial attempts for example 4 attempts 9 4 attempts 13 When you are satisfied with the setting pre...

Page 37: ...REPORT To enter this option press 4 REPORTED EVENTS When the display reads REPORTED EVENTS press disable report The display shows the currently selected option 5 or Click the or button until the displ...

Page 38: ...shows the currently selected option 7 or Click the or button until the display reads the event group you wish to be reported via email for example alarm 13 alarm 8 When you are satisfied with the set...

Page 39: ...d option 7 or Click the or button until the display reads the event group you wish to be reported via SMS for example alarm 13 alarm 8 When you are satisfied with the setting press to confirm alarm A...

Page 40: ...A Happy Tune sounds the display confirms the MMS SMS telephone number and returns to step 19 8 15 Return to step 19 Additional Information section B 12 1 For detailed instructions on how to select Use...

Page 41: ...etween enable 2 way enables 2 way voice communication with private telephones disable 2 way disables 2 way voice communication with private telephones 11 You can select between by single ack an acknow...

Page 42: ...uawk OFF 3 Squawk OFF A Happy Tune sounds The display confirms the saved setting and then returns to the User Settings menu step 1 3 4 Return to step 1 Additional Information section B 13 1 For detail...

Page 43: ...the start time of the selected operation press the button 8 TIME 10 00A The display shows the current setting of the start time 5 TIME 12 30P Use the numerical keypad to set or change the operation ON...

Page 44: ...f no time is programmed the time display will be blank 6 For detailed explanation of how to set the time refer to Section B 8 B 7 To end this session and return to the previous operation menu press th...

Page 45: ...e VOLUME CONTROL option and press 1 2 KP beeps vol The display will read KP beeps vol To enter this option press MID The display shows the currently selected option 2 3 or Click the or button until th...

Page 46: ...eep v and press 14 Confirm beeps v MID The display shows the currently selected option 2 15 or Click the or button until the display reads the desired volume level for the confirmation beeps for examp...

Page 47: ...sable prompts A Happy Tune sounds The display confirms the saved setting then returns to step 26 4 8 Return to step 26 Additional Information section B 15 1 For detailed instructions on how to select...

Page 48: ...421 v1 0 02 Displays the control panel keypad software version 2 5 Panel ID xxxxxx Displays the control panel ID for PowerManage connectivity 6 PYTHON 2 0 6 Displays the GSM image transfer software ve...

Page 49: ...en the called party answers a call initiated by the WP Panel he will hear a verbal message composed of the house identity and the type of event that occurred For example once smoke is detected in the...

Page 50: ...ne to the WP Panel control panel via PSTN landline or GSM and to perform a variety of arming commands remotely using your telephone s keypad To connect to the WP Panel when the WP Panel is connected t...

Page 51: ...the person at home 3 Speak out speaking to the person at home 1 Full duplex listening speaking 6 Note To prolong the communication session by 50 seconds press 3 1 or 6 again as required The 2 way com...

Page 52: ...P AWAY INST code or P AWI code 3 Arm AWAY Latchkey LATCHKEY code or LK code P LATCHKEY code or P LK code 4 Arm AWAY Latchkey instant LATCHKEY INST code or LKI code P LATCHKEY INST code or P LKI code...

Page 53: ...et by your installer to 6 hours a virtual 6 hour clock will carry out a 6 hour countdown If motion is detected within the 6 hour time frame the countdown will restart from the beginning the virtual 6...

Page 54: ...ntil the display reads PERIODIC TEST and press 1 PERIODIC TEST 2 ENTER CODE The screen will now prompt you to enter your user code 3 CODE Enter your User Code 2 3 Go to step 4 B To Test the Sirens 4 S...

Page 55: ...f you have not already changed your personal code number use the default setting 1111 3 If the INSTALLER CODE is used to enter the Periodic Test instead of the USER CODE the devices LED will also prov...

Page 56: ...ly drops one count for every tested device Test per partition is performed by activating each device as explained in point 4 in the Additional Information table below After a device has been activated...

Page 57: ...en the 4 minutes are up the system will automatically revert to the normal mode Cleaning the Control Panel The control panel may occasionally get stained if touched with greasy fingers and may accumul...

Page 58: ...ternately until clicking again to move to the next event or until the event log times out 4 minutes 09 02 10 3 37 P 4 Click the button as many times as necessary to read all the required data Importan...

Page 59: ...ck arm HOME If Quick Arm is enabled 2 sec Optional 4 INSTANT After arming HOME AWAY LATCHKEY After arming AWAY Initiating Alarms Alarms Actions Response Notes Emergency alarm 2 sec See section 3 3 in...

Page 60: ...INSTANT After arming HOME AWAY The keypad s LED blinks red once to indicate transmission of the command to the control panel The control panel s response is then indicated on the keypad via the LED an...

Page 61: ...n executing a command the keyfob s LED blinks red once to indicate transmission of the command to the control panel If the operation is successfully completed the green LED lights momentarily and a ha...

Page 62: ...of that office to use the reception area without generating an alarm Such an area is termed a common area Note Remote operation is performed per partition or per user code defined for a particular par...

Page 63: ...mmon area but continues with zones that are not assigned to a common area the siren will not stop until all partitions assigned to the alarmed zones are disarmed In case that there is a fire in partit...

Page 64: ...tion only The event will be ignored for other assigned armed partitions Interior Acts as defined only after the last assigned partition is armed AWAY In case that one of the partitions is disarmed or...

Page 65: ...hime zone is opened the buzzer beeps twice The buzzer doesn t beep however upon closing the zone return to normal Residences can use this feature to annunciate visitors Businesses can use it to signal...

Page 66: ...our installer can designate a zone for roles other than alarm For instance a motion sensor installed in a dark stairway may be used to switch on lights automatically when someone crosses the dark area...

Page 67: ...to grandparents Allow children to master fire escape planning and practice before holding a fire drill at night when they are sleeping The objective is to practice not to frighten so telling children...

Page 68: ...cklit 16 large character LCD Arming Modes AWAY HOME AWAY INSTANT HOME INSTANT LATCHKEY FORCED BYPASS Note AWAY INSTANT and HOME INSTANT are not permissible for CP 01 installations AWAY HOME AWAY INSTA...

Page 69: ...NA External wall mounted switching power supply 100VAC to 240VAC 50 60 Hz 0 5A 12 5 VDC 1 2A Internal AC DC Internal switching power supply Input 100 240VAC 0 12 A Max Output 7 5VDC 1 2A Max Internal...

Page 70: ...ckup period must be at least 24 hours Note Only the LTT AA2200LSDX8B battery pack is approved for use by UL Time to Charge 80 13 Hrs 80 30 Hrs for all battery types Optional Backup Battery Pack See Ba...

Page 71: ...01 PGx9901 Outdoor Sirens PGx9911 PGx9911 Repeater PGx9920 Gas PGx9913 CO detector Glass break PGx9912 Temperature PGx9905 Shock PGx9935 Magnetic Contact PGx9945 PGx9975 PIR Detectors PGx9904 PGx9904P...

Page 72: ...r Consult the dealer or an experienced radio TV technician WARNING To comply with FCC and IC RF exposure compliance requirements the device should be located at a distance of at least 20 cm from all p...

Reviews: