24 |
P a g e
014010-001 Rev 01
©2019 Data Sciences International.
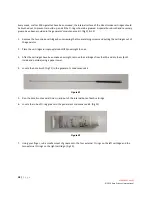
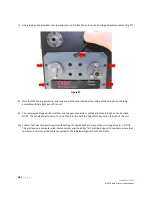
Figure 31
8)
Locate the bore brush in the generator’s maintenance kit. Run it several time through the transverse lung pipe
to remove any accumulated tar (Fig 31).
9)
Re-assemble the unit by doing the following.
•
Install and tighten the two lung-pipe access nuts.
•
Gently push the attachment plate back into the generator.
•
Install and tighten the five hex nuts to secure the attachment plate to the generator.
PARTS LIST
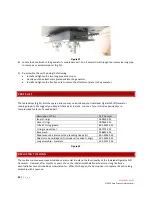
The table below (Fig 32) lists the spare parts you may need to keep your Individual Cigarette Puff Generator
running properly. We suggest you keep all these parts in stock, so none of your critical experiments are
compromised for lack of a needed part.
Description of Part
Part Number
Inner O-rings
009450-001
Outer O-rings
009460-001
Tube of O-ring grease
601-2524-053
O-ring removal tool
007579-001
Bore brush
008850-001
Maintenance Kit (includes the preceding five parts)
601-2056-001
Direct-smoke cartridges Kit (includes all needed O-rings)
601-6050-001
Lung assembly
—
complete
601-2112-001
Figure 32
REPLACING THE LUNG
The routine maintenance steps listed above are crucial to extend the functionality of the Individual Cigarette Puff
Generator. However, after months or years of use, the inhalation/exhalation actuators or lung itself may
eventually become corroded by accumulated tar. When this happen, the best option is to replace the entire lung
assembly with a new one.


