background image

• 4 •

5.  OPERATING INSTRUCTIONS

Pre-Charging

The DSR132 must be pre-charged before 

it can be used to jump start your vehicle. 

(Press the ON/OFF button once to see the 

Ultracapacitor charge %.) The “Standard 

Mode” instructions will guide you on using your 

current vehicle’s “weak” battery to pre-charge 

the jump starter. If your vehicle’s battery is 

completely discharged, or does not allow you 

to pre-charge the jump starter, see “Alternative 

Pre-Charge Methods”.

Standard Mode

In most cases, the weak battery can fully 

recharge the jump starter. 

Follow these steps to pre-charge your jump 

starter and get your car started:

1. 

For a negative-ground vehicle (as in 

most vehicles), connect the POSITIVE 

(RED) clamp to the POSITIVE (POS, P, +) 

battery post. Next, connect the NEGATIVE 

(BLACK) clamp to the vehicle chassis or 

engine block, away from the battery. 

2. 

For a positive-ground vehicle, connect 

the NEGATIVE (BLACK) clamp to the 

NEGATIVE (NEG, N, -) battery post. Next, 

connect the POSITIVE (RED) clamp to 

the vehicle chassis or engine block away 

from the battery.

3. 

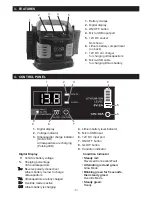
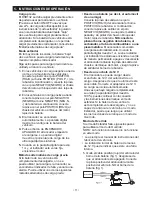
The jump starter will turn on automatically. 

The digital display will show the voltage of 

the vehicle’s battery.

4. 

Press the ON/OFF button. The jump 

starter will start to recharge. The digital 

display will show the charging percentage 

of the internal ultracapacitors.

5. 

When digital display shows 

FUL

, and the 

condition indicator is steady green, crank 

the engine.

Alternative Pre-charge Methods

If your vehicle’s battery is completely 

discharged, or is unable to charge the jump 

starter, the Fault indicator will turn on and an 

audio alarm will sound. You can use one of the 

following alternative pre-charging methods:

• From a battery (i.e, friend’s car)

Connect the jump starter’s red (POSITIVE) 

output clamp to the POSITIVE post of 

the battery.  Next, connect the black 

(NEGATIVE) output clamp to a heavy, 

unpainted metal part of the chassis or 

engine block, away from the battery. 

DO 

NOT connect clamp to the negative 

battery post, carburetor, fuel line or a 

sheet metal part.

 The jump starter will start 

to charge itself automatically. When the 

digital display shows 

FUL

, the audio alarm 

sounds and the condition indicator is steady 

green, turn off and disconnect the jump 

starter by removing the output clamp from 

the chassis or engine block, followed by the 

output clamp from the battery post.

• From a 12V socket

The jump starter can be recharged from a 

donor car’s 12V DC socket. Make sure the 

car is running. Plug in the provided 12V 

adapter. Charging starts automatically.

Once you have fully charged your jump 

starter (the digital display shows 100%), 

you can continue with the connection and 

starting instructions in Standard Mode. 

If your vehicle’s battery is completely 

discharged, and you are unable to start the 

vehicle in Standard Mode, you may need to 

use the Override Mode starting instructions.

Override Mode 

If there is no battery mounted on the engine 

to be started, follow these steps to use 

Override mode:

NOTE: The GLOW function will not operate in 

this mode.

• Always read the vehicle manufacturer’s 

instruction manual.

• An initial battery indication of below 12V may 

suggest that there is an internal fault.

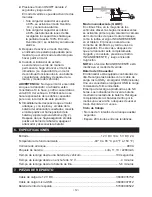
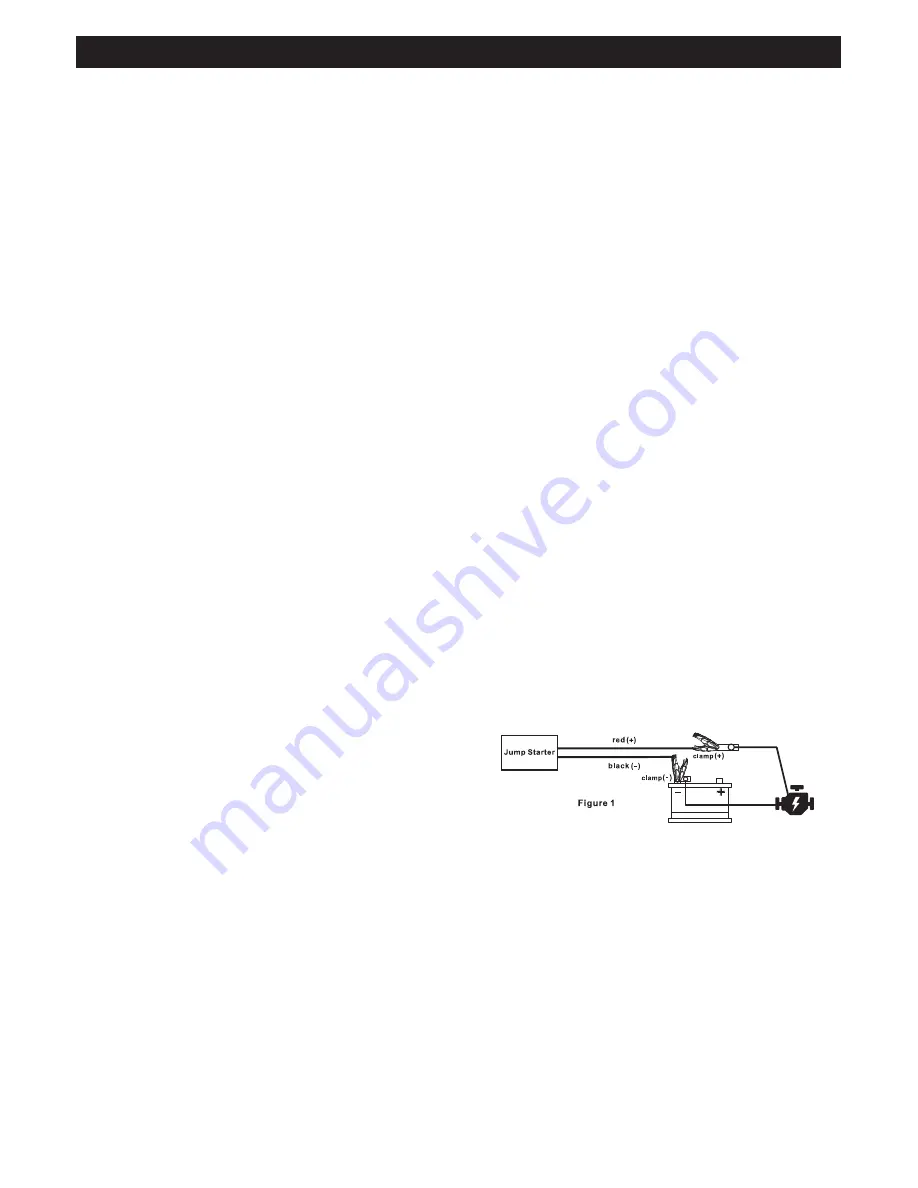
1. 

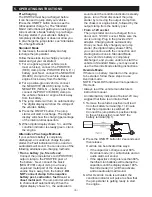
Remove the vehicle’s positive (red) lead 

from the battery terminal (fig. 1). Ensure 

that the jump starter is switched off. 

Connect the jump starter’s positive clamp 

to the vehicle positive lead, NOT the 

battery terminal (fig.1).

2. 

Press the ON/OFF button for 2 seconds and 

then release.

Override can be activated two ways:

•  If the capacitor’s charge is over 80%, 

Override mode (

OUr

) will activate and an 

audio alarm will sound. 

•  If the capacitor’s charge is less than 80%, 

the lithium ion batteries will recharge the 

capacitors until the display shows 100%. 

Override mode (

OUr

) will then activate, 

and an audio alarm will sound.

3. 

After Override mode is activated, the 

condition indicator will pulse to show that 

the jump starter is getting ready to start 

the engine.

Summary of Contents for DSR132 Pro Series

Page 1: ...ilizar el arrancador con seguridad y eficacia Por favor lea y siga las siguientes instrucciones y precauciones ESSAYER DE GARDER LE MANUEL D INSTRUCTIONS ET LE LIRE AVANT CHAQUE UTILISATION Ce manuel explique comment utiliser le booster d une façon sûre et efficace S il vous plaît lisez et suivez ces instructions et précautions MODEL MODELO MODÈLE DSR132 Ultracapacitor Hybrid Jump Starter Arrancad...

Page 2: ... else uses the jump starter ensure they are well informed on how to use it safely and have read and understood the operating instructions 1 13 The jump starter is NOT designed to be installed as a replacement for a vehicle battery 1 14 Do not use for dry cell batteries that are commonly used with home appliances 1 15 Make sure your vehicle is in park and the emergency brake is engaged 1 16 Turn of...

Page 3: ...sing LED 4 Lithium battery level indicator 5 Micro USB input 6 12V DC input port 7 ON OFF button 8 GLOW button 9 Condition indicator 1 2 3 4 5 6 7 8 9 Digital Display V Vehicle s battery voltage Charging percentage of the ultracapacitors Err Reverse polarity connection Lithium battery too low to charge ultracapacitors FUL Ultracapacitors are fully charged OUr Override mode is active CH6 Lithium ba...

Page 4: ... part of the chassis or engine block away from the battery DO NOT connect clamp to the negative battery post carburetor fuel line or a sheet metal part The jump starter will start to charge itself automatically When the digital display shows FUL the audio alarm sounds and the condition indicator is steady green turn off and disconnect the jump starter by removing the output clamp from the chassis ...

Page 5: ...ipped with a lithium battery pack Recharge the battery pack with the micro USB charging cable and USB charger included Once connected to a USB charger charging starts automatically Recharge time is approximately 5 8 hours The battery level indicators will show battery status Fully recharge the lithium battery pack at least once a year or after using Override Mode 2 3 times Working Cycle Maximum of...

Page 6: ...will not overheat and cause fire or explosion NOTE Reverse polarity and short circuit protection is disabled during Override Mode Q Does the jump starter need to be regularly recharged A No The jump starter relies on the instant recharging of ultracapacitors rather than stored electric energy Therefore it does not need regular recharge and can be stored for years However the back up lithium batter...

Page 7: ...duct that are not manufactured by Schumacher Electric Corporation and approved for use with this product This Limited Warranty is void if the product is misused subjected to careless handling repaired or modified by anyone other than Manufacturer or if this unit is resold through an unauthorized retailer Manufacturer may void this Limited Warranty if a warranty void if removed label is removed fro...

Page 8: ...r care accidents unauthorized changes or modifications incorrect transport storage or treatment of the Product d In order to exercise this right the Product must be returned complete and in its original state and packaging with mail costs prepaid along with proof of purchase to the Manufacturer or its authorized representatives in order for repair or replacement to occur Common Warranty Provisions...

Page 9: ... usarlo de manera segura y además de que haya leído y comprendido las instrucciones de funcionamiento 1 13 El arrancador NO está diseñado para ser instalado como reemplazo de la batería del vehículo 1 14 No lo utilice para cargar las baterías de celdas secas que se suelen usar en los aparatos domésticos 1 15 Asegúrese de que el vehículo esté en estacionado park y que el freno de mano esté accionad...

Page 10: ...n cargando LED parpadeando 4 Indicador de nivel de la batería de litio 5 Puerto de entrada micro USB 6 Puerto de entrada de 12V DC 7 Botón de APAGADO ENCENDIDO 8 Botón de modo incandescente GLOW 9 Indicador LED de condición Pantalla digital V Voltaje de la batería del vehículo Porcentaje de carga de los Ultracapacitadores Err Polaridad invertida Batería de litio con carga demasiado baja para carga...

Page 11: ...derá el indicador de falla y sonará una alarma Puede utilizar uno de los siguientes métodos alternativos de carga previa Desde una batería es decir el automóvil de un amigo Conecte la pinza de salida con el polo POSITIVO ROJO del arrancador al borne POSITIVO de la batería A continuación conecte la pinza de salida con el polo NEGATIVO NEGRO a una parte metálica pesada y sin pintar del chasis o bloq...

Page 12: ...ente GLOW En climas fríos en la mayoría de los vehículos diésel las bujías incandescentes se activarán primero para calentar la cámara del motor antes de que el motor arranque como lo indica el signo INCANDESCENTE en el tablero El proceso necesita una corriente de 40 60 Amp y tarda unos 4 a 6 segundos En este caso después de que el arrancador esté completamente cargado y conectado presione el botó...

Page 13: ...y estará listo para su uso P Cuál es el promedio de vida útil del arrancador R Este arrancador se puede utilizar más de 10 000 veces antes de que haya pérdida notable de rendimiento Los ultracapacitores se pueden seguir usando por más de 10 años P Es seguro mi arrancador híbrido R Es extremadamente seguro La tecnología de ultracapacitores es una de las ventajas más importantes con respecto a los a...

Page 14: ...s al Cliente de Schumacher Electric Corporation 10 GARANTÍA LIMITADA SCHUMACHER ELECTRIC CORPORATION 801 BUSINESS CENTER DRIVE MOUNT PROSPECT IL 60056 2179 REALIZA LA PRESENTE GARANTÍA LIMITADA AL COMPRADOR MINORISTA ORIGINAL DE ESTE PRODUCTO LA PRESENTE GARANTÍA LIMITADA NO PUEDE TRANSFERIRSE NI CEDERSE Schumacher Electric Corporation el Fabricante otorga garantía por esta arrancador por un 1 año...

Page 15: ...ente anuladas y excluidas Algunos estados no permiten la exclusión ni la limitación de los daños accidentales ni directos o el plazo de garantía implícita por lo que las limitaciones o exclusiones mencionadas anteriormente podrían no corresponder con su caso La presente garantía le otorga derechos legales específicos y es probable que usted cuente con otros derechos que podrían diferir de los incl...

Page 16: ...toute sécurité et avoir lu et compris les instructions de fonctionnement 1 13 L unité n est pas conçue pour être installée comme un remplacement de la batterie du véhicule 1 14 Ne l utilisez pas avec les batteries sèches qui sont d usage courant dans les électroménagers 1 15 Vérifiez que le levier des vitesses est en position Park et que le frein à main est serré 1 16 Éteignez TOUT ce qui peut com...

Page 17: ...recharge DEL clignotante 4 Indicateur de charge de la batterie lithium 5 Port d entrée micro USB 6 Port d entrée allume cigare 12V DC 7 Bouton Marche Arrêt 8 Bouton GLOW 9 Indicateur d état Affichage numérique V Voltage de la batterie du véhicule Pourcentage de charge des ultra condensateurs Err Erreur Inversion de polarité La charge des accumulateurs au lithium est trop faible pour recharger les ...

Page 18: ...z avoir recours à l une des méthodes de précharge alternatives suivantes À partir d une batterie p ex celle de la voiture d un ami Connectez la pince de sortie rouge POSITIVE du booster à la borne POSITIVE de la batterie Ensuite connectez la pince de sortie noire NÉGATIVE à une partie métallique massive et non peinte du châssis ou du bloc moteur loin de la batterie NE LA CONNECTEZ PAS à la borne n...

Page 19: ...teignez le booster et déconnectez la batterie Mode de bougie de préchauffage GLOW Par temps froid sur la plupart des véhicules diesel les bougies de préchauffage s activent d abord avant le démarreur pour préchauffer la chambre de combustion Le voyant GLOW du tableau de bord l indique Ce processus consomme de 40 à 60 ampères et prend de 4 à 6 secondes Si c est le cas de votre véhicule une fois que...

Page 20: ...e Il peut donc assister autant de démarrages que nécessaire successivement Q Combien de temps le booster garde t il la charge R Ce booster perd toute sa charge en quelques jours mais il peut être rechargé à l instant à partir d une batterie déchargée ou de la batterie de secours au lithium et être prêt à l usage Q Quelle est la durée de vie de ce booster R Ce booster peut être utilisé plus de 10 0...

Page 21: ...Batterie Sans Batterie Sans Batterie Batterie Faible Sans Batterie 900A 8 0L 7 0L 5 0L 5 0L 4 0L 9 AVANT DE RETOURNER POUR LES RÉPARATIONS AMÉRIQUE DU NORD Pour plus d informations sur le dépannage contacter le service technique au services schumacherelectric com www batterychargers com ou composez le 1 800 621 5485 Pour RÉPARATION OU RETOUR contactez le service téchnique au 1 800 621 5485 NE PAS ...

Page 22: ...ris mais sans s y limiter la perte de profits de revenus les ventes prévues les occasions d affaires interruption d activité écarts d acquisition et de toute blessure ou dommage Toutes les garanties autres que la garantie limitée du présent document sont par les présentes expressément déclinée Certains états ne permettent pas l exclusion ou la limitation des dommages fortuits ou consécutifs ou la ...

Page 23: ...____________________ Esta es la única garantía limitada expresa y el productor no autoriza ni otorga a alguien a realizar alguna otra obligación No existe ninguna otra garantía más que la descrita en el manual del dueño La tarjeta de garantía debe enviarse durante los primeros 30 días después de la compra El cliente debe mantener el recibo de compra ORIGINAL como comprobante el cual le otorga todo...

Page 24: ...e carte à Schumacher Electric Corporation 801 Business Center Drive Mount Prospect IL 60056 2179 É U Nom________________________________________________________________ Adresse_____________________________________________________________ Ville_____________________________Prov_______________ Code postal________ Tél ________________________Courriel__________________________________ Nom du magasin où...

Reviews: