+N
C
o
n
tr
o
l
p
a
n
e
l
+N A G
A
S
G
AS SP
CALL / LADY
M
O
D
E
G
N
D
AS
G
T
P
a
NC
C
o
n
tr
o
l
p
a
n
e
l
C
NA
Power supply
- +13.8 (600mA)
+N A G
A
S
G
AS SP
CALL / LADY
M
O
D
E
G
N
D
AS
G
T
P
b
+N A G
A
S
G
AS SP
CALL / LADY
M
O
D
E
G
N
D
AS
G
T
P
AS
C
o
n
tr
o
l
p
a
n
e
l
+N
Detector
A.
S.
c
+N A G
A
S
G
AS SP
CALL / LADY
M
O
D
E
G
N
D
AS
G
T
P
d
Jumper Cut
+12
C
o
n
tr
o
l
p
a
n
e
l
+N
NA
NC
C
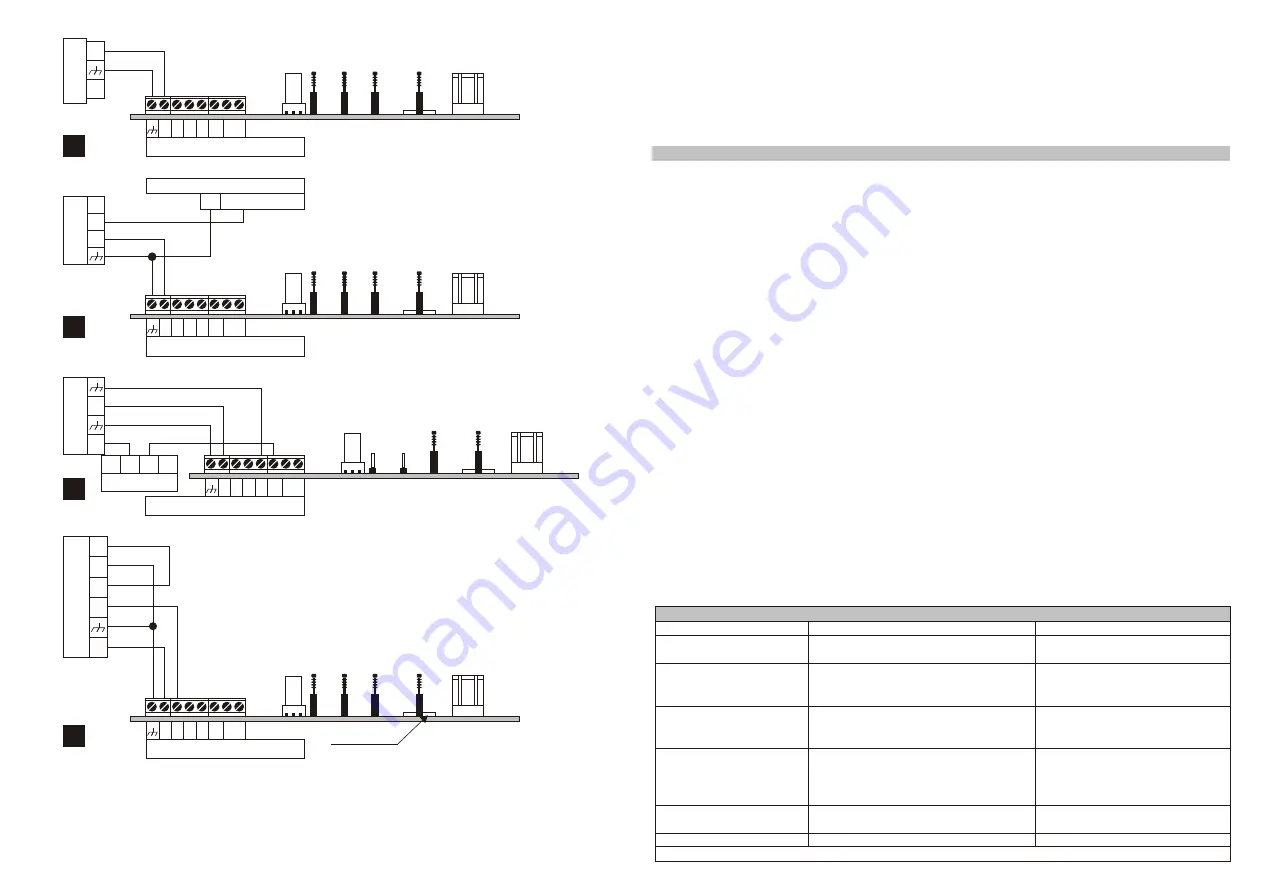
Fig. 3 -
a) Automatic mode with 10 min. max alarm-time;
b) Automatic mode with 3 rain. max. Alarm-time;
c) Normal mode;
D) Automatic mode with A with Negative polarity (relay output programmed as Normally Closed
Associated with the required event).
This installation process will allow you to mount this SIREN and connect it (via terminal [+N]) to the 13.8 V
of the Control panel when you are ready.
The flasher/strobe will not function during the Wait phase, and therefore, use of the battery will be reduced
to a minimum.
WARNING: If you are fitting or removing the metal innerplate while the flasher is active, DO NOT allow it to
come into contact with the flasher terminals, as this may cause a short-circuit.
CONNECTIONS
Use shielded cable only, with one end connected to the Control panel Negative and the other left free.
The Control panel Alarm Output can be connected to either the [+N] or [A] terminal (with programmable
polarity). In I~th cases, 13.8 V (min. 0.6 A) must be applied across the [+N] terminal and Negative.
This voltage is necessary for the battery charge and Wire cutting protection.
Some Control panels have a custom [+N] terminal for the connection to the SIREN [+N] terminal, see fig.3a.
The 13.8 V, present on the custom [+N] terminal during Standby status, will fail if the Control panel
generates an Alarm.
If the Control panel you are using does not have such a terminal, you can use the free voltage Alarm relay
changeover contacts, as per fig 3b.
In figures 3a and 3b the [AS] jumper is inserted (Automatic mode). Therefore, in the event of internal Tamper,
this SIREN will go into Alarm status, regardless of the status of terminals [A] and [+N].
The Alarm will end 40 seconds after Tamper restoral or when the maximum Alarm time expires. In the latter
case, the flasher will continue to signal.
If you apply the Alarm signal to the [A] terminal with programmable polarity, you should connect it to a
Control panel terminal that closes with compatible polarity in the event of an Alarm (see fig. 3d).
Fig. 3(; shows a connection using the [AS] terminals of this SIREN.
These terminals, and the [A.S.] terminals of the detector in the wiring diagram, will be short-circuited during
standby status.
If Ihe SIREN detects Tamper, or the [A.S.] terminals of the Detector open, an Alarm signal will be present on
the [AS] terminals of the Control panel.
However, neither the horn or strobe/flasher will activate, because the AS jumper is not connected (AS mode).
Figure 3d shows an application using the [A] Input with Negative polarity.
The common contact [C] of the relay is connected to the [A] terminal with Negative polarity.
Under standby conditions, this terminal will be shorted to the [NC] terminal, and therefore, connected to
Negative.
Under Alarm conditions, the relay will switch the [C] contact to [NA], conn12V to the [A] Input of this
SIREN, thus generating an alarm.
TROUBLE
The battery is connected but
the flasher does not function
Continuous flashing
The hom sounds but the
flasher does not function
The flasher functions but the
horn is silent
It is impossible to activate
the siren
Continuous sound on the horn
The manufacturer reserves the right to change the technical features of this product without prior notice
The battery may be low
1) The snatch device is not secured
properly; or the cover or the metal
innerplate is not closed properly.
1) The battery may be low
2) The flasher may be out-of-order
1) More than the maximum alarm-time has
elapsed since the start of audible signalling
2) The horn is out-of-order
3) The horn is bypassed (refer to signalling)
1) The installation-time has not expired
2) The battery low
The causes may be as per continous flashing
TROUBLE SHOOTING
Replace the battery
Eliminate the cause
-Replace the battery if necessary
-Change the flasher bulb or call
the installer
-Eliminate the cause of alarm
-Call the installer
-Wait 4 minutes without requesting
signalling
-Wait 20 seconds
-Replace the battery if necessary
-Eliminate the cause
CAUSE
SOLUTION


